
In this article I will show you how to create a task sequence in SCCM which can be used to deploy any operating system version you wish.
I have been creating task sequences in sccm for just over 10 years and I will teach you all the best practices that I have learned.
Below is what you will learn in this article.
- How To Create A Task Sequence
- How To Edit Task Sequence Steps
- Configure Support For Multiple Regions
- Add Drivers For Hardware Models
- Add Applications
- How To Get Applications To Only Install On Laptops/Desktops
Lets get started.

It is recommended to install Windows ADK on your SCCM server as this install includes lots of tools we will use in this guide. Check out this article I wrote on how to install windows ADK
1 : Add Operating System Image To SCCM Console
The first thing we need to do is add the install.wim file for the operating system we want to install in to the SCCM console.
To do this follow these steps.
- Download the iso file for the operating system you want to install, This can be downloaded from
Volume Licensing Service Center : You need to sign in with a work or school email account that has permissions. or
MSDN : Will need an active MSDN subscription for the operating system you want to download - Copy the .iso file on to your SCCM server. Right click on it and select mount. The .iso file will now be mounted on the next available drive on your system.
- Go in to the Sources folder and you should see a install.wim file. The wim file should be a few gb in size as shown below.

- Create a folder on your sccm server where we will copy the wim file to. Below I have created D:\SCCM Packages\Operating_System_Images

- Copy the wim file to this folder, make sure to give it a good name (Such as Windows2016.wim Windows10_1904.wim and not install.wim, install2.wim, installnew.wim) so it can be easily identified in the future when you might have more wim files in here.
TOP TIP : I recommend that you copy all .wim files you import in to SCCM here and do not remove them from this folder.
If you need to troubleshoot task sequence errors in the future you might want a copy of the original wim file, a prime example is that wim files can become corupted when they are copied to SCCM DP servers. - Open the Configmgr Console
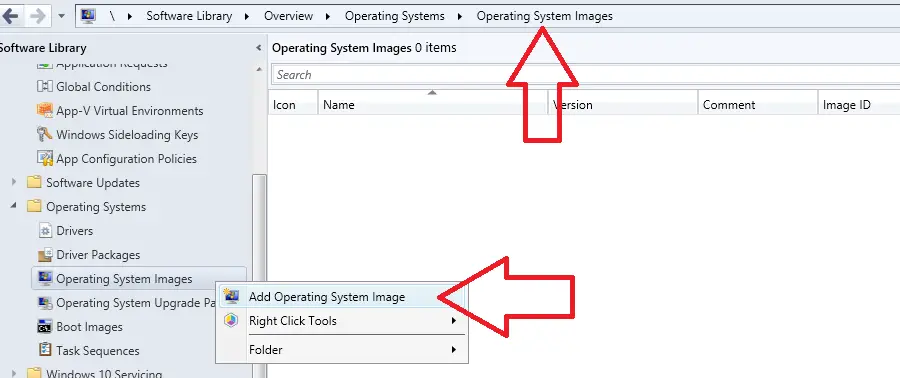
- Go to \Software Library\Overview\Operating Systems\Operating System Images

- Right click on “Add Operating System Image”
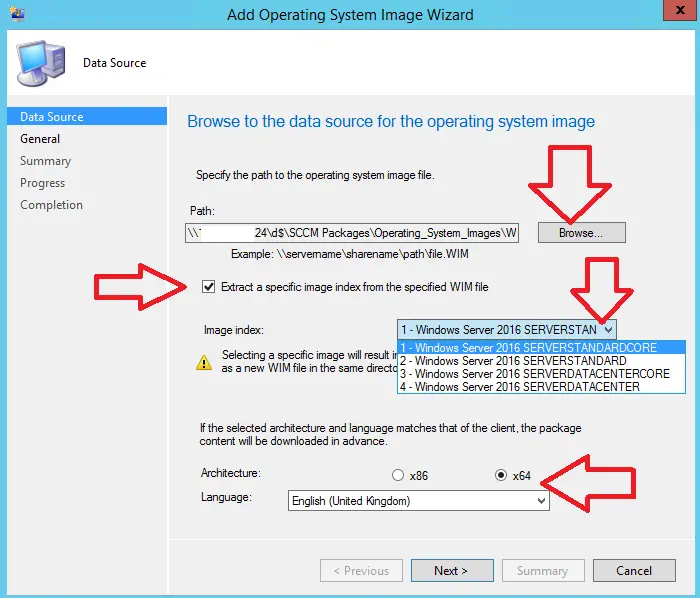
- Click browse and select the wim file we copied in step 4
- Important : Make sure you tick the box “Extract a specific image index from the specified WIM file” This will drastically reduce the size of the wim file which will speed up your operating system deployment
- Next to Image Index: Select the operating system version you plan to install
- Architecture select x64
- Select relevant language

- Click Next
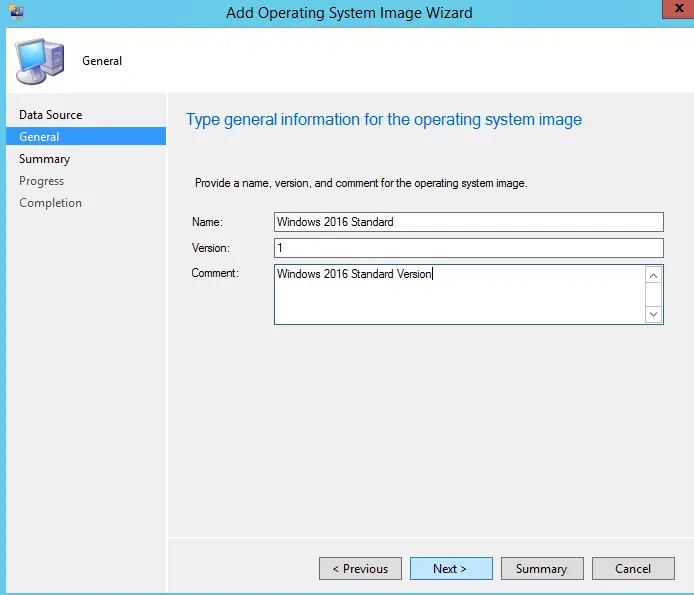
- Enter a good descriptive name, version and comment. If you have lots of task sequences this will really help.

- Click Next
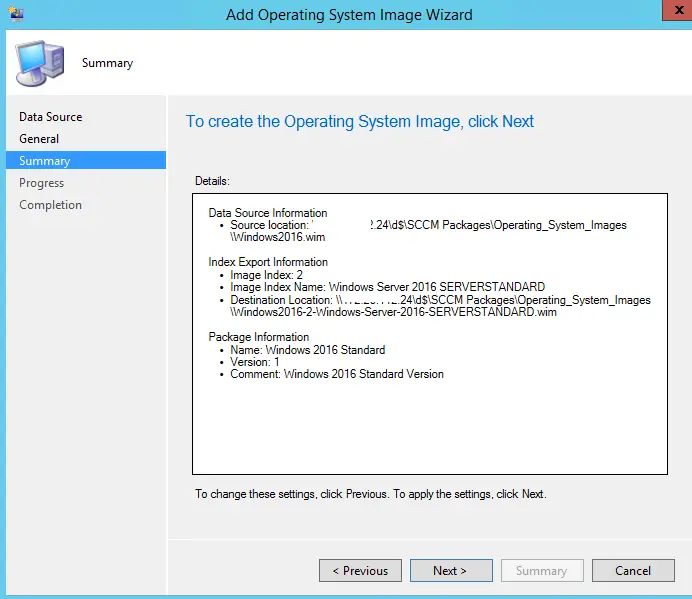
- Confirm all your details and click next

- Click close
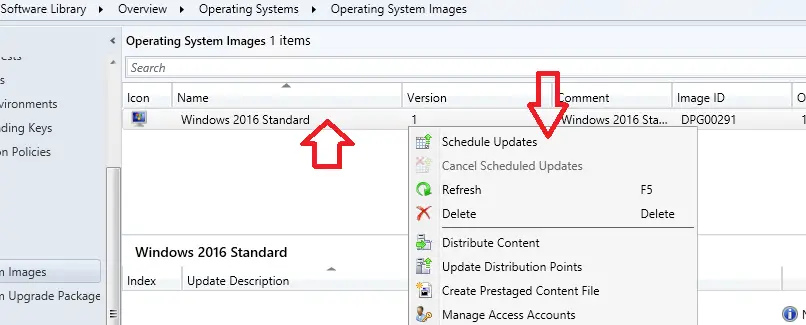
- Optional Step : If you right click on the operating system image you just added you can click on “Schedule Updates” this can be used to inject the latest software updates in to the wim.
TOP TIP : In my personal experience I recommend not to schedule updates in to the wim as it can cause issues with task sequence steps failing.
The wim file can also grow to a huge size and will slow down the staging process. I recommend to install updates at the end of the task sequence.
- We need to distribute the operating system image to all SCCM DP’s
- Right click on the operating system image and select distribute content
- Click Next
- Click Add > Select DP’s
- Click Next
- Click Next
- Click Close
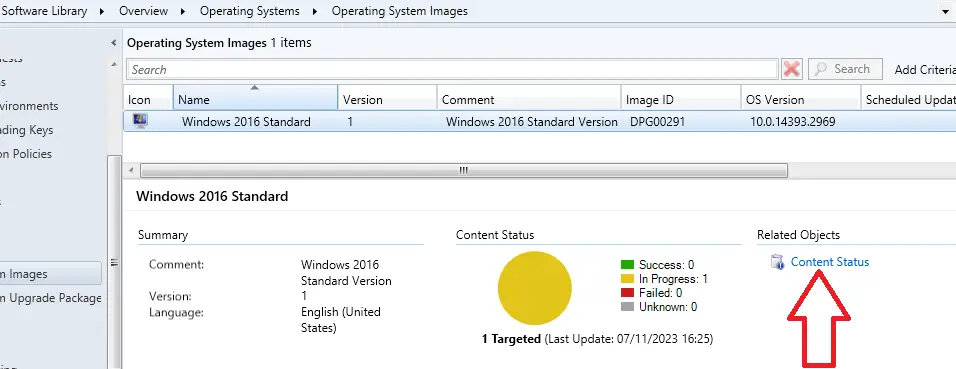
- Confirm the operating system image was distributed successfully by clicking on the “Content Status” link


2 : Create The SCCM Task Sequence
In this section I will show you how to create a new SCCM task sequence and the additional steps you need to configure such as;
- Bios Settings
- Installing Applications
- Settings For Laptops / Desktops
- Installing Software Updates
- Enable Bitlocker
In many SCCM environments I have taken over I have seen multiple task sequences created, usually one for desktop machines and one for laptops. I do not recommend to do this, If you use SCCM variables correctly (IsLaptop for example) it is possible to only use one task sequence which will make your life much easier.
To create a task sequence follow these steps.
- Log on to the SCCM Console
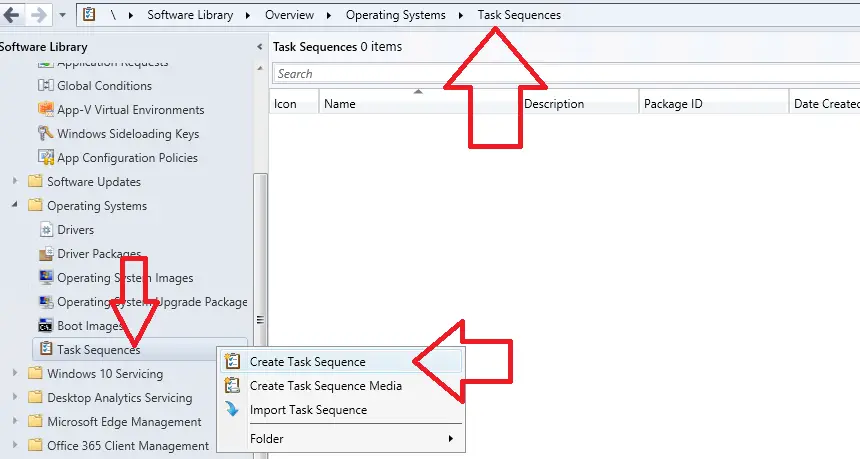
- Go to \Software Library\Overview\Operating Systems\Task Sequences
- Right click on task sequences and select “Create Task Sequence”

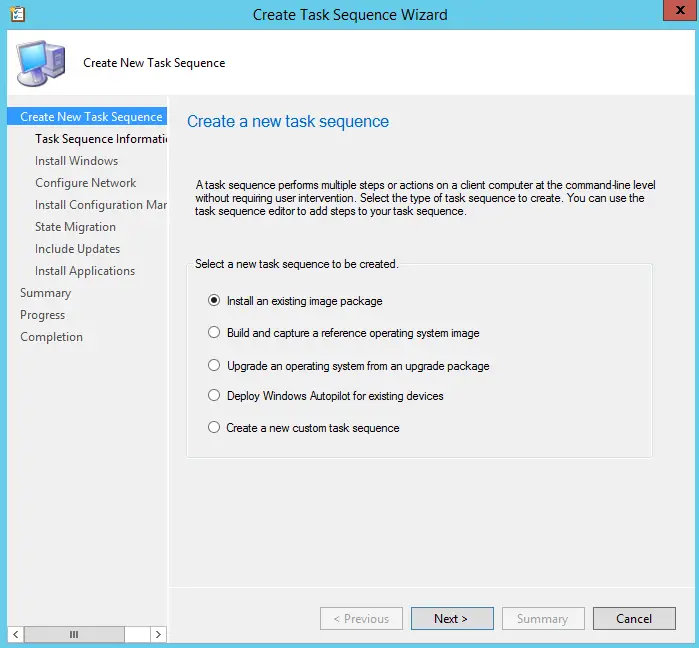
- Make sure “Install an existing image package” is highlighted and click next

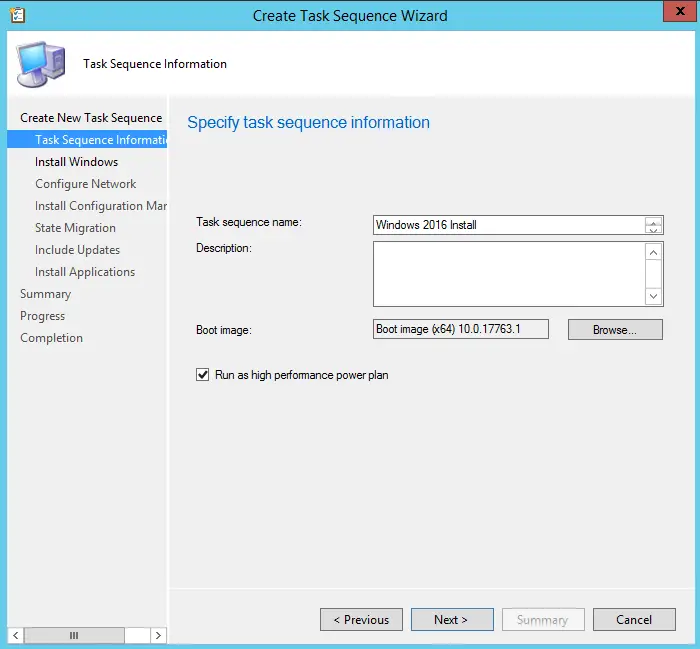
- On the next window give the task sequence a good descriptive name
- Click browse and select “Boot Image (x64)”
If you want to inject device drivers in to the boot image check out this article I wrote on how to do that.
- I recommend to enable “Run as high performance power plan” By enabeling this step I have seen builds take roughly 10% – 20% less time.
PRO TIP : If you don’t want to enable performance on laptops then you can leave this setting disabled and add a task sequence step with a variable that does the following
IsDesktop = True Run cmd.exe /c powercfg /setactive 8c5e7fda-e8bf-4a96-9a85-a6e23a8c635c - Click Next

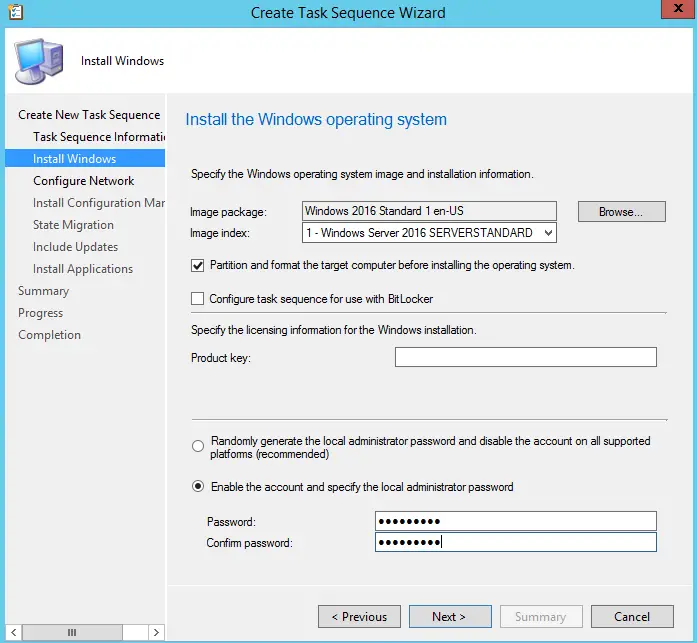
- Click browse and select the operating system image we uploaded earlier
- Make sure the expected image index is selected
- Untick configure Bitlocker
PRO TIP : In my experience bitlocker is the #1 cause for many task sequence failures, I recommend to start with it disabled and enable it at the end once you have successfully tested the task sequence.
- Enter the product key for the version of windows you are installing
- Select how you want to set the local administrator password, randomly or enter a password twice
- Click Next

- If the built machine is to be put in to a work group select workgroup and click next
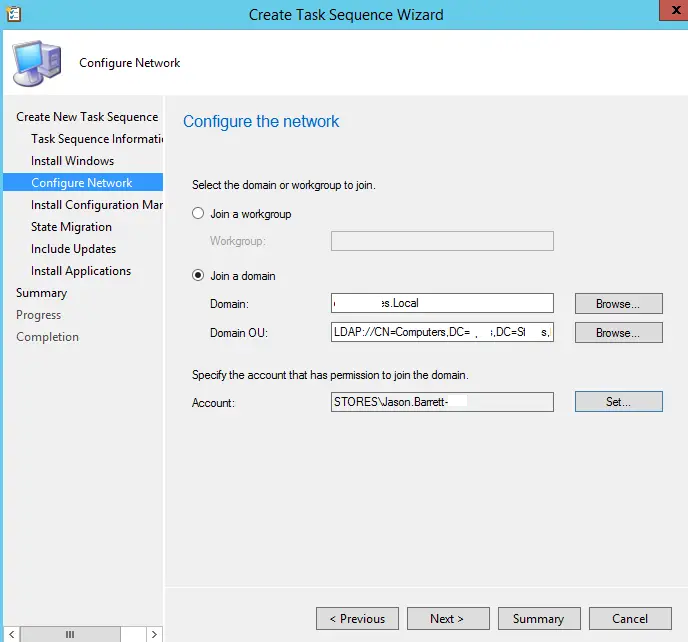
- If the machine is to be put in to an active directory domain select “Join a Domain”
- Select Domain and Domain OU by clicking the browse buttons

- Under account click set
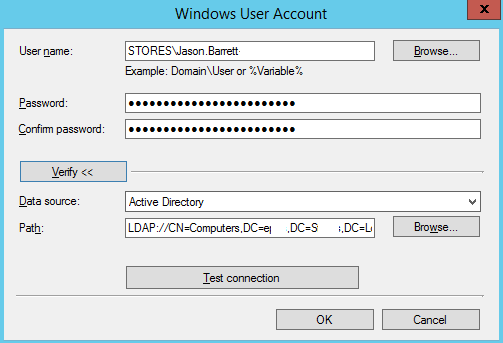
- Enter username
- Enter password twice
- Click Verify > Test Connection
- Click Ok

- Click Next
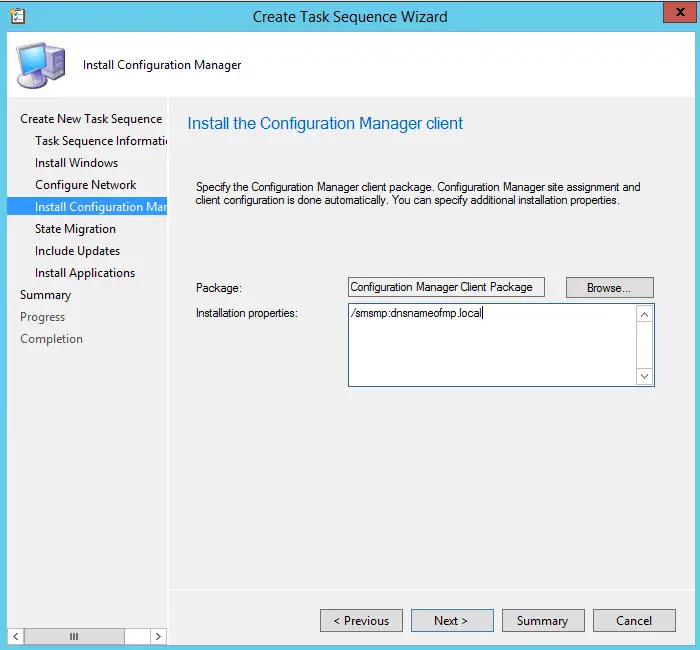
- Leave the defaults for the configuration manager client
- Click Next

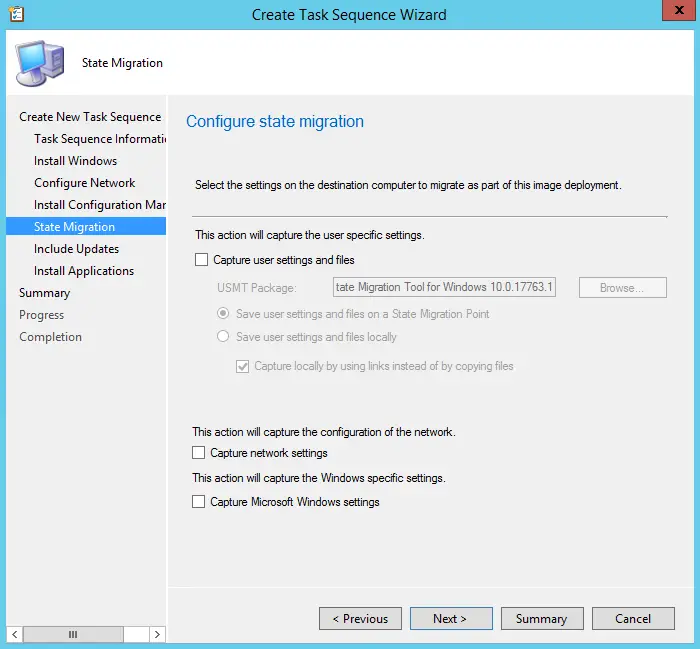
- If you want to use state migration you will need to install the state migration role on a SCCM DP and configure it for this to work. Enable or disable these steps as required.
PRO TIP : When I rebuild machines, user data backup is the most important thing, there is nothing worse than telling someone “Sorry Your Data Is Gone”
If you are rebuilding existing machines I recommend to backup users data multiple ways, with the SCCM state migration tool as well as other methods such as “OneDrive” or even a powershell script that runs and backups the data.
- Click Next
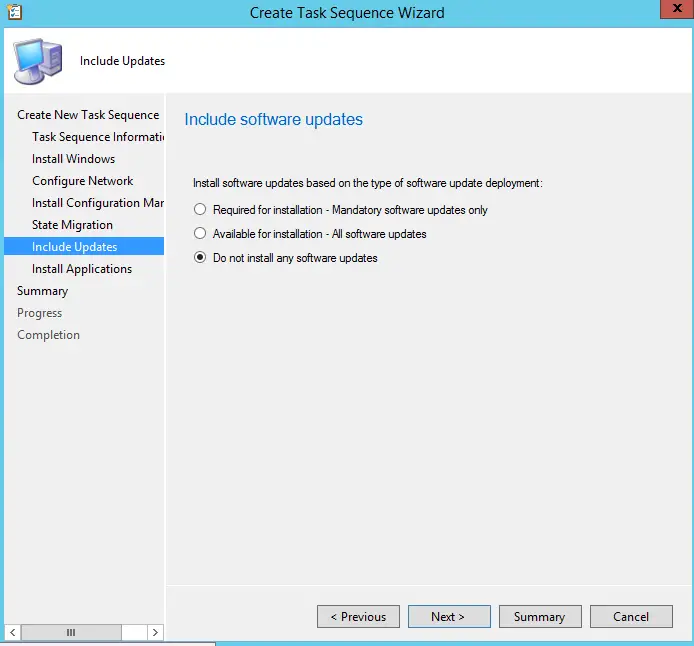
- Select “Do not install any software updates” I will cover installing software updates later in the article
- Click Next

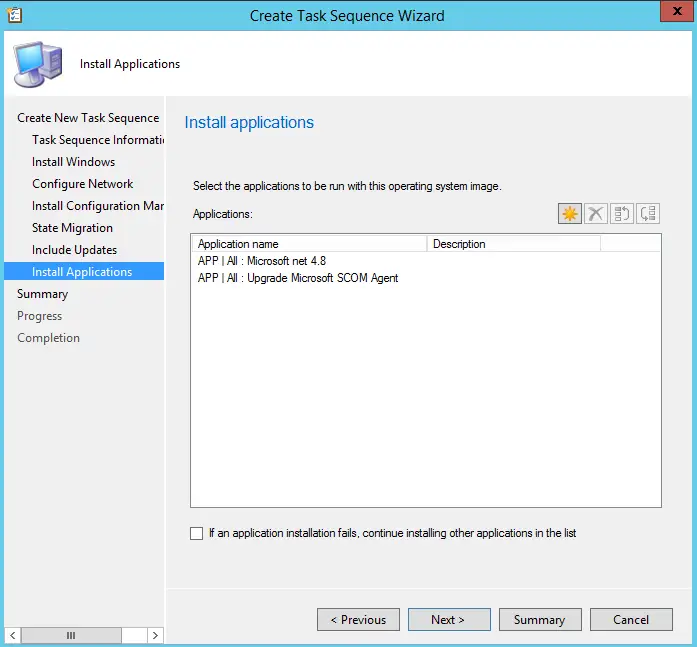
- At the install applications page click on the yellow sun icon
- Select the applications you wish to install, they can be laptop or desktop select all apps and we will organise them later in to groups if needed
- Click Next

- Confirm settings
- Click Next
- Click Close
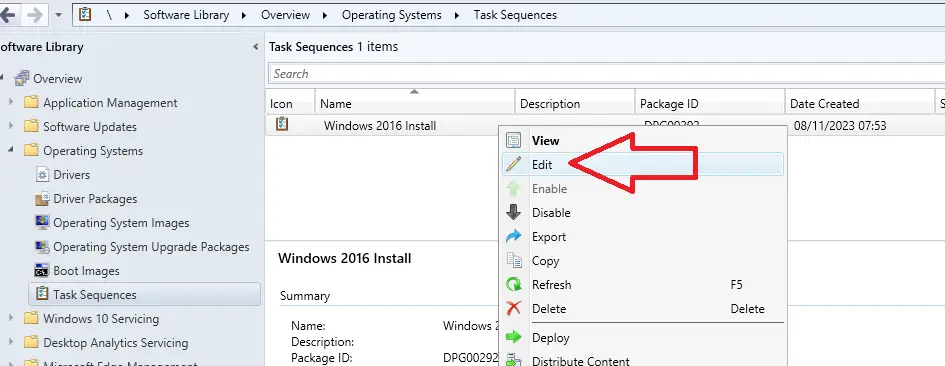
- In the SCCM console go to \Software Library\Overview\Operating Systems\Task Sequences
- Right click on the task sequence we just created and click edit

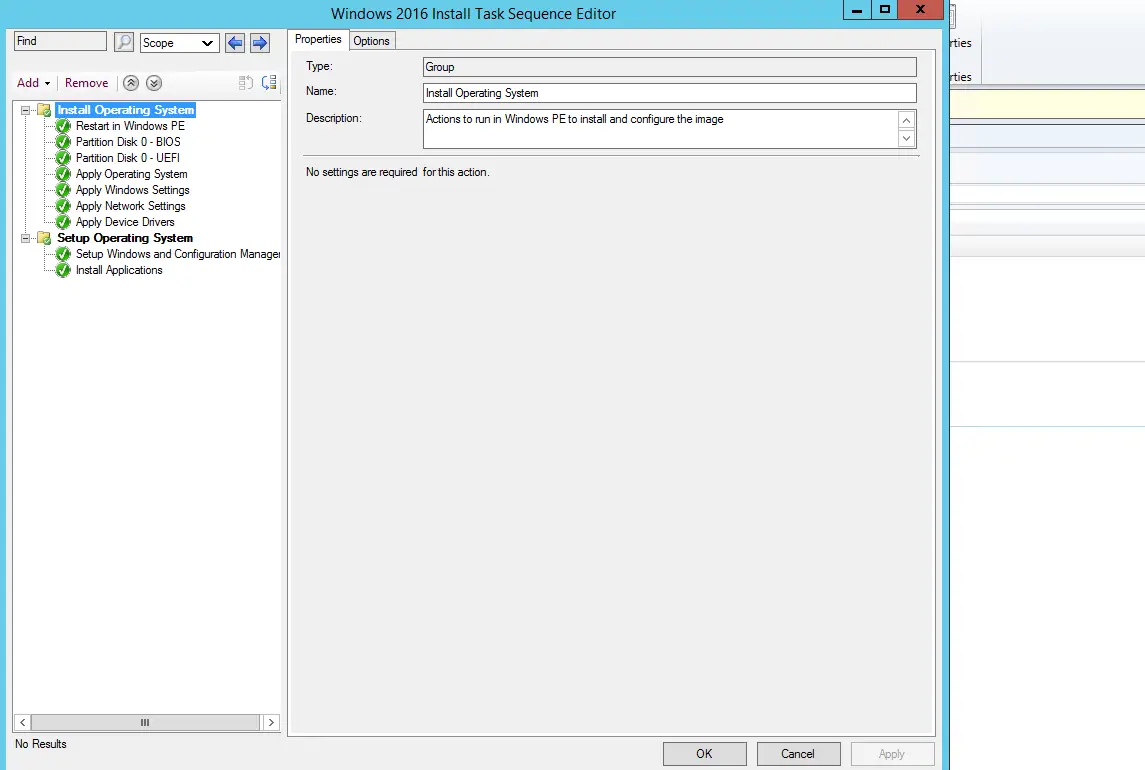
- You will now see the basic steps that have been created. There are a few things we will need to check and also add to this task sequence which I will cover in the next section.

When you boot a client in to a task sequence the first window to show will be the welcome screen, If you want to supress this window from showing you can follow the steps in this article I wrote about how to remove the welcome screen from task sequence.
3 : Edit SCCM Task Sequence Steps
Now we have a basic task sequence setup we need to edit a few things and configure them to our needs.
Below is a list of things we need to check;
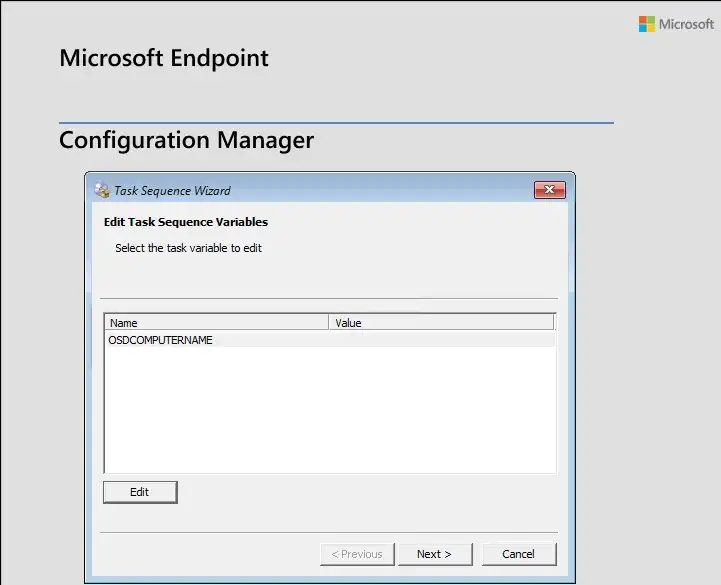
Set Computer Name Prompt
Currently when the task sequence runs it does not know what name to give a machine, so it will give a default name of “MINT-*****”
We can make the task sequence prompt you to enter a computername. To configure this follow these steps;
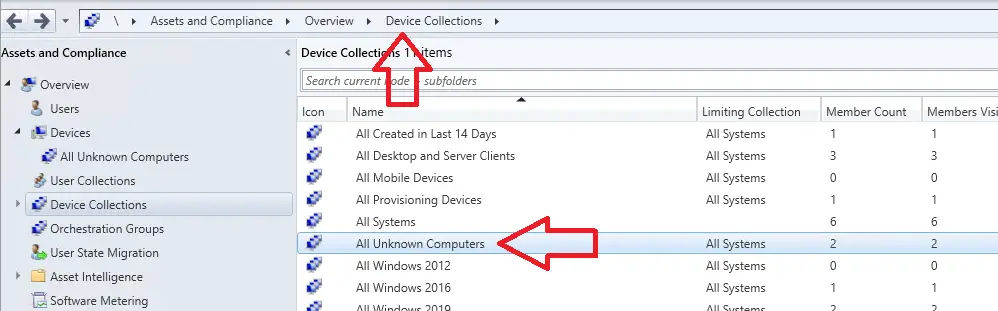
- In the SCCM console go to \Assets and Compliance\Overview\Device Collections
- Right click on the device collection “All Unknown Computers” and select properties

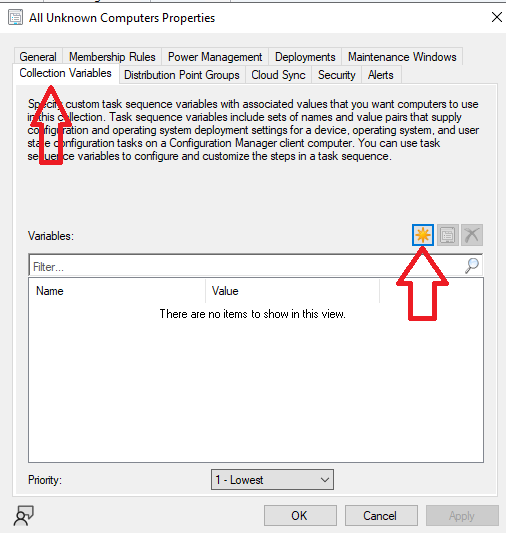
- Select the “Collection Variables” tab
- Click on the yellow sun icon

- Under name enter OSDComputerName
- Tick the box “Do not display this value in the Configuration Manager Console”
- Leave the value field blank. Because the value field is blank the task sequence will prompt you to enter a value when it runs.

- When you run the task sequence it will prompt you as per below


Set Custom Task Sequence Variables
When you launch the sccm task sequence you can make it prompt you to enter values for variables. You can then use these values in your task sequences to do certain things.
Some examples of variables you might want to use are
- Region
- Department
- OS Version
Then in the task sequence you can activate steps if the above conditions are met, for example
- If Region = “UK” Then Apply UK Settings
- If Department = “IT” Then Install IT Applications
- If OS Version = “PRO” Then Apply Pro Version Of The Operating System Image
To prompt for custom task sequence Variables follow these steps;
- Log in to the SCCM Console
- Go to \Assets and Compliance\Overview\Device Collections
- Right click on the device collection “All Unknown Computers” and select properties
- Select the “Collection Variables” tab
- Click on the yellow sun icon
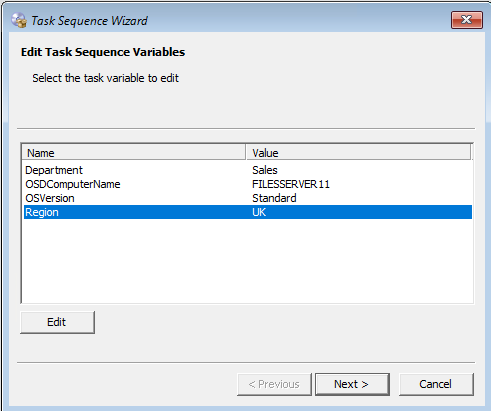
- Under name enter the name of the variable you want to add, Below I have added “Region”
- Tick the box “Do not display this value in the Configuration Manager Console”
- Click Ok

- Repeat steps 5-8 For every variable you want to set
- Below you can see I have set 4 custom variables

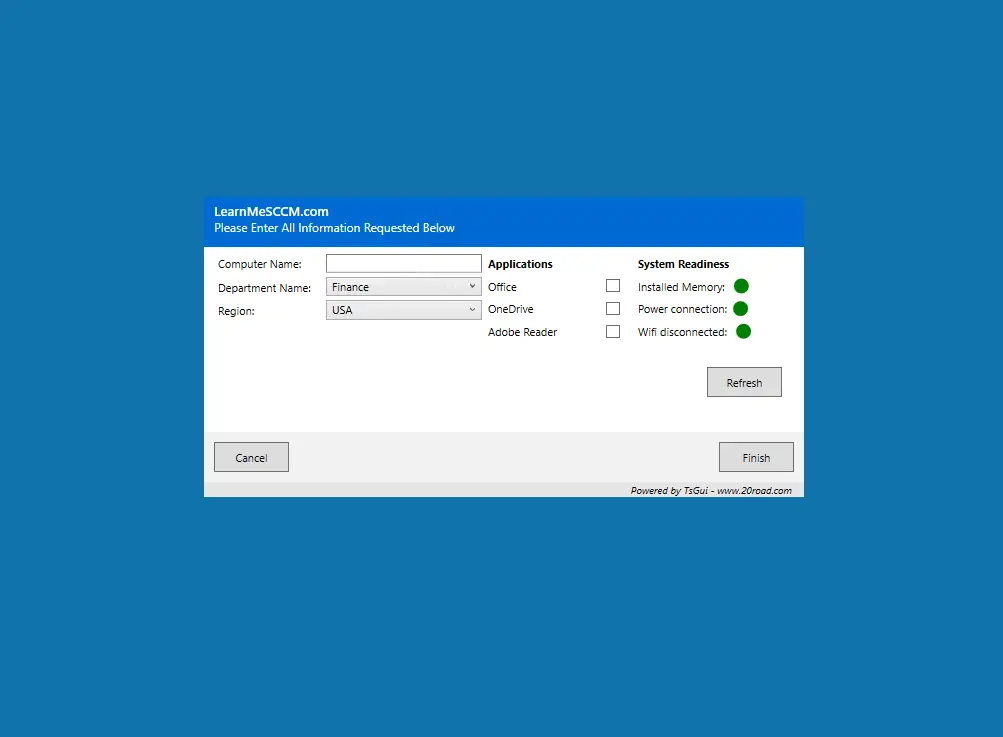
- Below is a screenshot of what this will look like when you start a task sequence


NOTE : Want to create a custom GUI like the ones below take a look at this article I wrote on how to create them.
Configure Regional Settings
To configure regional settings use to be a right pain, but not any more as its now an option in the task sequence.
To configure regional options do the following
- Log in to the SCCM Console
- Go to \Software Library\Overview\Operating Systems\Task Sequences
- Right click on your task sequence and click edit
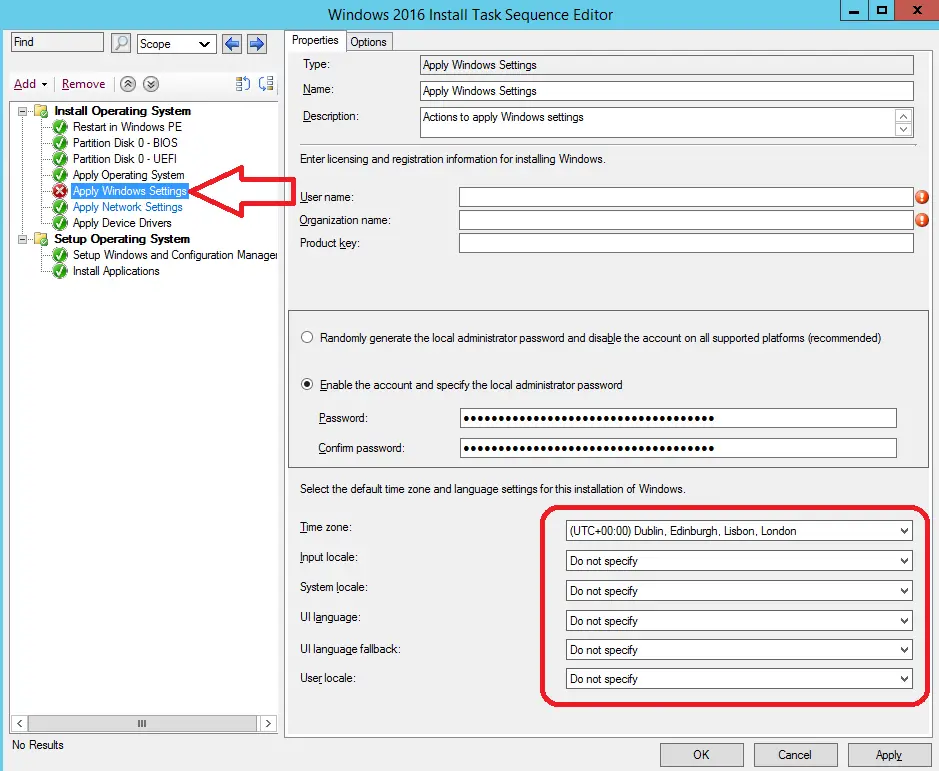
- Click on the step “Apply Windows Settings”
- Change the regional settings as required

Configure Multiple Regional Settings
If you have multiple regions such as US + UK you can use the custom variable we set in the previous step. When the task sequence is launched it will prompt you to enter a region, what ever you enter as a region will be used in the task sequence.
Below I will show you how to add two regions to your task sequence, US + UK
- Log in to the SCCM Console
- Go to \Software Library\Overview\Operating Systems\Task Sequences
- Right click on your task sequence and click edit
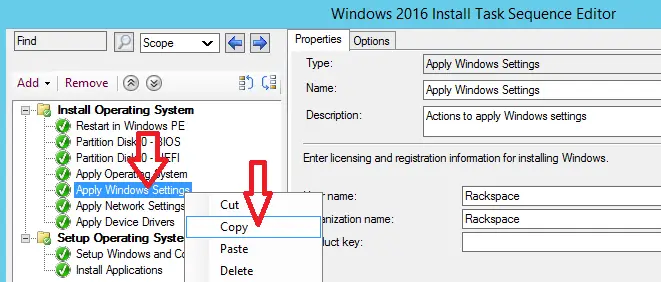
- Right Click on the step “Apply Windows Settings” and click copy

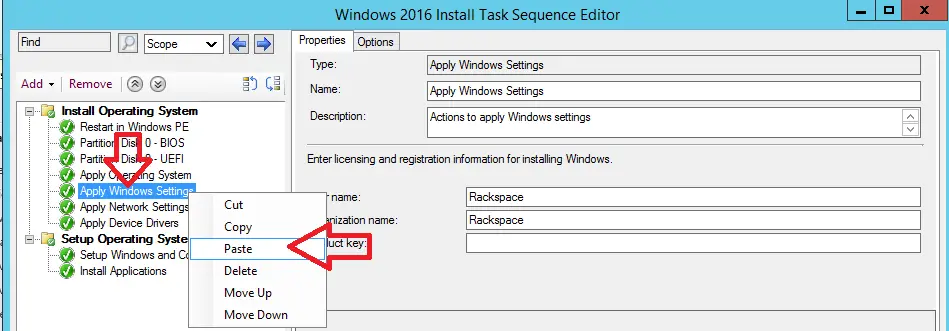
- Now left click on “Apply Windows Settings” to highlight that line, then right click and select paste

- You will now have two steps named “Apply Windows Settings”
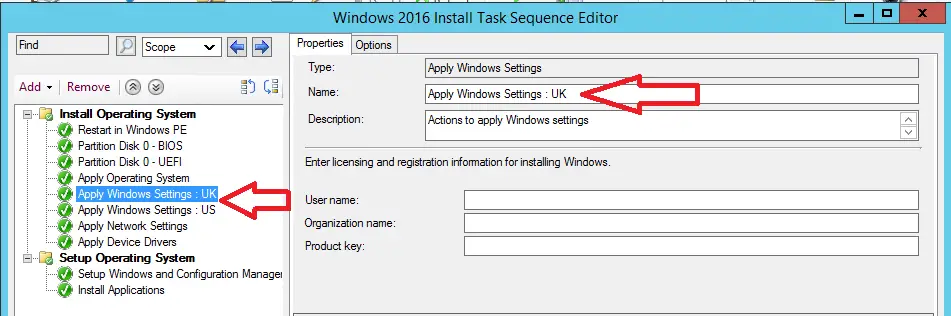
- Rename these steps to “Apply Windows Settings : UK” and “Apply Windows Settings : US”

- Left click on the “Apply Windows Settings : UK” step
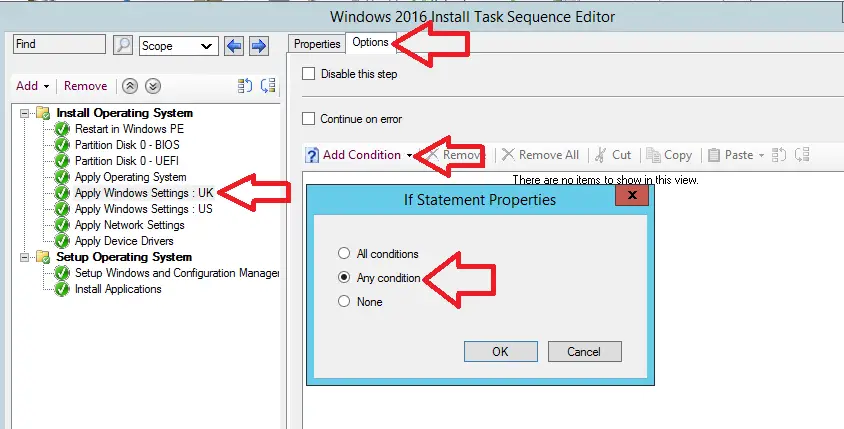
- Click the options tab
- Click add condition
- Click if statement
- Select Any Condition
- Click Ok

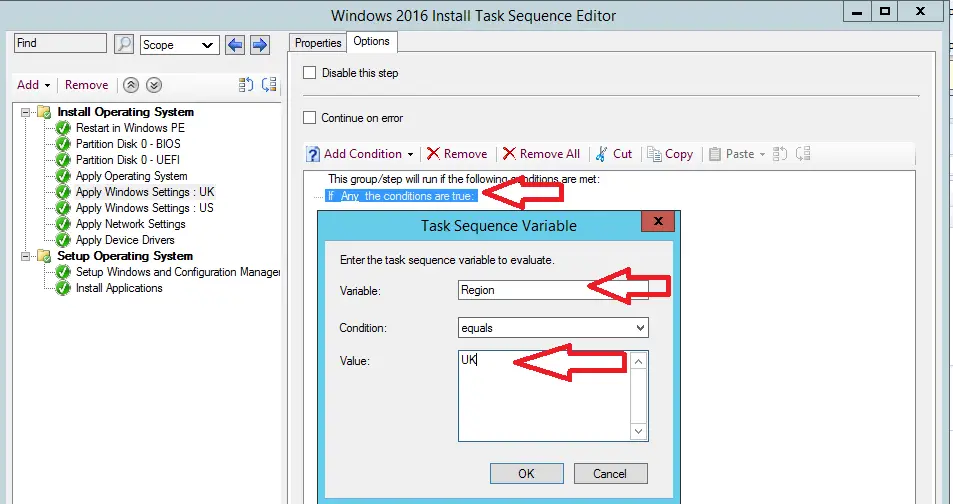
- Now left click on “If Any the conditions are true”
- Click Add condition
- Click “Task Sequence Variable”
- In Variable enter the name of your custom variable, in the example above I have used Region
- Then in value enter the value of the variable
- Now if the conditions are met “Region = UK” this task sequence step will run

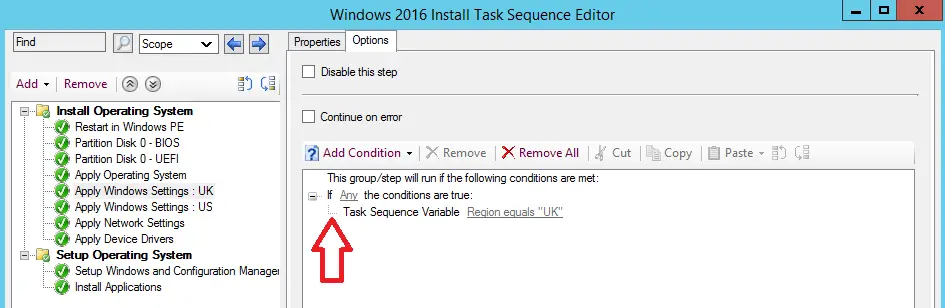
- Now check that the condition looks correct. This has caught me out a few times as I entered it in wrong and did not double check it.
- Confirm there is a dotted L in the condition as highlighted below

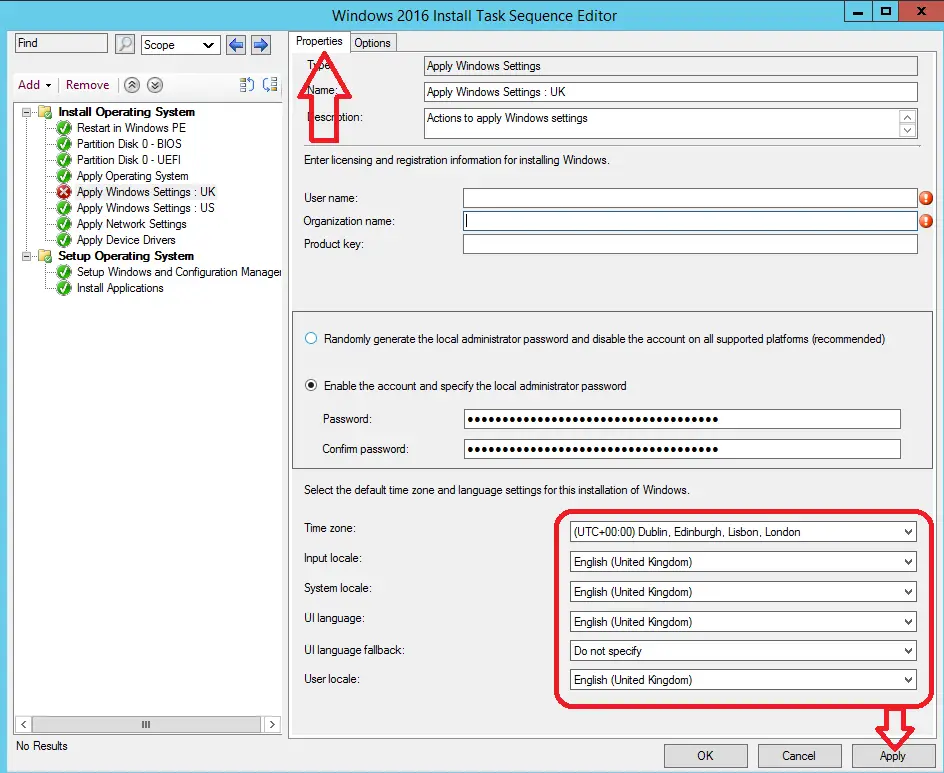
- Click on the properties tab
- Set the required regional settings
- Click apply to save the changes

- Left click on the “Apply Windows Settings : US” step
- Repeat steps 9-24 for the US region, make sure to set US as the variable
4 : Add Drivers To SCCM Task Sequence
For each machine that you want to build via the task sequence you need to add the drivers for that system to the task sequence, or the machine will fail to build.
Drivers are another common reason for task sequence failures so it is important to do this step correctly.
Before you can start this section you need to import the drivers in to SCCM, to do this take a look at this article I wrote on how to do that : How To Import Drivers In To SCCM
You will also need to know the vendor and model information for the hardware you want to put in to the task sequence, To get this information you can follow this article I wrote on How To Query WMI To Get Computer Model
To add drivers to your task sequence do the following
- Open the SCCM console
- go to \Software Library\Overview\Operating Systems\Task Sequences
- Open the task sequence with edit
- Left Click on the last step under the “Install Operating System” group
- Click Add > New Group
 Rename the step to “Apply Drivers” or something similar
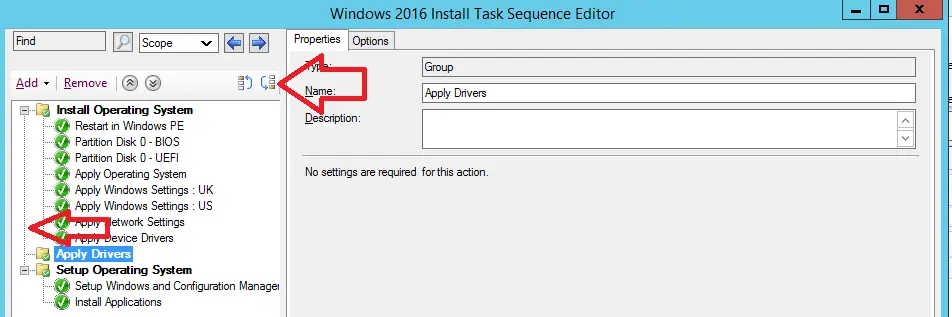
- Highlight the “Apply Drivers” folder and click the move down button
- Confirm the “Apply Drivers” folder is now not part of the “Install Operating System” group

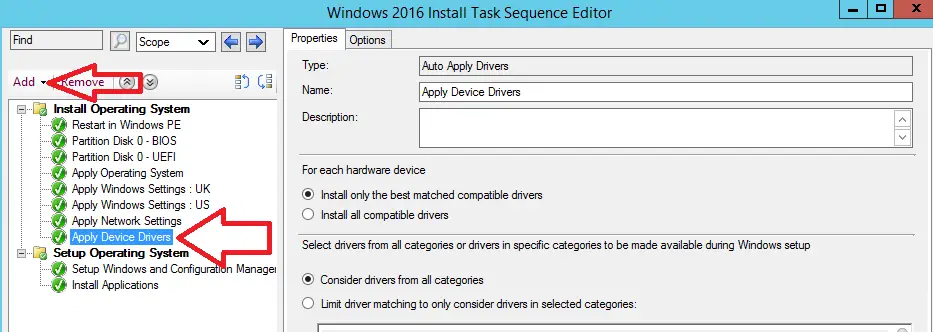
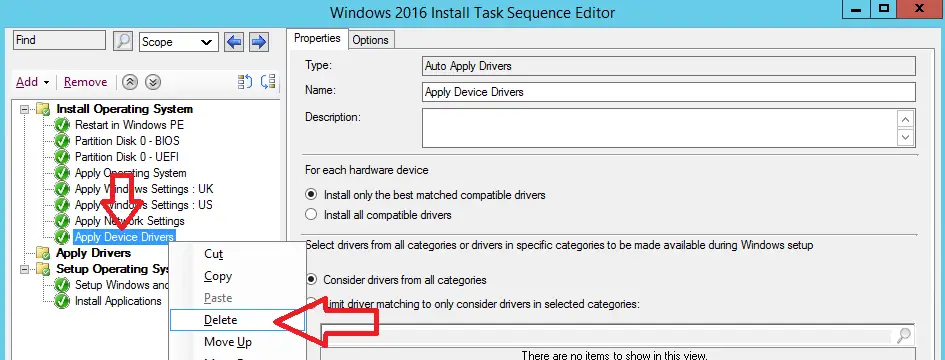
- Now right click on the “Apply Device Drivers” step and select delete

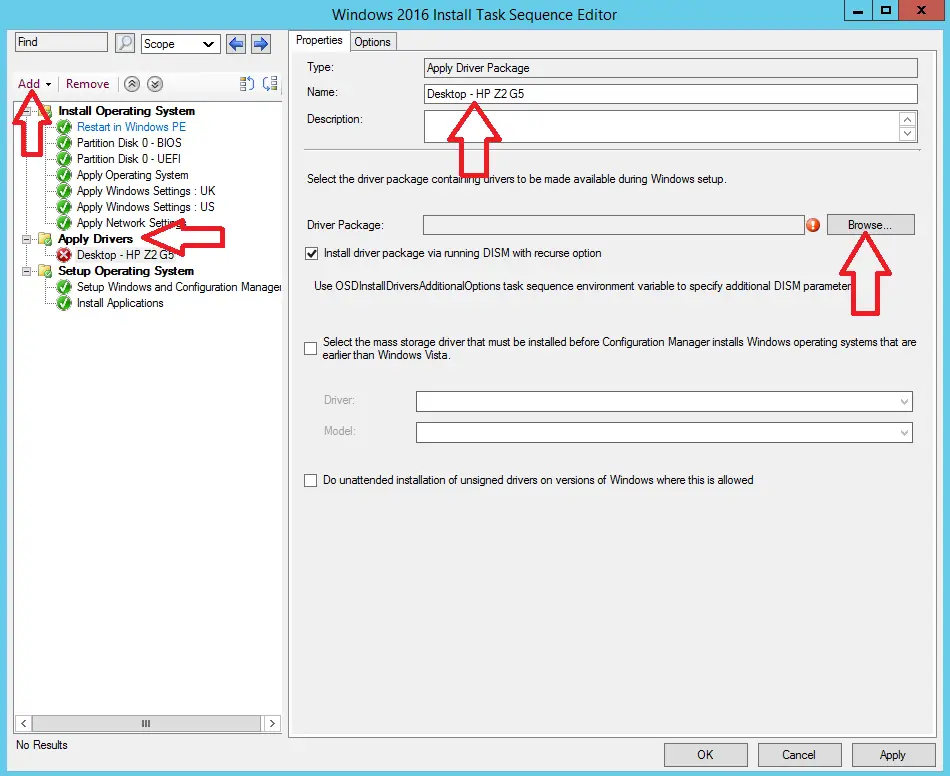
- Left click on the Apply Drivers folder
- Then click Add > Drivers > Apply Driver Package
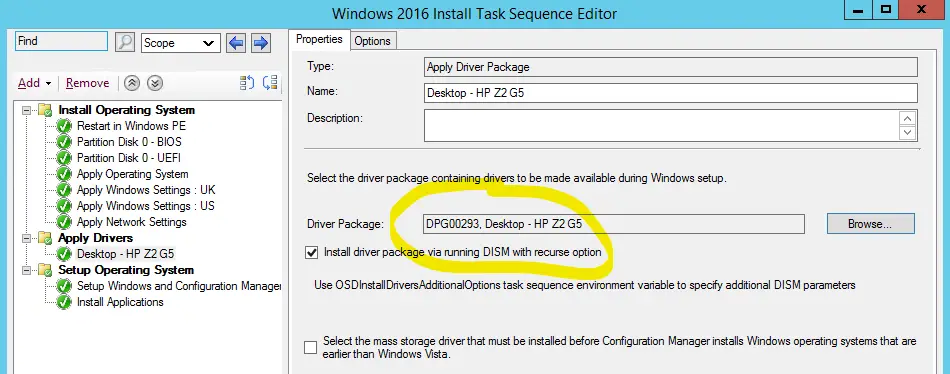
- Give the task sequence step a name, I recommend to use the same naming convention we used before
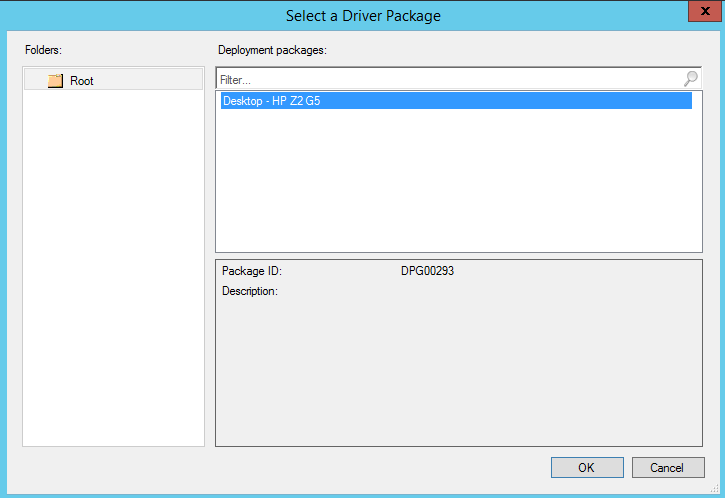
- Click Browse

- Left click on the driver package you want to add and click ok

- Confirm the driver package was selected

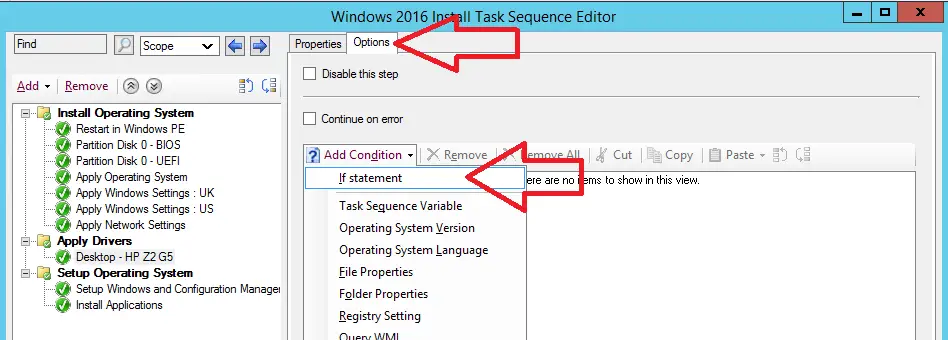
- Click the options tab
- Click Add Condition > If statement

- Select all conditions
- Click ok
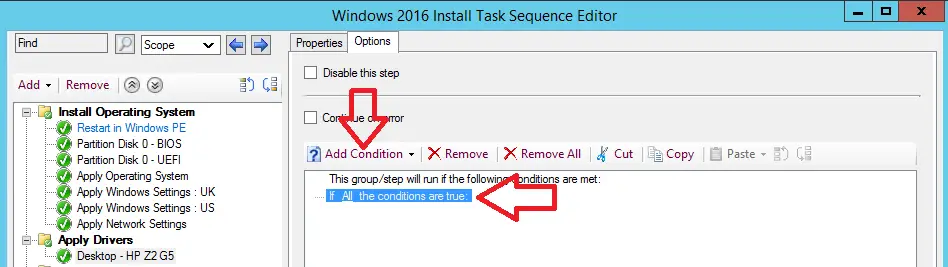
- Left click “if All The conditions are true” make sure the line is blue
- Click Add condition > Query WMI

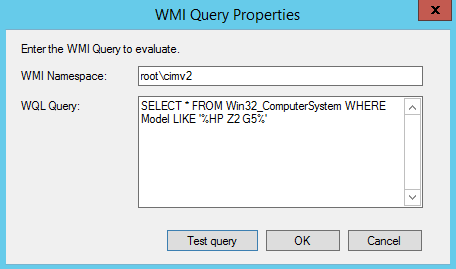
- Now add the WMI query to identify the hardware we are adding the drivers for
- If you need help to create the query take a look at the article I wrote “How To Query WMI To Get Computer Model” on how to do that

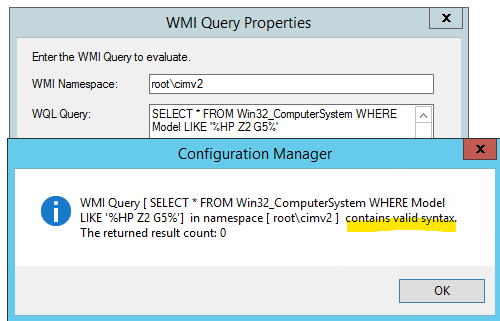
- Click Test Query
- Confirm you see “Contains valid syntax”

- Click ok
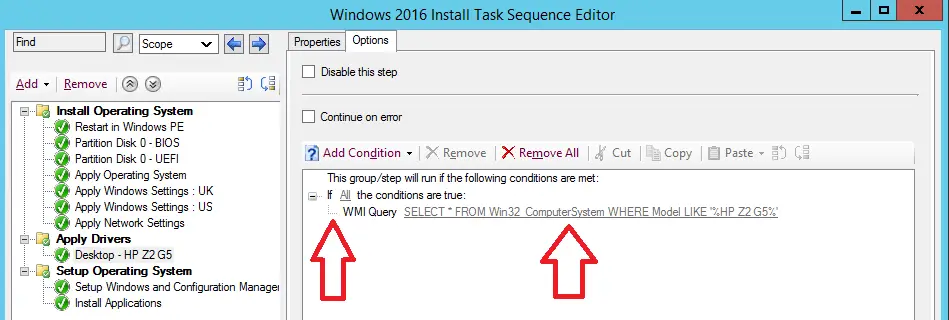
- Confirm the query looks correct, check, check and check again, The amount of times I have entered the query wrong with out double checking is quite high 🙁
- Also confirm you can see a dotted grey L, this means the query is structured correctly, this has also caught me out to many times

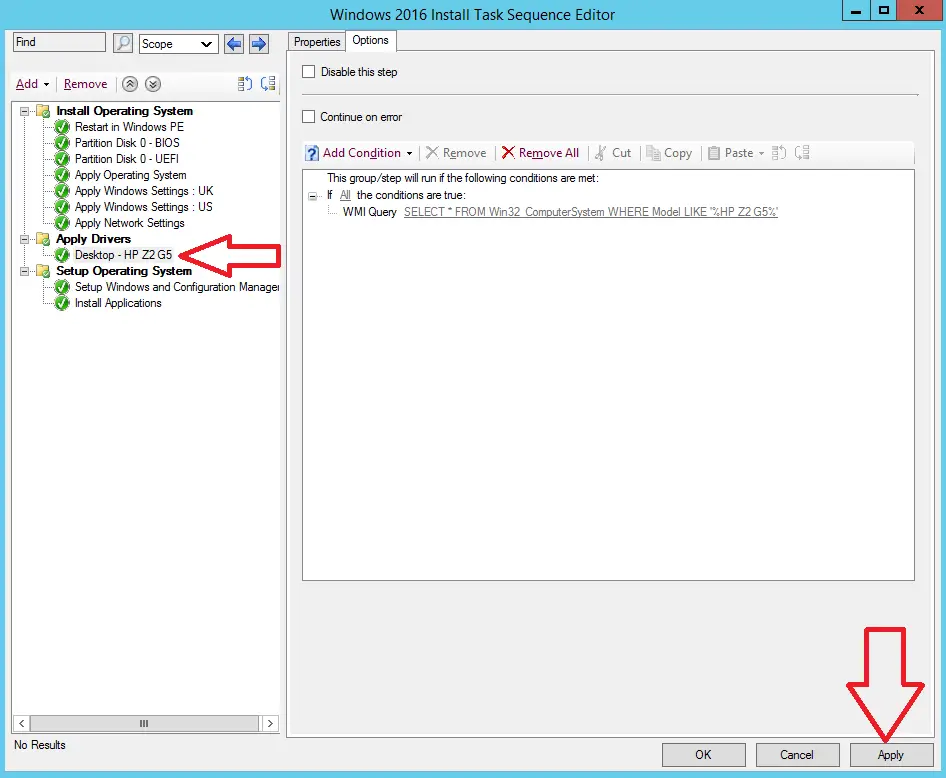
- Click Apply to save the changes we just made
- Make sure the step we just added has a green tick, If the step is red that means there is an issue somewhere which will be highlighted with a red !

- This step is now complete
 Rename the step to “Apply Drivers” or something similar
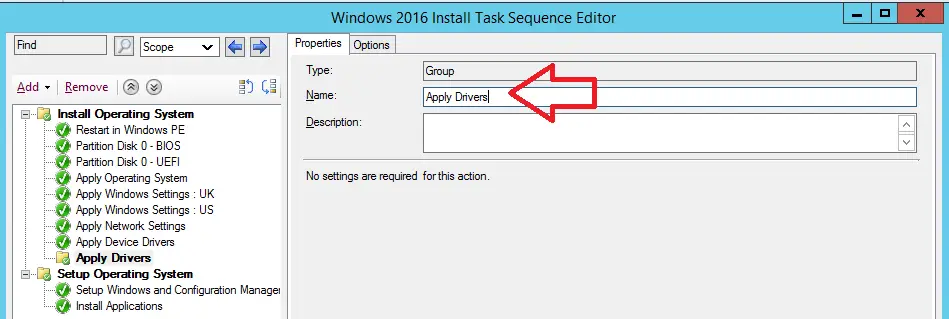
To Summarise
This SCCM task sequence step will now only run if the computer model we set under the options tab is a match and it will apply the drivers that we selected in the properties tab.
PRO TIP : After adding in a new driver package to your task sequence I recommend to test all hardware models that your SCCM environment supports.
This is because sometimes the WMI Query that you just added for this model might run for another model causing the task sequence to fail for that model.
5 : Adding Applications To The Task Sequence
In this section I will show you how to add applications to the task sequence.
I will also show you how to configure the task sequence to only install applications on laptops or desktops or even by department.
Adding An Application
To add applications to your task sequence follow these steps
- Open the SCCM console
- go to \Software Library\Overview\Operating Systems\Task Sequences
- Open the task sequence with edit
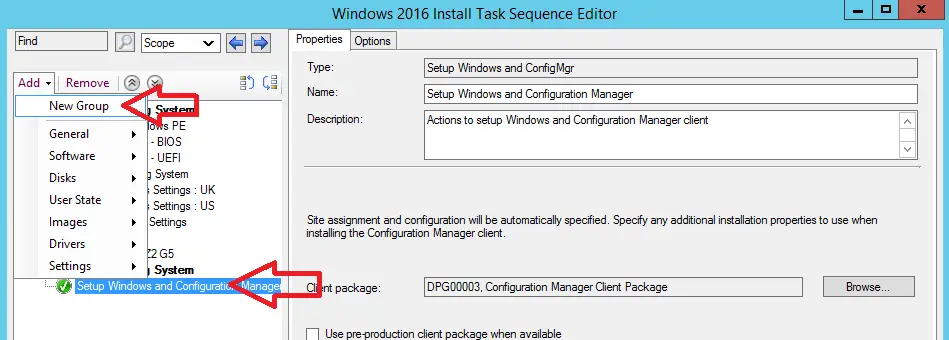
- Left click to select the last step in the task sequence
- Then click add > New Group

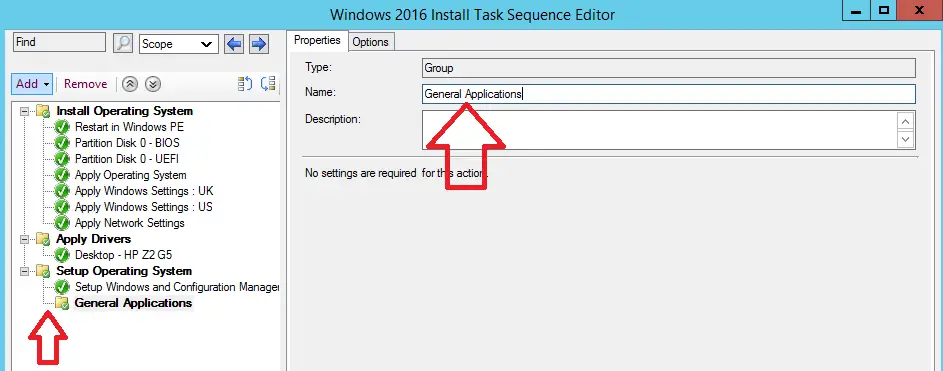
- Give the group a name, In this example I gave it “General Applications”
- In this group I will put all the applications that will install on all machines
- Notice that the “General Applications” group is sitting in the “Setup Operating System Group” we need to move out of this group

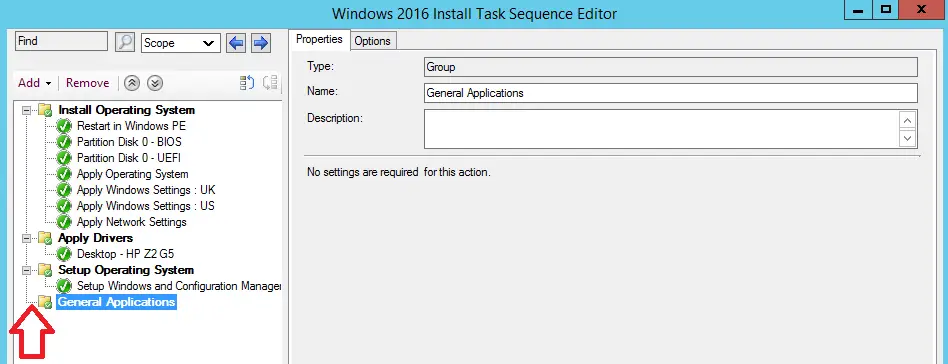
- Highlight “General Applications” and push the down button

- The group should now be structures like below with the dotted L

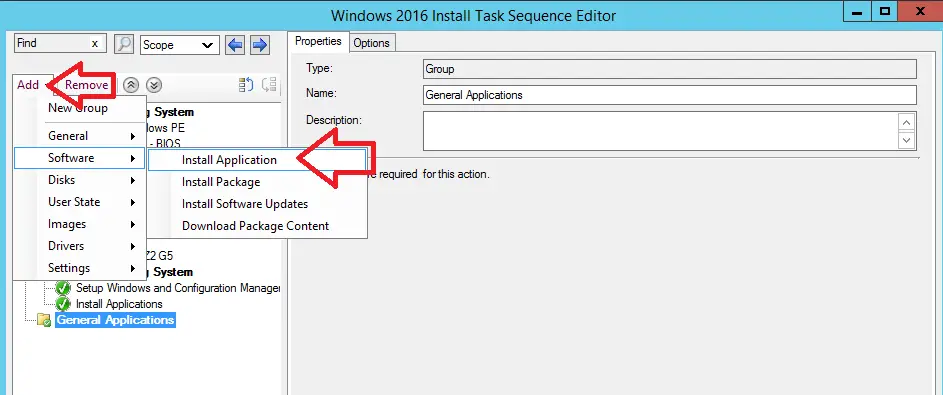
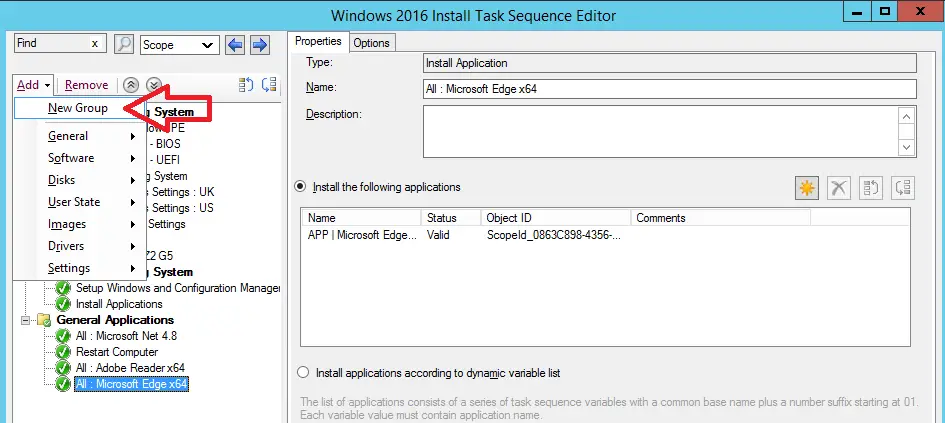
- To add an application Click Add > Software > Install Application

- Click the sun icon

- Find the application you wish to add and tick the box next to it
- Click Ok

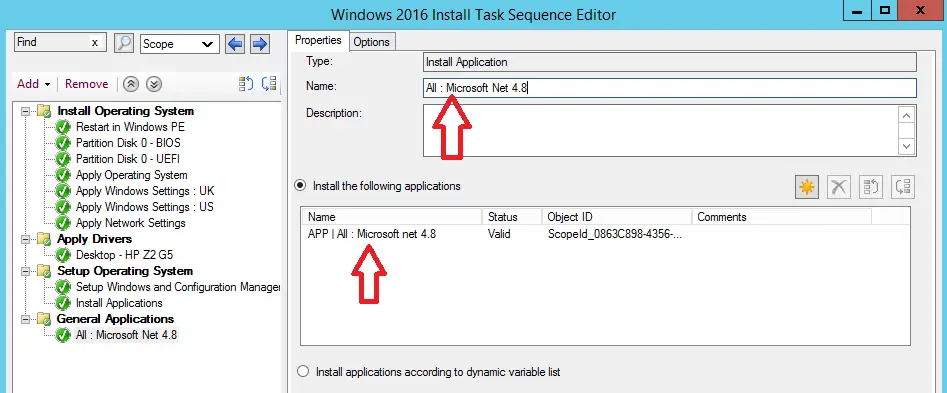
- Enter a name for the application in the name field
- Confirm the application appears under “Install the following application” section

- Click apply bottom right to save the task sequence
TOP TIP : You can add more than one application in to a task sequence step but I recommend to only add one per step. In my experience it is easier to find the application in the future if you need to, you have more control over it (Can supress errors, Assign a filer like only install on laptops) and makes troubleshooting task sequence failures a bit easier. - Some applications such as Microsoft .net need a reboot to finish the application install, You can add a restart step by doing the following
- Click Add > General > Restart Computer (Shown Below)
- Below I have added two more applications to complete the General Applications installs


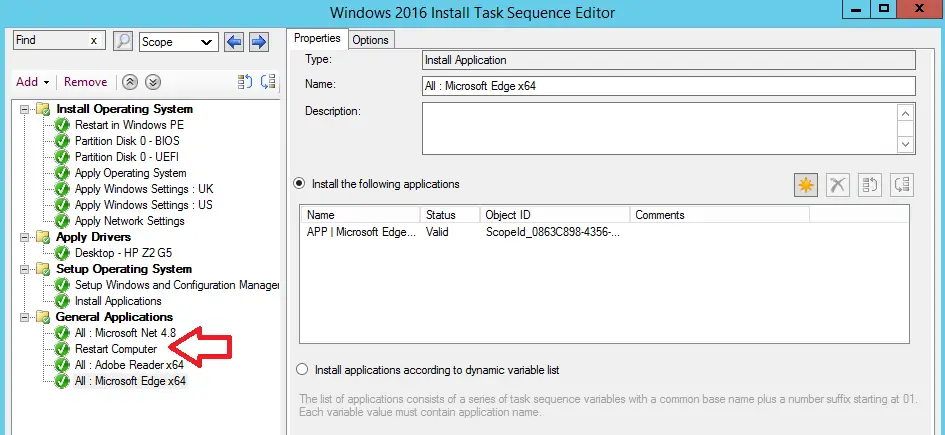
Now any application that is put in to the General Applications group will install for all devices because we did not put any conditions on the applications for application group.
Install Applications On Laptops Only
By Adding a wmi query on to a application group it is possible to only install applications on laptops. To do this follow these steps
- Open the task sequence in edit mode
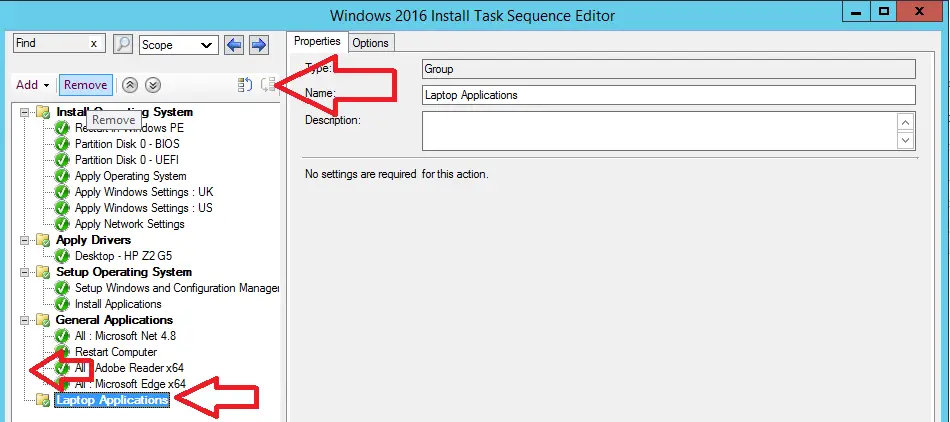
- Add a new group by clicking Add > New Group

- Name the group something like “Laptop Applications”
- Move the “Laptop Applications” group down by pressing the down button

- Click the options tab
- Click Add condition > If statement > Any condition
- Left click to highlight “If Any the conditions are true”
- In the query window enter Select * from Win32_Battery where chemistry > “0”
- Click test query, Confirm you see “Contains valid syntax”

- Click Ok
- Click Ok
- Now add the applications you want only to install on laptops under this group
- Click apply to save the changes you made


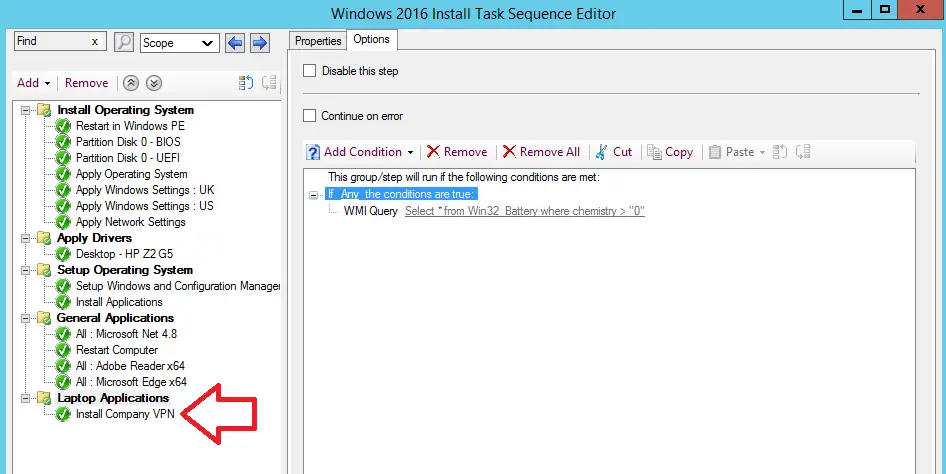
Now any applications placed in the “Laptop Applications” group will only be installed on laptops because they inherit the wmi query we placed on the “Laptop Applications”
Install Applications On Desktops Only
To Install applications on desktop machines only repeat the steps I went over in the laptop section but name the application group “Desktop Applications” and use the query Select * from Win32_Battery where chemistry < “0” note the > is now a <
Install Applications By Department / Custom Variable
Using custom variables it is possible to install applications only in certain conditions such as by department, Hardware type, Poweruser?
To be able to do this you need to first set a custom variable, you can see how to do that in this article I wrote How To Use Variables In A SCCM Task Sequence
Then on the task sequence step put a filter in for the application you want to install, To do this follow these steps
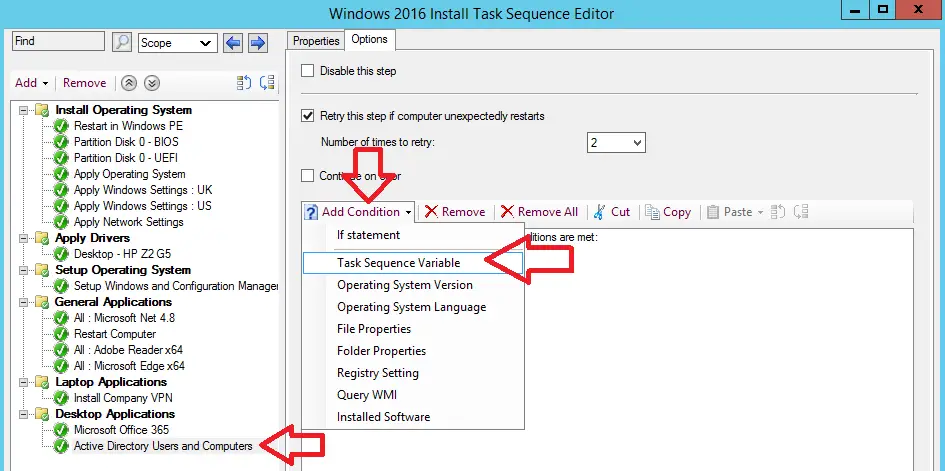
- Open the task sequence in edit mode
- Select the application you want to filter by
- Click the options tab
- Click Add condition > If statement > Any condition
- Left click to highlight “If Any the conditions are true”
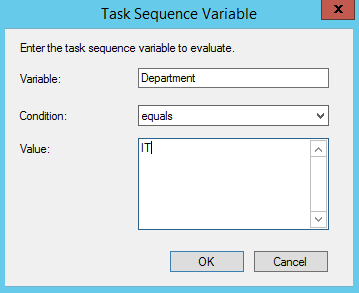
- Click add condition > Task Sequence Variable

- Enter the name of the variable
- Edit the condition if needed
- Enter the value

- Click ok
- Confirm the condition looks correct

- Click apply to save the step we just edited
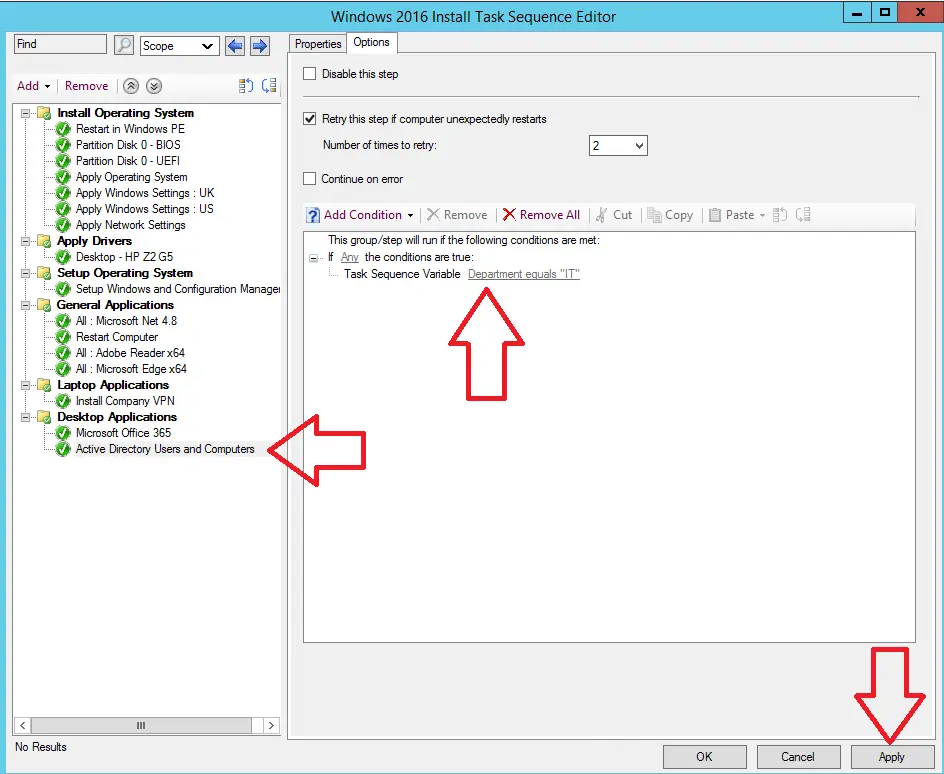
Above we edited the “Active Directory Users and Computers” step to only install for installs where the department equals IT.
How To Add Software Updates
The last step we are going to configure is installing the latest software updates. It is best practice to install software updates at the end of the task sequence.
To add software updates to your task sequence follow these steps
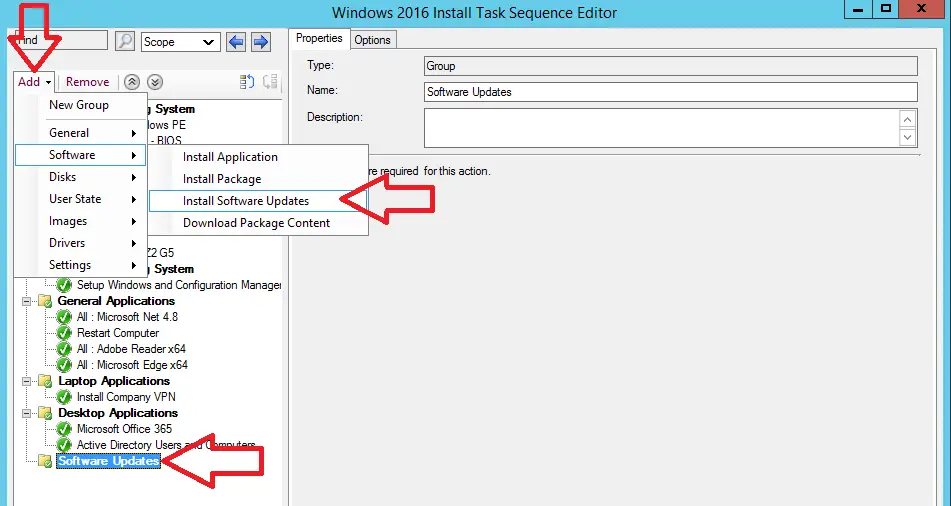
- In the task sequence create a “Software Updates” group and move it to the bottom of the task sequence
- Select the Software Updates group
- Click Add > Software > Install Software Updates

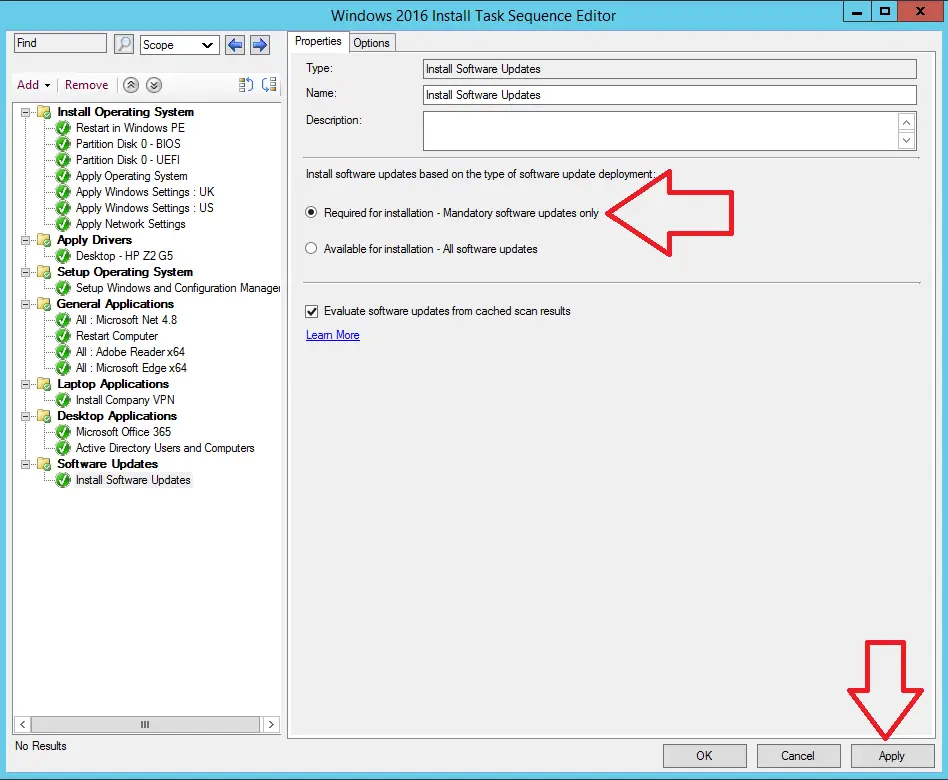
- Make sure required for installation is selected

- Click apply to save the task sequence
Once the above has been setup the software updates that have been deployed to “All Unknown Computers” will get installed when the task sequence is run.
Useful Articles
Listed below are all the related articles to task sequences that you might find helpful
- How To Set A Custom Background When Task Sequence Running
- How To Display Custom Pop-up Message Box In SCCM Task Sequence
- How To Make Custom GUIs For SCCM Task Sequence
- How To Display Custom Pop-up Message Box
Troubleshooting Task Sequence Failures
Below is a list of articles I have written on how to fix the common task sequence failures I see in my environments.
- Error 0x80070490 : This is related to an issue with the task sequence finding a local storage device
- Error 0x80004005 : This is a general error but the most common error you are likely to see