
Hello, Today I am going to show you how to set a custom background for OSD (Operating system deployment)
I will cover how to change the background to a singular static custom background, and then how to set the background which will show the osd progress depending on what step the task sequence is on, as shown below.
Personally I use the above background on all my SCCM environments because I feel it looks much better than the default background and it also give you more information about the osd process.

NOTE : Are you looking to creating a custom GUI to capture task sequence variables? If yes take a look at this article I wrote on How To Create A Gui To Capture Task Sequence Variables
How To Set A Custom Background For OSD
Below I will show you how to add a single image which will display as the background when you are deploying an operating system.
- Prepare an image which is 1024 pixels wide and 768 pixels high
- Copy the file to your SCCM server
- Open the SCCM console
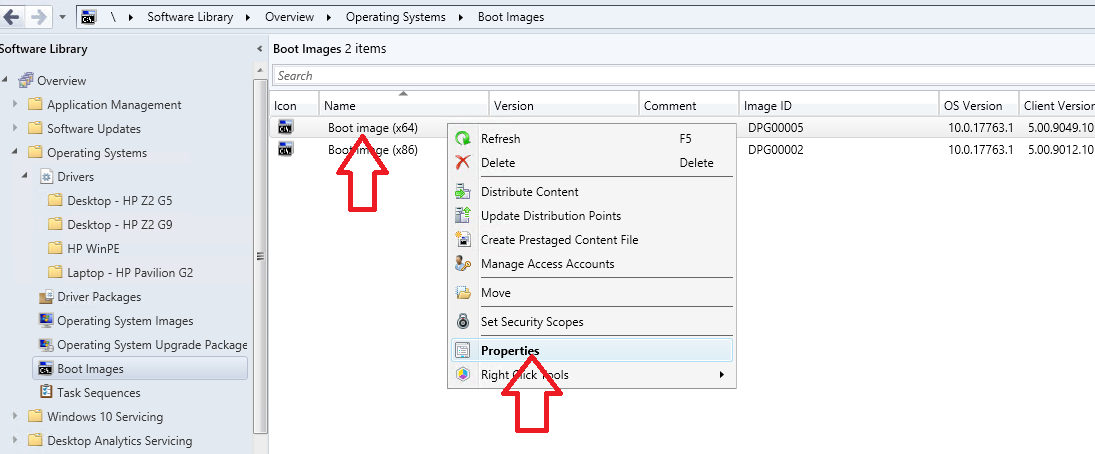
- Go to \Software Library\Overview\Operating Systems\Boot Images

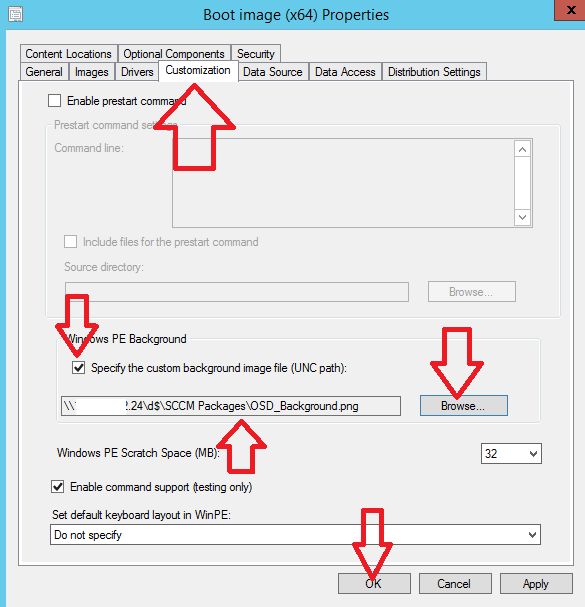
- Click the customization tab
- Tick the box “Specify the custom background image file”
- Click browse
- Enter the unc path to the image file
- Click ok
- Click ok

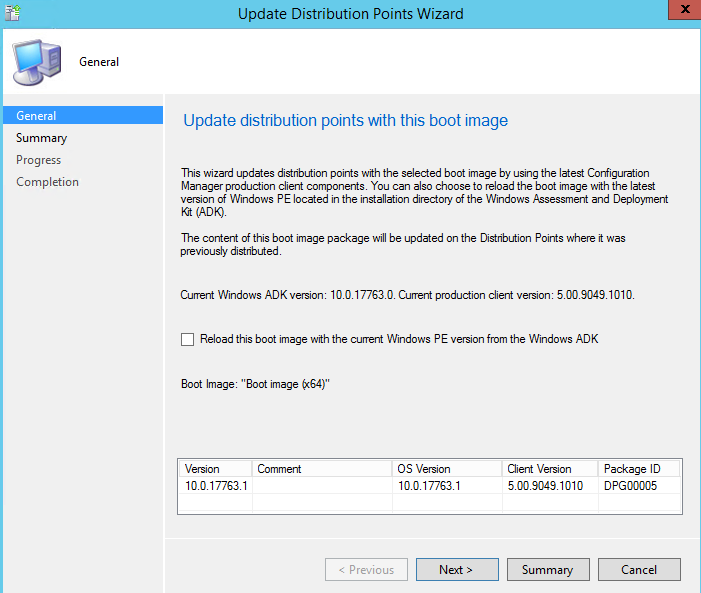
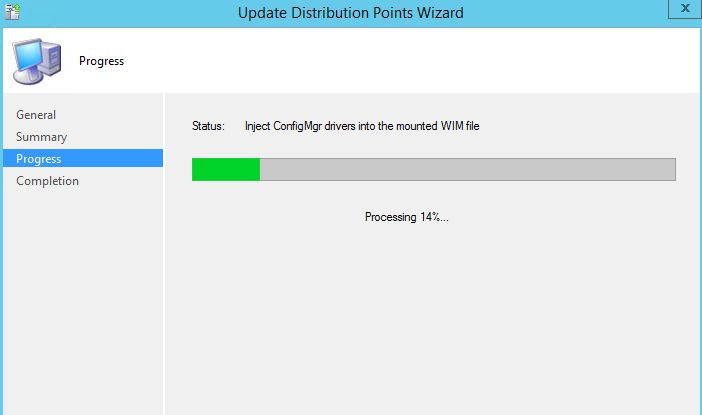
- You will get a prompt to distribute the boot image with the new version. Click yes

- On the update distribution points with this boot image click next

- Click next, The boot image will be regenerated and distributed, expect this to take a few minutes

- Click close
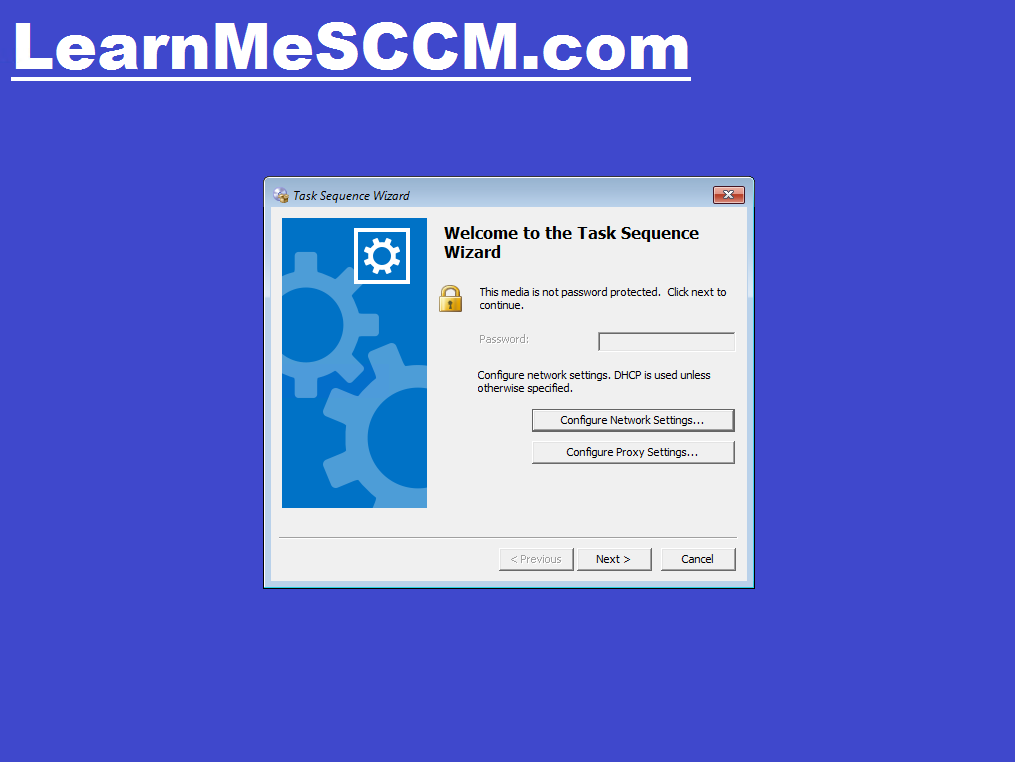
- Now start the SCCM task sequence and you should see the custom background you just set


Custom Background With Progress For OSD
Next I will show you how to add a custom background to your operating system deployment which will keep changing depending on which step in the task sequence you are.
For example you can configure the background to change on the following steps
- Installing Operating System
- Applying Drivers
- Configuring Operating System
- Installing Applications
- Installing Software Updates
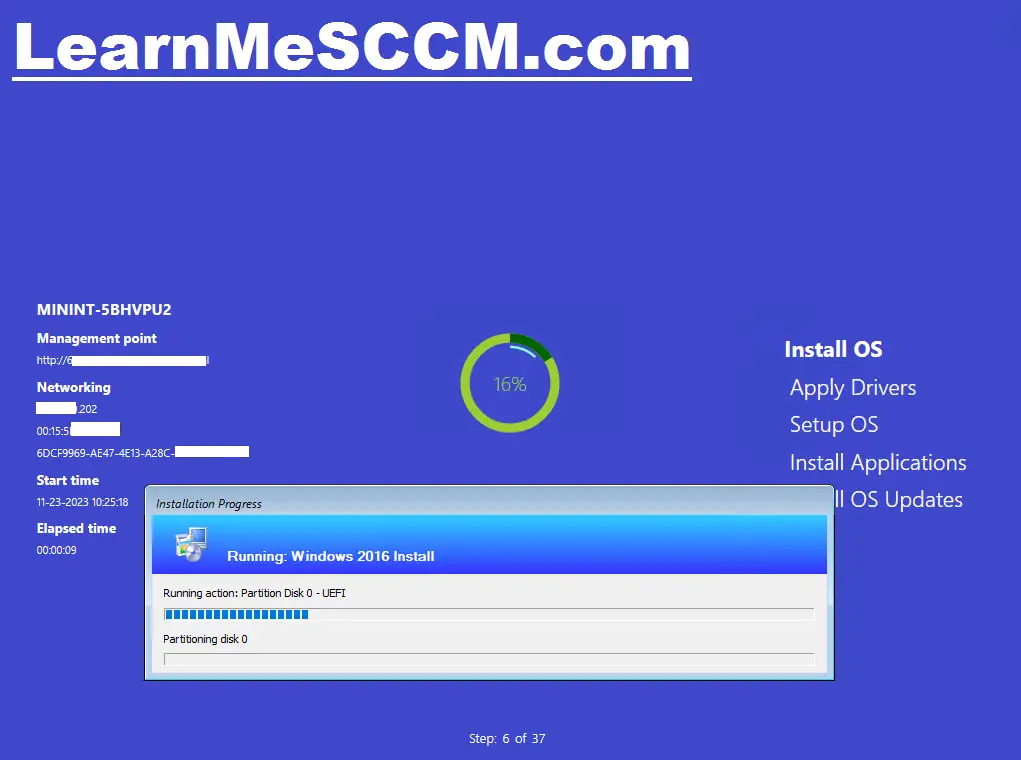
You will also see information such as
- Time the OSD started
- Assigned Computer Name
- Networking Information
- Management Point Connected To
- Elapsed Time
To implement this we are going to use an application called TSBACKGROUND. To implement this follow these steps
- Download the TSBACKGROUND files here
- Extract the TSBackground.zip file we downloaded
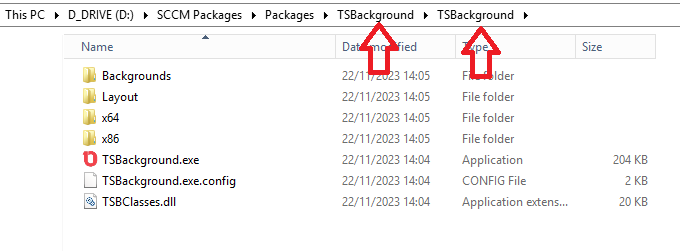
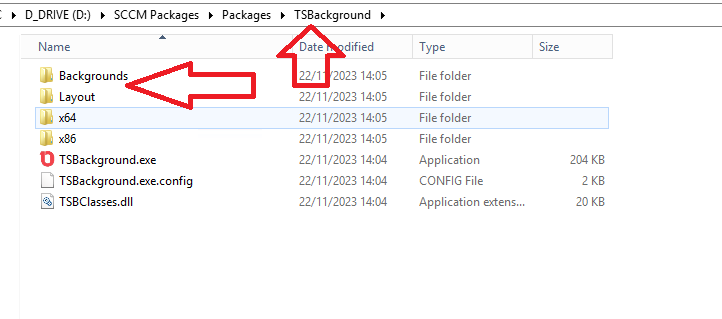
- Copy the \TSBackground folder in to a location on your SCCM server where you keep the files for SCCM packages
- You should see the following files and folders once copied, note there should be two TSBackground folders

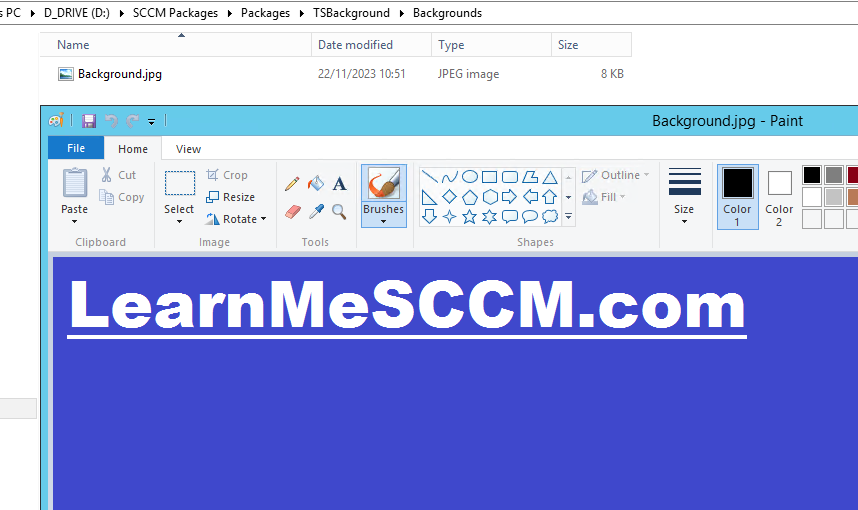
- Go in to the backgrounds folder and replace the Background.jpg with your own custom background. Important to keep the same file name

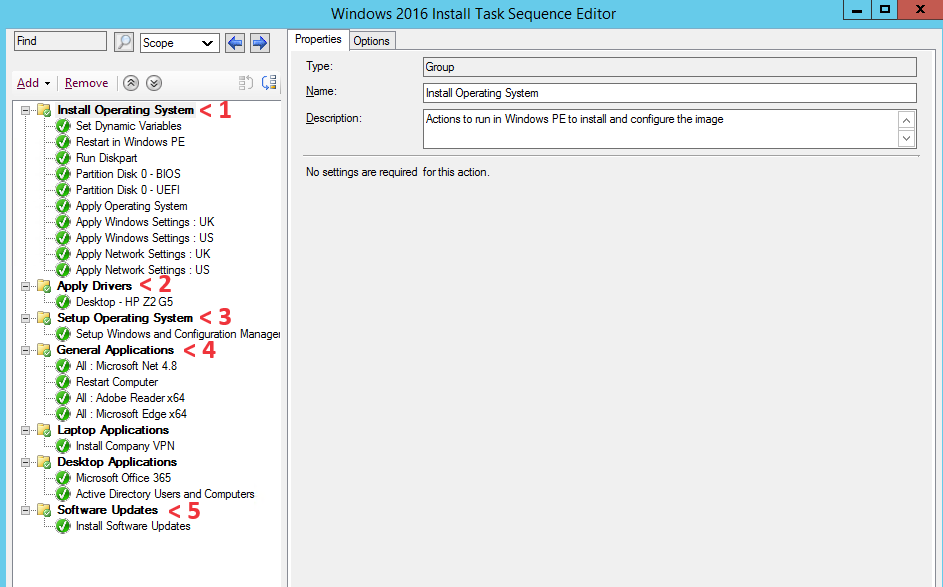
- Now take a look in your task sequence and note down what steps you want to list on the progress steps
- Below for example I have 5 steps
1 – Install Operating System
2 – Apply Drivers
3 – Setup Operating System
4 – General Applications
5 – Software Updates

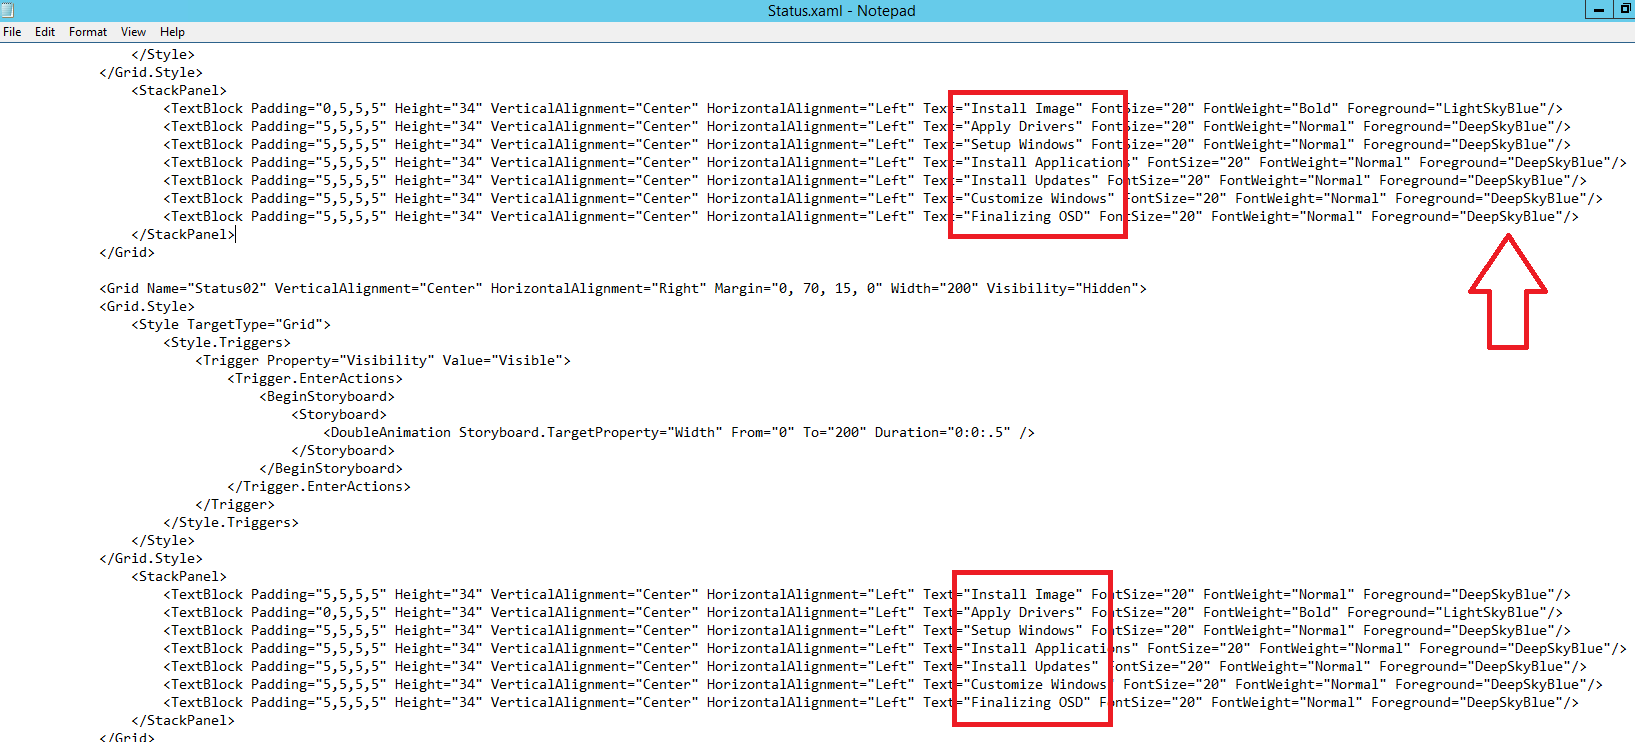
- Now open the file “TSBackground\Layout\Status.xaml” in notepad
- We now need to edit the text for the progress steps, We need to change the highlighted text below
- I am also going to change the font colour

- Below shows the changes I have made, I changed the name for 5 progress steps and I also removed the “Customize Windows” and “Finalizing OSD” steps
- Make sure you edit each section in between the <StackPanel> sections, There are six sections

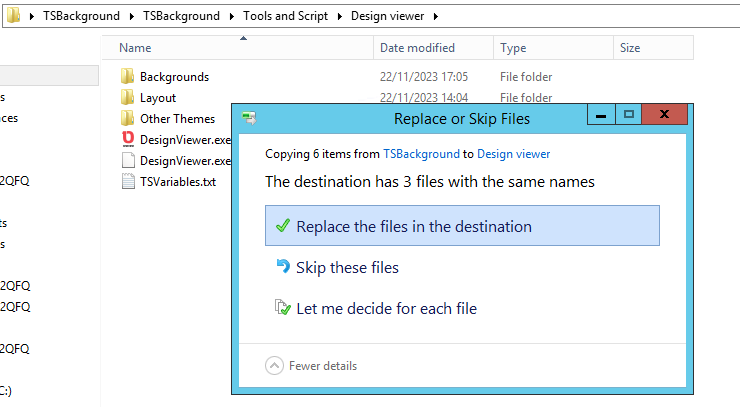
- Now we need to test we have configured everything correctly, To do this copy the Backgrounds and Layout folder

- Go to the folder where you extracted the files from TSBackground.zip and paste the folders in to the “TSBackground\TSBackground\Tools and Script\Design viewer” folder overwriting the existing folders

- Double click on “TSBackground\TSBackground\Tools and Script\Design viewer\DesignViewer.exe”
- In the TSBackground Design viewer application tick the boxes General, Status01 and Progress
- This will give you an idea what the OSD Wizard will look like. Below I need to edit the “Install Software Updates” text

- Now unselect Status01 and select Status02, you should see the “Apply Drivers” step now highlighted

- Now select each Status0* step in turn to make sure they all look correctly setup and formatting as expected
- In the SCCM Console go to \Software Library\Overview\Operating Systems\Task Sequences
- Edit the task sequence you want to show the progress updates for
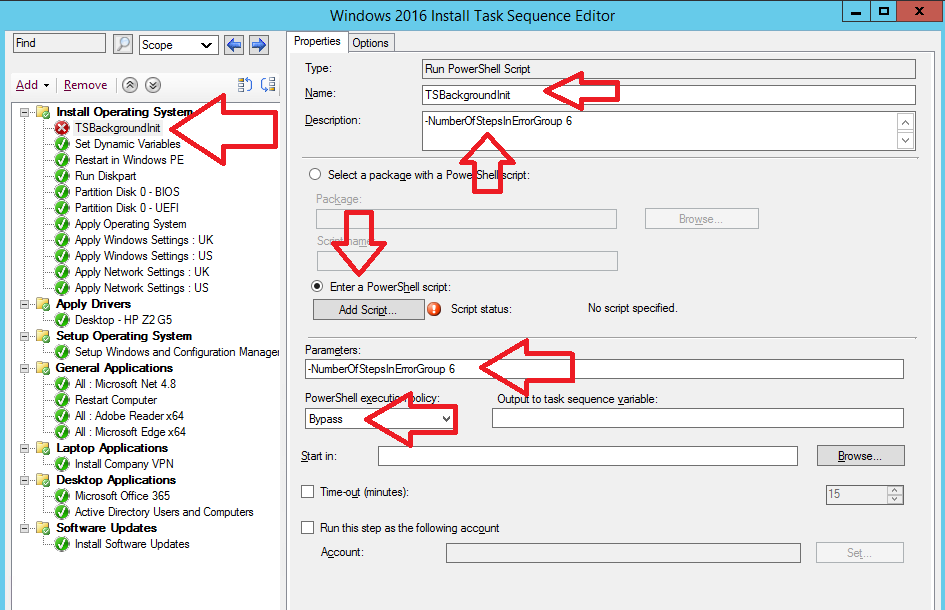
- Click Add > General > Run Powershell Script

- Give it a name of “TSBackgroundInit”
- Make sure it is the first step in the task sequence
- Under description and parameters enter “-NumberOfStepsInErrorGroup 6” Replace the number 6 with the amount of steps you have
- Set Powershell Execution Policy to bypass
- Select enter a powershell script “Add Script”

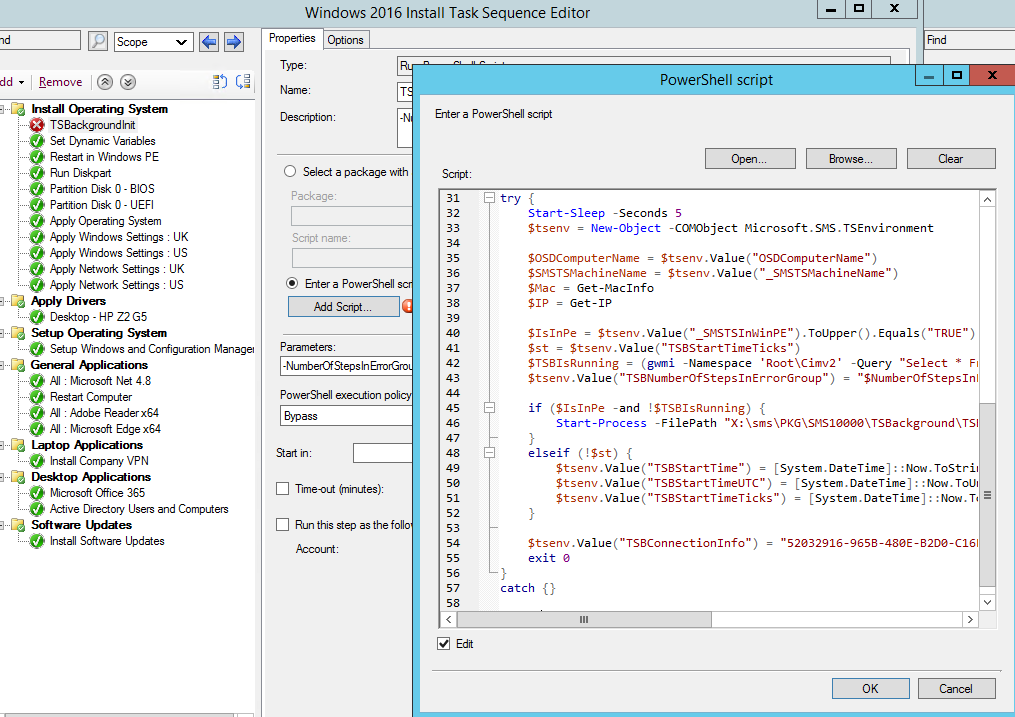
- Enter the below powershell code, Then hit ok
[CmdletBinding()]
Param(
[Parameter(Mandatory=$True,Position=1)]
[string]$NumberOfStepsInErrorGroup = “0”,
[string]$DateTimeFormat = “yyyy-MM-dd HH:mm:ss”
)function Get-IP {
(gwmi -Class ‘Win32_NetworkAdapterConfiguration’ -Filter “IPEnabled = 1”) | foreach {
$_.IPAddress |% {
if($_ -ne $null) {
if($_.IndexOf(‘.’) -gt 0 -and !$_.StartsWith(“169.254”) -and $_ -ne “0.0.0.0”) {
$ip = $_}
}
}
}$ip
}function Get-MacInfo {
$nic = (gwmi -Class ‘Win32_NetworkAdapter’ -Filter “NetConnectionStatus = 2”)
$nic.MACAddress -join ‘,’
}try {
Start-Sleep -Seconds 5
$tsenv = New-Object -COMObject Microsoft.SMS.TSEnvironment$OSDComputerName = $tsenv.Value(“OSDComputerName”)
$SMSTSMachineName = $tsenv.Value(“_SMSTSMachineName”)
$Mac = Get-MacInfo
$IP = Get-IP$IsInPe = $tsenv.Value(“_SMSTSInWinPE”).ToUpper().Equals(“TRUE”)
$st = $tsenv.Value(“TSBStartTimeTicks”)
$TSBIsRunning = (gwmi -Namespace ‘Root\Cimv2’ -Query “Select * From Win32_Process Where Name = ‘TSBackground.exe'”)
$tsenv.Value(“TSBNumberOfStepsInErrorGroup”) = “$NumberOfStepsInErrorGroup”if ($IsInPe -and !$TSBIsRunning) {
Start-Process -FilePath “X:\sms\PKG\SMS10000\TSBackground\TSBackground.exe”
}
elseif (!$st) {
$tsenv.Value(“TSBStartTime”) = [System.DateTime]::Now.ToString(“$DateTimeFormat”)
$tsenv.Value(“TSBStartTimeUTC”) = [System.DateTime]::Now.ToUniversalTime().ToString(“$DateTimeFormat”)
$tsenv.Value(“TSBStartTimeTicks”) = [System.DateTime]::Now.ToUniversalTime().Ticks
}$tsenv.Value(“TSBConnectionInfo”) = “52032916-965B-480E-B2D0-C16FE6BCB4DA;$($OSDComputerName);$($SMSTSMachineName);$($Mac);$($IP);”
exit 0
}
catch {}exit 1

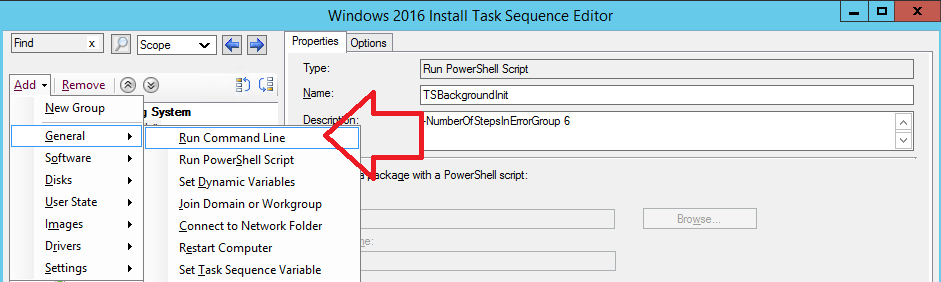
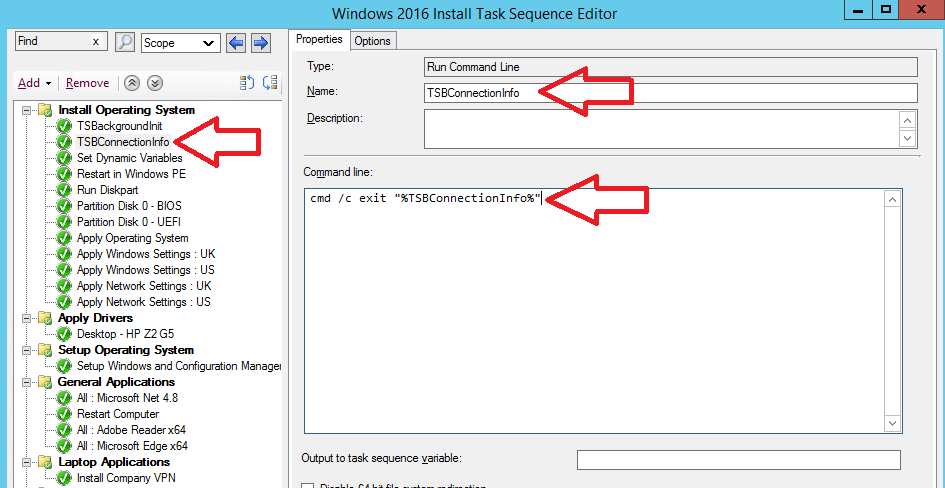
- Click Add > General > Run Command Line

- Make sure this step is 1 under the previous step we just created
- Give this step a name of “TSBConnectionInfo”
- In the command enter “cmd /c exit “%TSBConnectionInfo%”

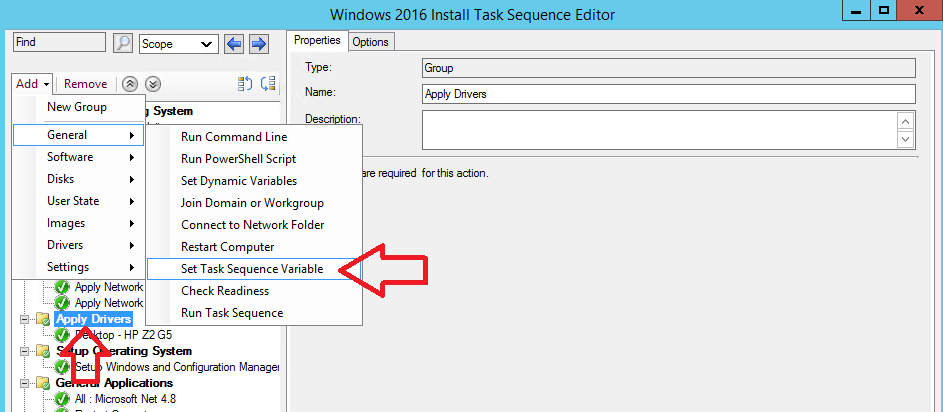
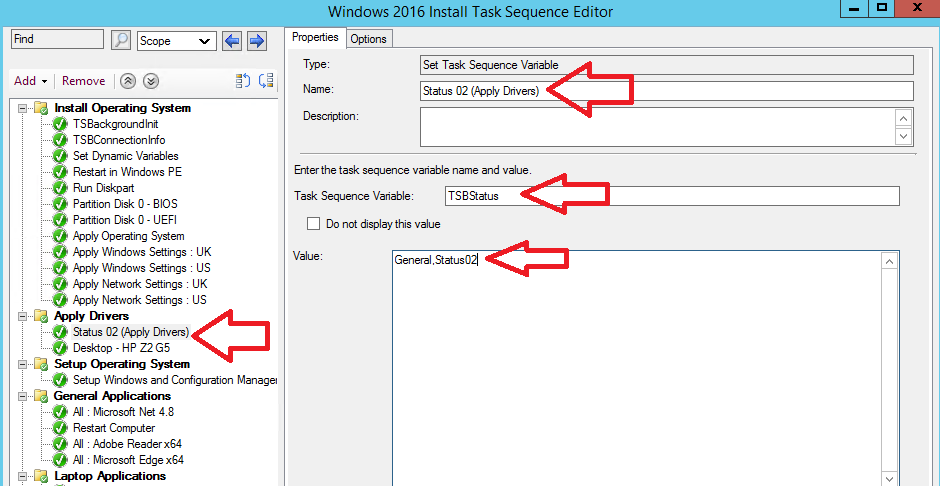
- Next click on the Apply Drivers section
- Click Add > General > Set Task Sequence Variable

- Set the “Set Task Sequence Variable” step to be the first to run in the apply drivers section
- Name the step “Status 02 (Apply Drivers)”
- Enter “TSBStatus” for the Task Sequence Variable
- Give a value of General,Status02 (This will show the general and Status02 which we saw in the Design Viewer Application

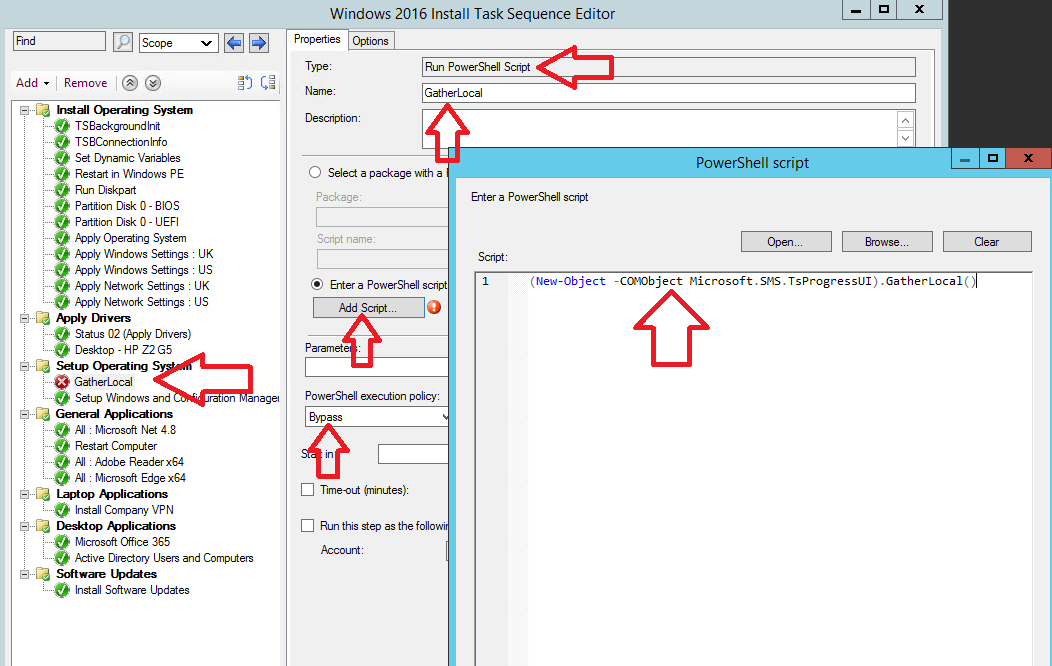
- Add another “Run Powershell Script” just before the “Setup Windows and Configuration Manager” Step
- Give it a name of “GatherLocal”
- Set Bypass for PowerShell execution policy
- Click add script and add the code on the following line
(New-Object -COMObject Microsoft.SMS.TsProgressUI).GatherLocal()
- Click ok

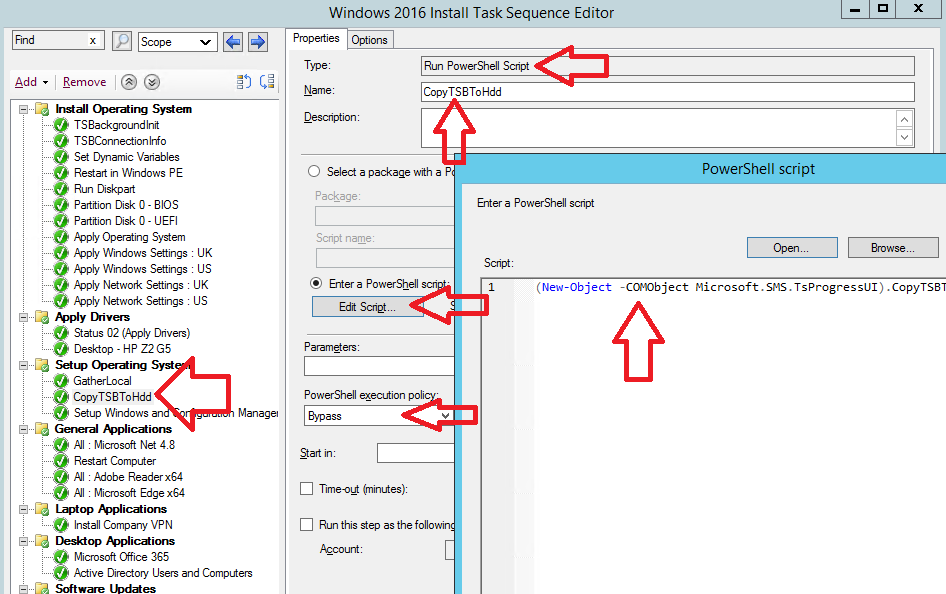
- Add another “Run Powershell Script” just after the “GatherLocal” Step
- Give it a name of “CopyTSBToHdd”
- Set Bypass for PowerShell execution policy
- Click add script and add the code on the following line
(New-Object -COMObject Microsoft.SMS.TsProgressUI).CopyTSBToHdd()
- Click ok

- Add a “Set Task Sequence Variable” step just under the “CopyTSBToHdd” step
- Name the step “Status 03 (Setup Windows)”
- Enter “TSBStatus” for the Task Sequence Variable
- Give a value of General,Status03 (This will show the general and Status03 which we saw in the Design Viewer Application

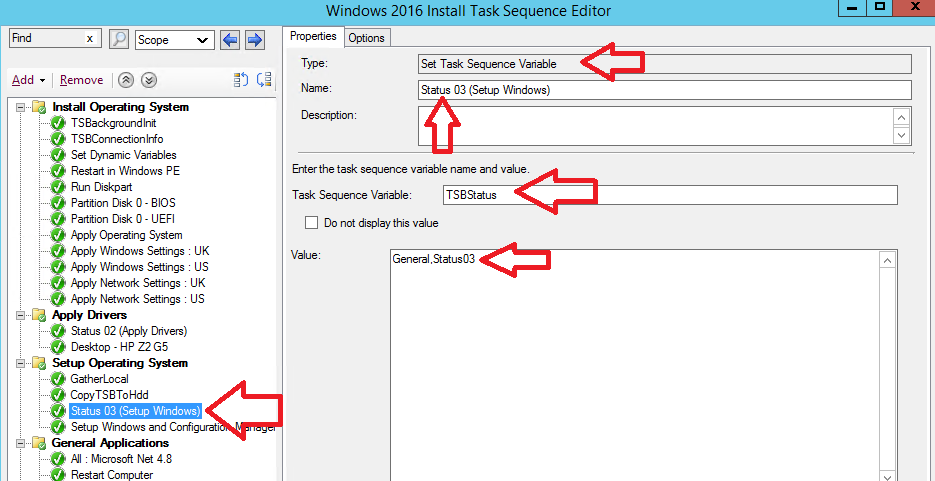
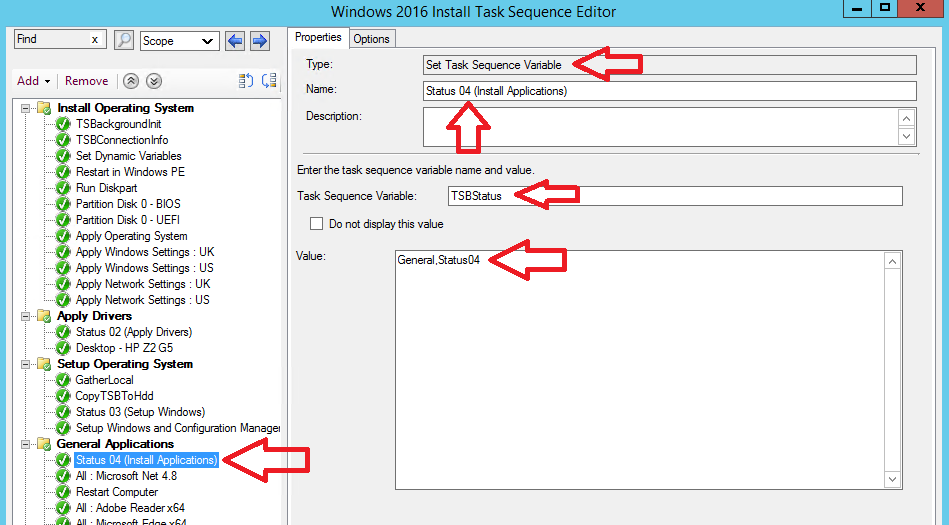
- Add a “Set Task Sequence Variable” step just before the application installs
- Name the step “Status 04 (Install Applications)”
- Enter “TSBStatus” for the Task Sequence Variable
- Give a value of General,Status04 (This will show the general and Status04 which we saw in the Design Viewer Application

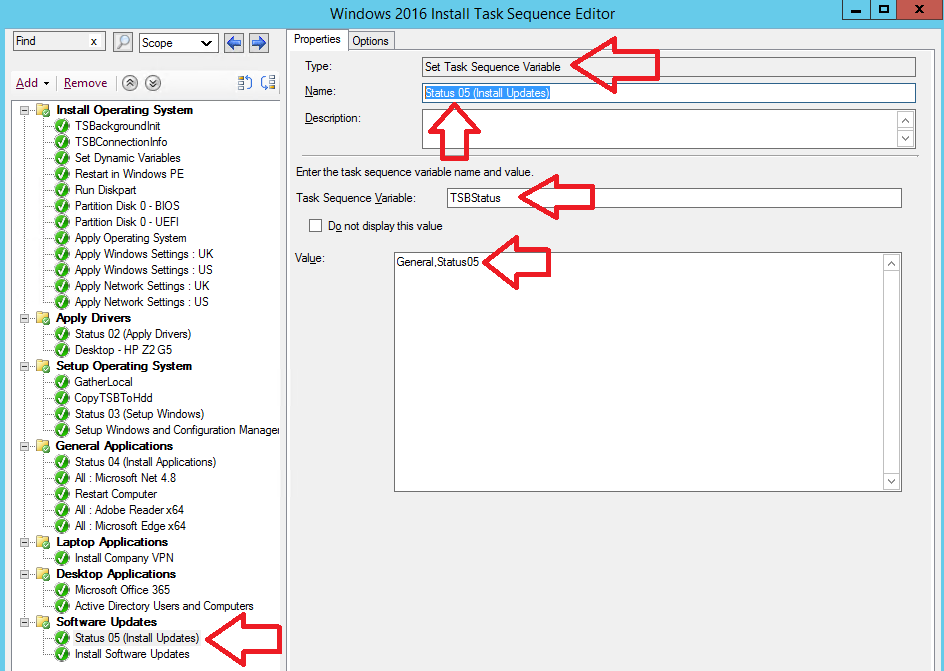
- Add a “Set Task Sequence Variable” step just before the software update installs
- Name the step “Status 05 (Install Updates)”
- Enter “TSBStatus” for the Task Sequence Variable
- Give a value of General,Status05 (This will show the general and Status05 which we saw in the Design Viewer Application

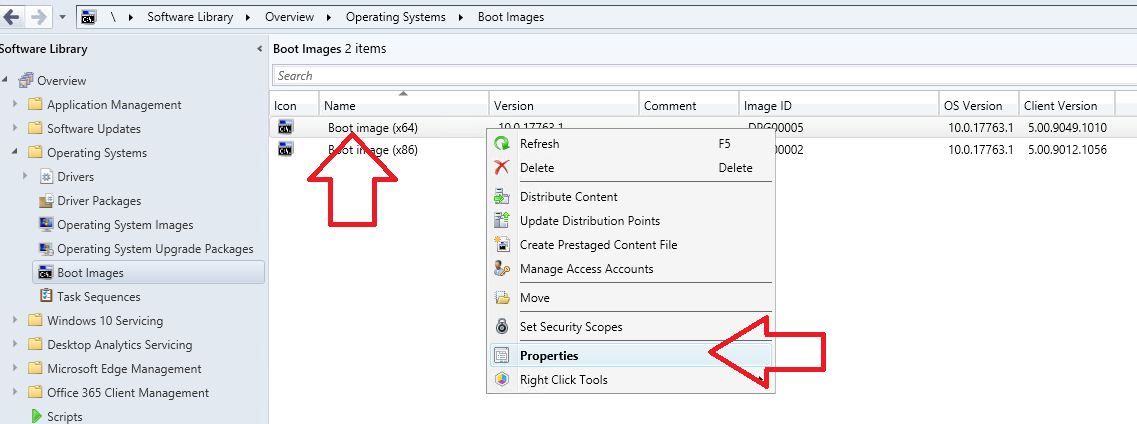
- Open SCCM console
- Go to \Software Library\Overview\Operating Systems\Boot Images
- Right click on “Boot image (x64)” and select properties

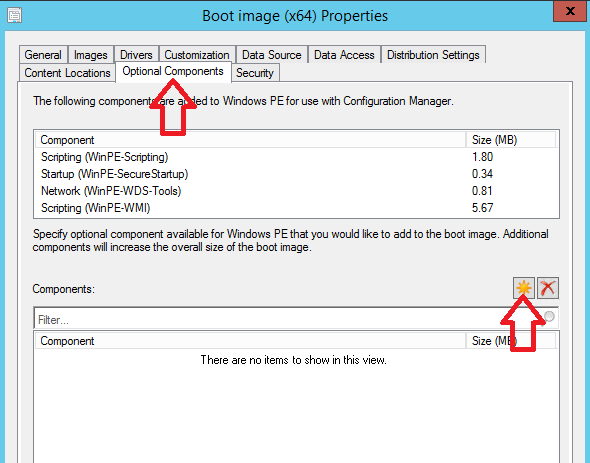
- Click the Optional Components tab
- Click the sun icon

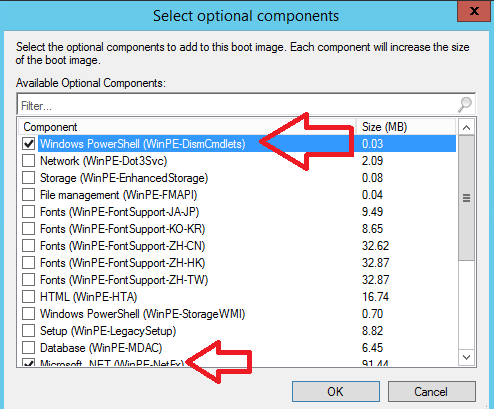
- Select “Windows PowerShell” and “Microsoft .NET”

- Click ok
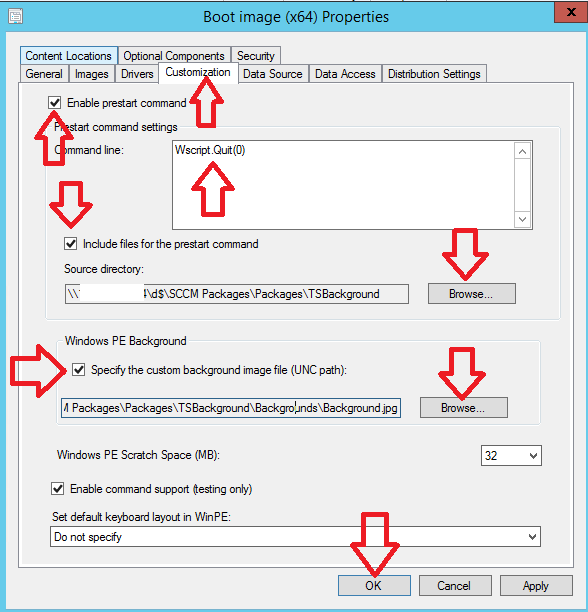
- Click the customization tab
- Tick the box “Enable prestart command” enter “Wscript.Quit(0)”
- Tick the box “Include files for the prestart command”
- Click browse, browse to the folder where the file “TSBackground.exe” exists
- Tick the box “Specify the custom background image file”
- Click browse, select the Background.jpg file in the \Packages\TSBackground\ folder
- Click ok

- Click apply
- Click yes to update distribution points

- Click Next
- Click Next
- Click Close
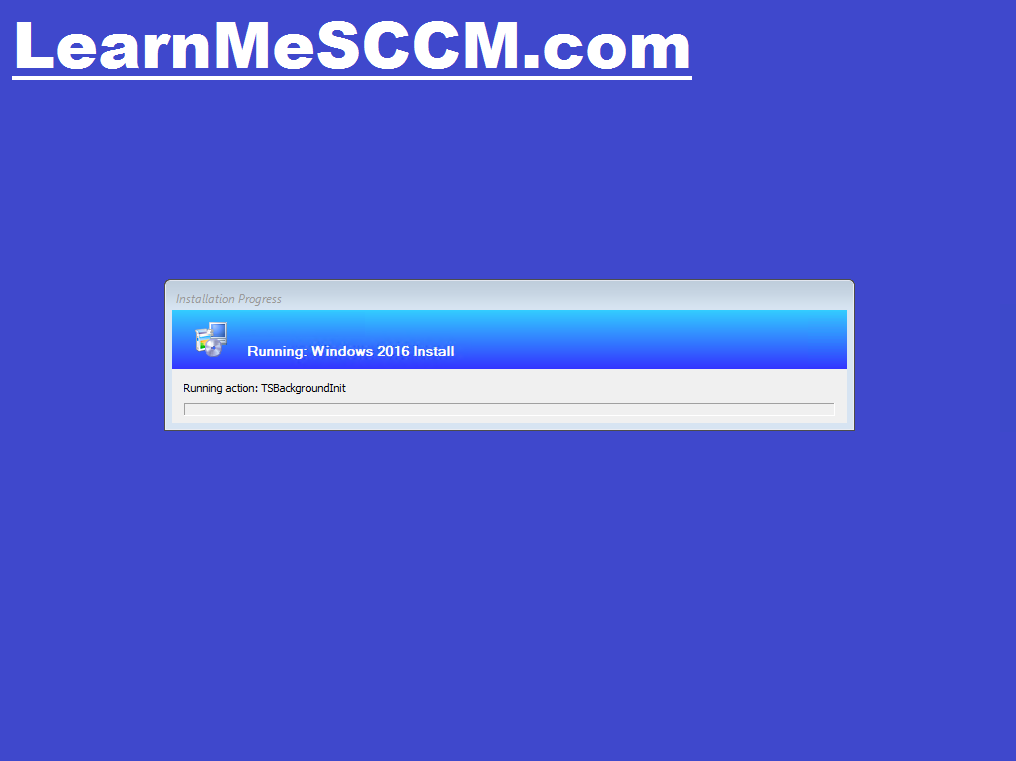
- Now run the task sequence on a machine
- When it loads you should see it run a new first step as shown below (If this step errors check the fix here)

- Then it should load the screen we saw in the designer viewer application
- Below you can see the progress is on the install OS step, 16% complete and on step 6 of 37


How To Fix Task Sequence Fails To Run TSBackgroundInit Step
If the task sequence fails on the first step which is running the TSBackgroundInit application this will be because the task sequence can not locate the TSBackground.exe file.
To fix the issue follow these steps
- Open the SCCM console
- go to \Software Library\Overview\Operating Systems\Task Sequences
- Open the required task sequence in edit mode
- Click on the TSBackgroundInit step
- Click edit script
- Find the line Start-Process -FilePath “X:\sms\PKG\SMS10000\TSBackground\TSBackground.exe
- And replace it with Start-Process -FilePath “X:\sms\PKG\SMS10000\TSBackground.exe”
- Click ok
- Click ok
- Run the task sequence again
Conclusion
Above I have shown you two ways to set a custom background for OSD (Operating system deployment).
The first method will set a static picture that will not change through out the task sequence, This helps to make the OSD process look a bit more professional as the default look is a bit dull.
The second method is what I personally use on all my builds as it give you a lot of good information about the deployment status.