
In this article I will show you how to create a custom GUI which you can use in a SCCM task sequence to capture information about the machine you are building.
The GUI can capture information such as
- Computer Name to Use
- Which Applications To Install
- Which Region The Machine is for
- What Department The Machine is for
- And Much more
With these captured variables you can configure your task sequence to perform custom steps on the variables that have been set, For more information on this take a look at this article How To Use Variables In A SCCM Task Sequence I wrote on that.
Below is an example of a gui I use in one of my environments.

If you need help creating a task sequence take a look at this guide I wrote about creating task sequences in SCCM
How To Make Custom GUIs For SCCM Task Sequence
To be able to make a GUI we need to enable Microsoft .Net support in the boot image, then we will use an application called TSGUI to build the GUI.
I have tried many different applications to build GUI’s but I have found TSGUI the easiest and the best application. In fact I use TSGUI in most of my SCCM environments I support.
To make a custom GUI for SCCM Follow these steps.
1. Add Microsoft .Net Addon To Boot Image
The custom GUIs I am going to show you require Microsoft .Net to run. We will need to add Microsoft .Net support in to the SCCM Boot Image.
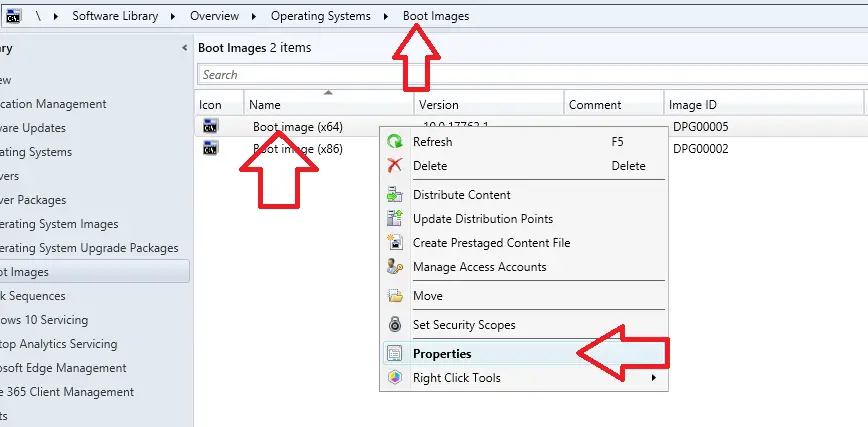
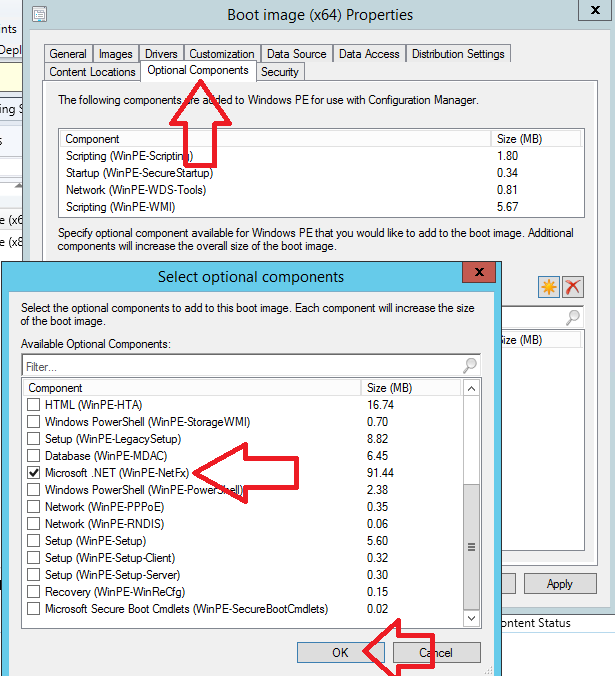
To do this follow these steps
- Open the SCCM console
- Go to \Software Library\Overview\Operating Systems\Boot Images
- Right click on “Boot image (x64)” and click properties

- Click the optional components tab
- Select “Microsoft .Net”
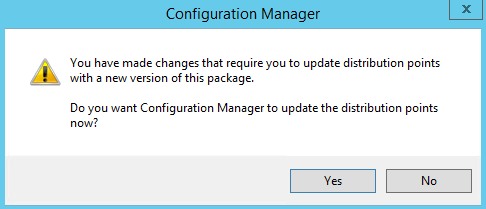
- Click ok

- Click yes to update the SCCM distribution points with the new boot image

- Click Next
- Click Next
- Click Close
2. Create & Test The GUI
Next step is to download the TSGUI application and edit the xml file with the information we want to capture in the GUI.
To do that follow these steps
- Go to TSGUI website and click download
- Download the latest version (I am using version 2.0.7.0 in this guide)
- Extract the files
- Browse in to the folder
- Edit the config.xml as per your needs (More information about this step here, I have also created some templates you can copy + paste)
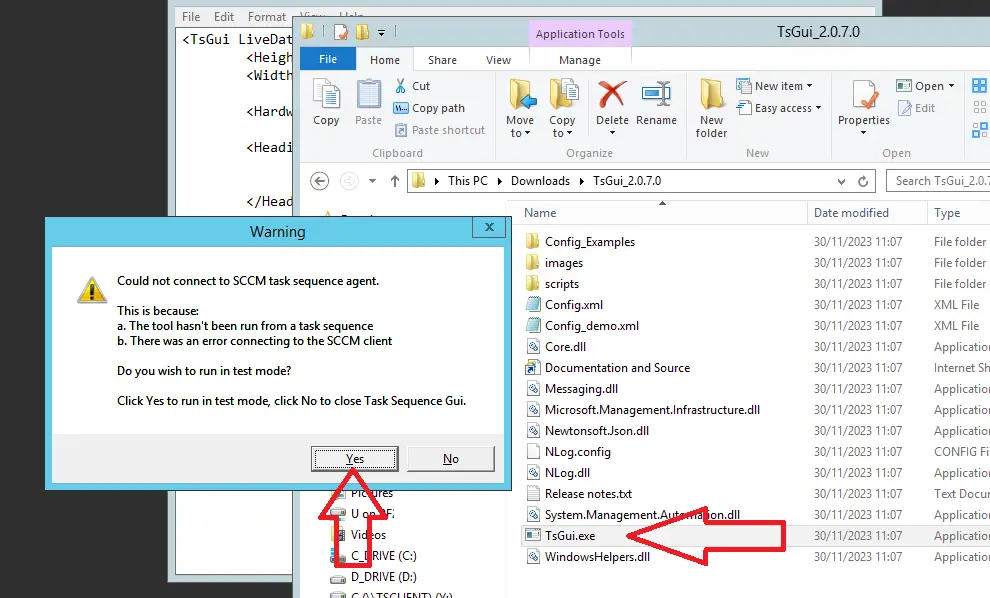
- Double click on TsGui.exe
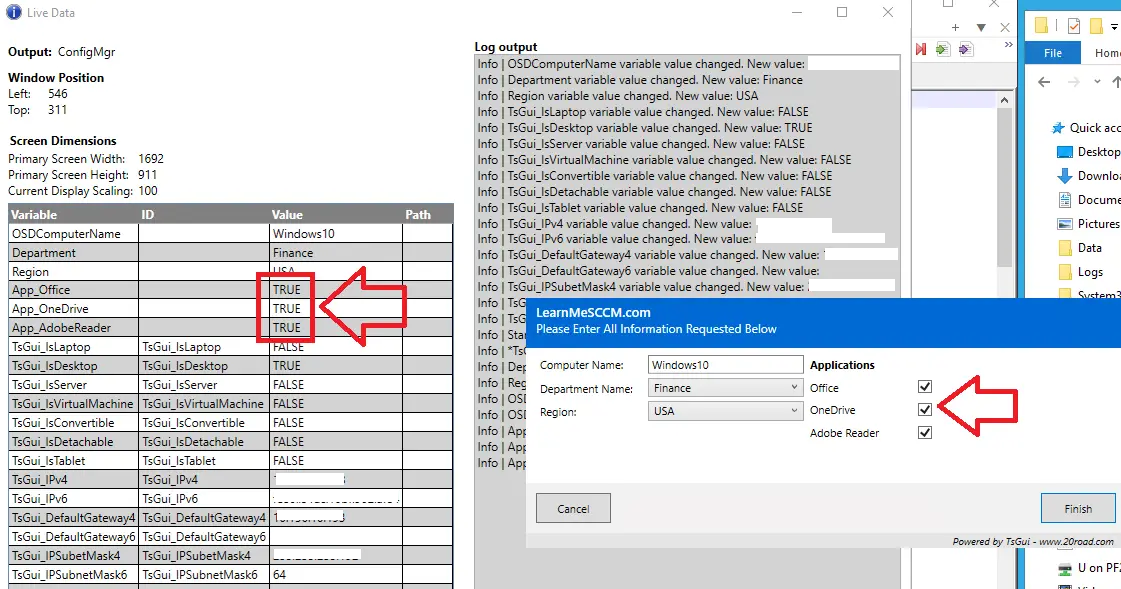
- Click yes, this launches the tool in test mode

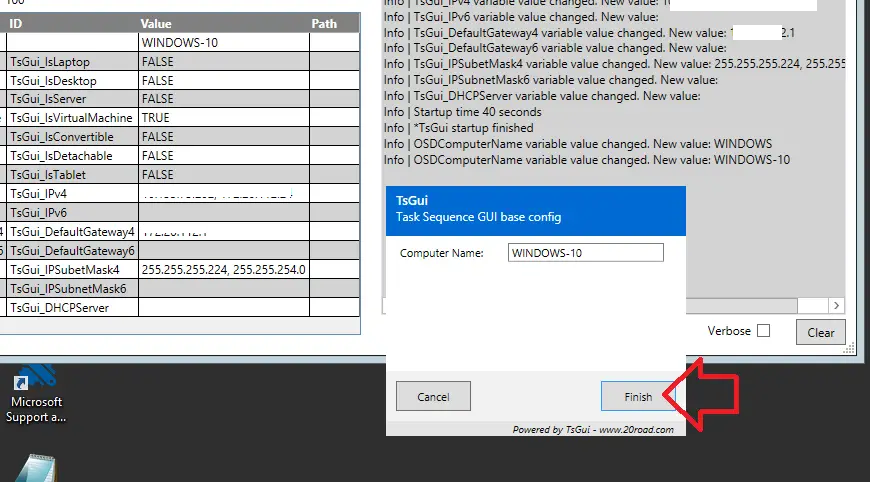
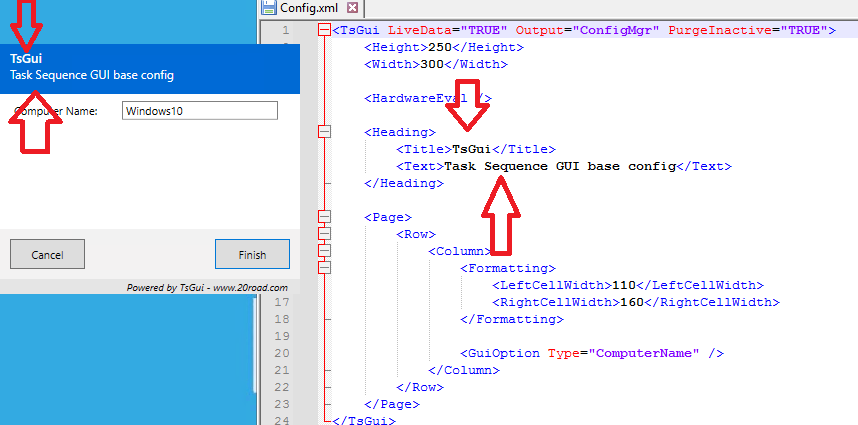
- Highlighted below in green is the preview of the settings you put in to the config.xml
- Highlighted in purple is the log of everything the TSGui application is doing, You can see I entered the Computer Name Windows-10
- Highlighted in yellow are the current variables that are being set by TSGui

- Click finish

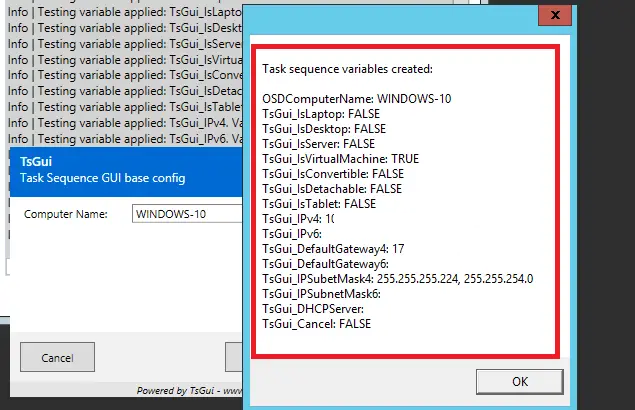
- Now a window will pop up showing all of the task sequence variables that have been created.

- When you are happy with the look of the GUI and the variables it creates move on to the next step

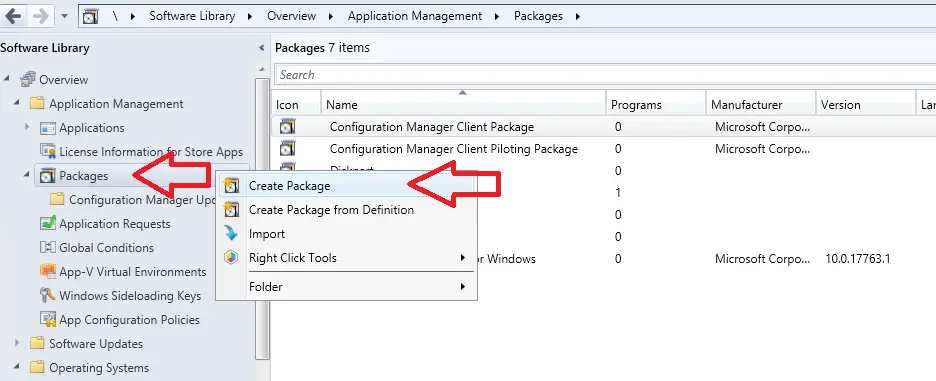
3. Create TSGUI SCCM Package
Now we have finished configuring and testing our GUI we need to create a package in SCCM for the application so we can call it from within a task sequence.
To create the TSGUI package follow these steps
- Log on to your SCCM server
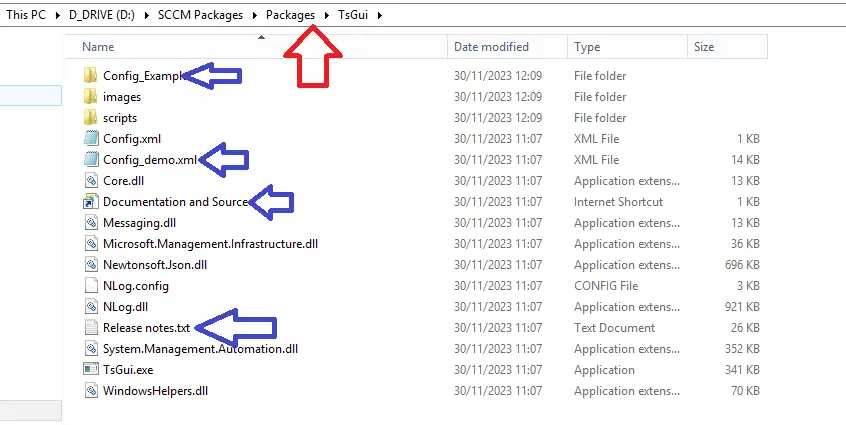
- Copy the TSGui folder to where your SCCM packages are located
- Optional : Remove unwanted files to reduce package size. The files that the blue arrow points to are safe to delete

- Open the SCCM console
- Go to \Software Library\Overview\Application Management\Packages
- Right click packages and select create package

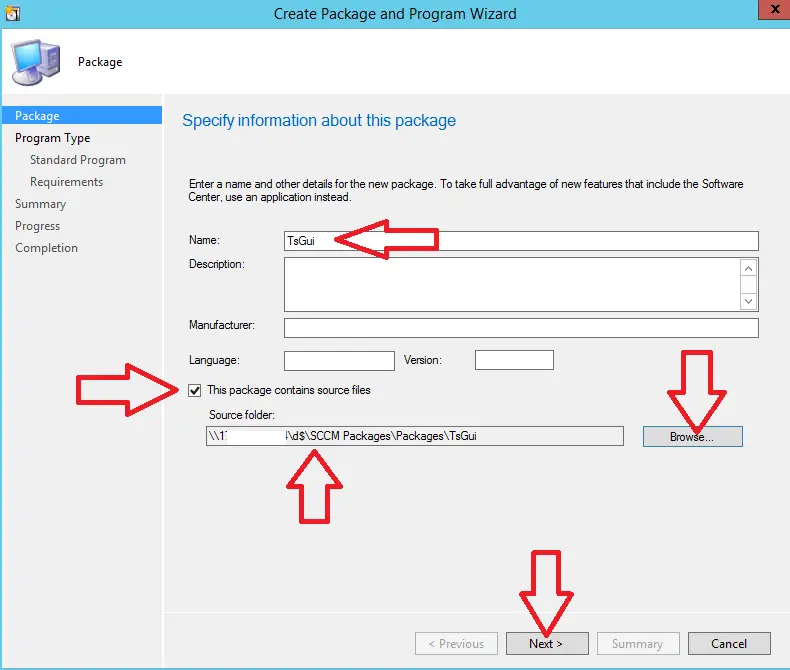
- Give the package a descriptive name
- Tick the box “This package contains source files”
- Click browse and select the folder where you copied the TSGui files to (Has to be a unc path)
- Click next

- Select “Do not create a program”
- Click next

- Click next
- Click close
- Right click on the TsGui package we just created
- Select Distribute Content

- Click next
- Select the SCCM distribution points you want to copy the package to
- Click next
- Click next
- Click close


We have now finished creating the SCCM package TsGui.
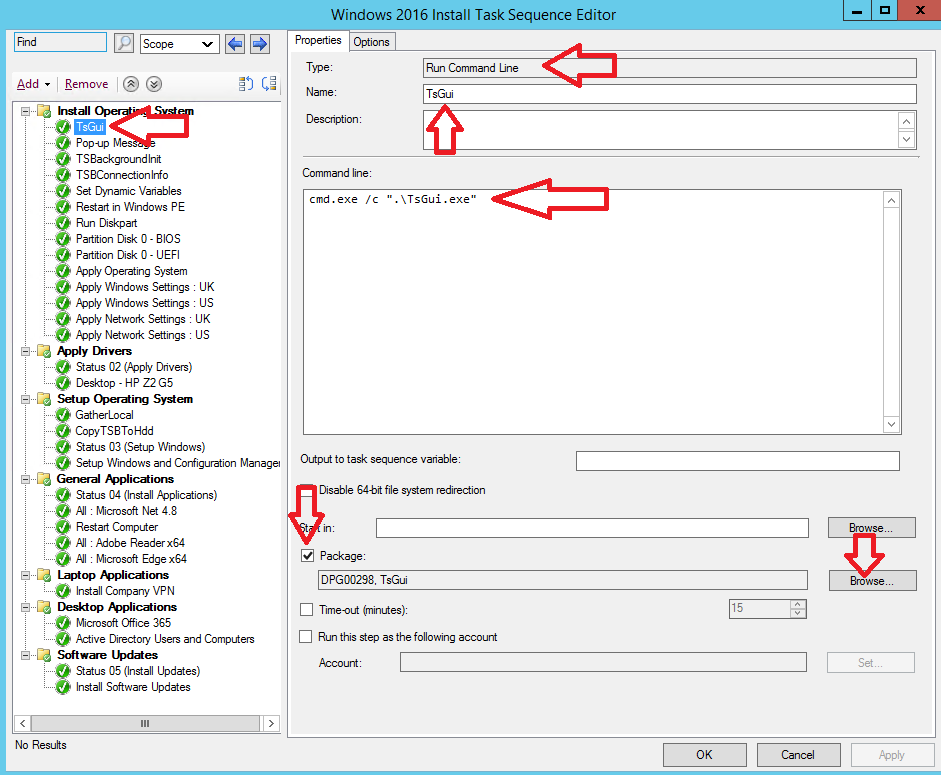
4. Add The TsGui Package To The SCCM Task Sequence
We have now configured the application TsGui with the settings we want, We have also added the TsGui application in to SCCM as a package, The last thing we need to do is add it in to our SCCM task sequence.
To do this follow these steps
- Open the SCCM console
- Go to \Software Library\Overview\Operating Systems\Task Sequences
- Open the required task sequence with edit
- Add a “Run Command Line” step at the very beginning of the task sequence
- Give it a descriptive name such as “TsGui”
- At the command line enter cmd.exe /c “.\TsGui.exe”
- Tick the box to include a package
- Click browse and select the TsGui package we created

- Click ok to save the task sequence
- Run the task sequence on a client
- You will now see the TsGui application as per screenshot below
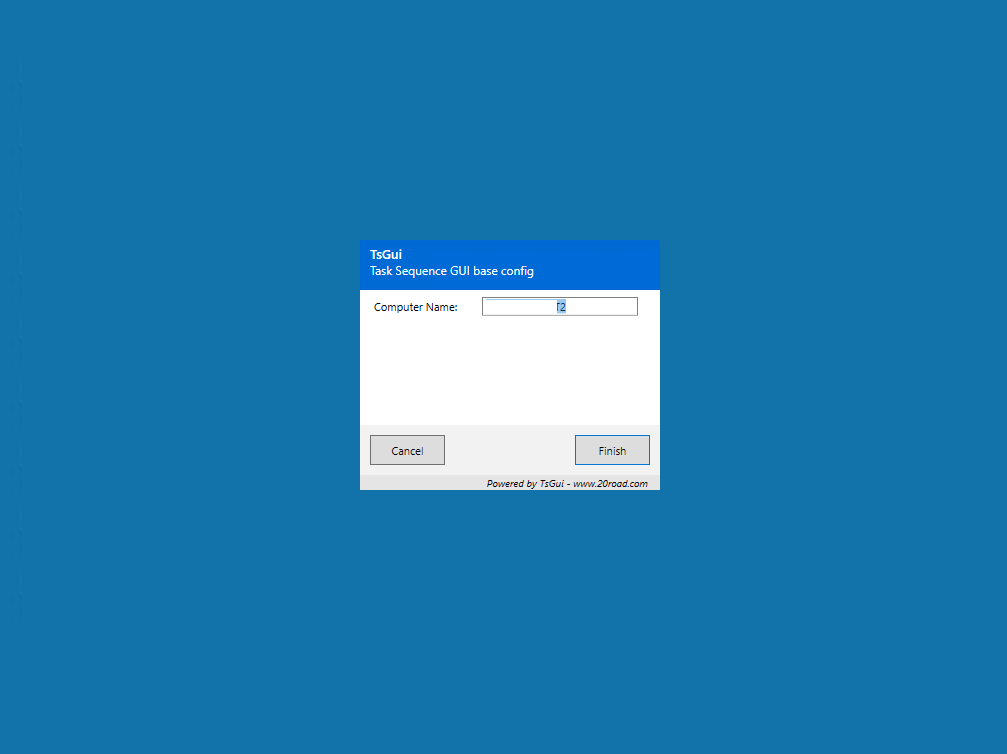
The above Gui only captures the Computer Name, In the next section I will show you how to edit the Gui to your needs.
Don’t worry the process is quite easy.
How To Customise TsGui
TsGui is very powershell and you can customise it to do almost anything you want. Below are the steps you will need to perform to make the changes to the GUI.
I recommend to edit the config.xml in Notepad++ as this will help you with the syntax as shown below. Note you will need to install the Notepad++ Addon “XML Tools”
Changing Header Text
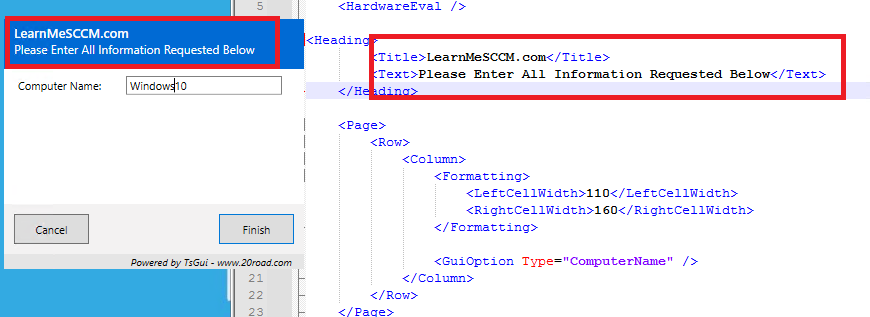
To change the default header text follow these steps
- Open Config.xml with notepad++
- Replace the following code with the text you want to enter
<Title>TsGui</Title>
<Text>Task Sequence GUI base config</Text>

- With something like
<Title>LearnMeSCCM.com</Title>
<Text>Please Enter All Information Requested Below</Text>

- You can test the changes you made by opening the TsGui.exe application
Adding Extra Text Boxes
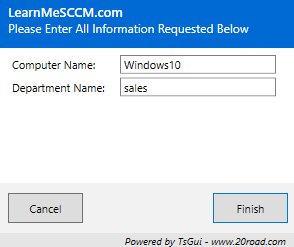
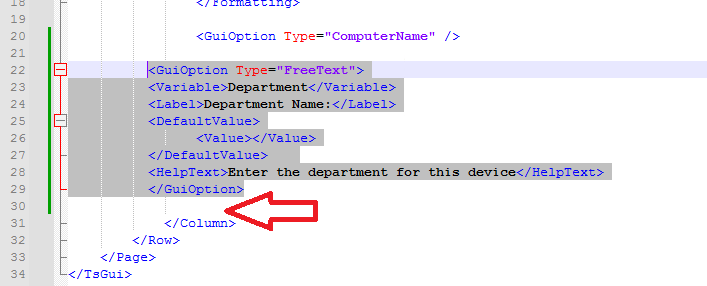
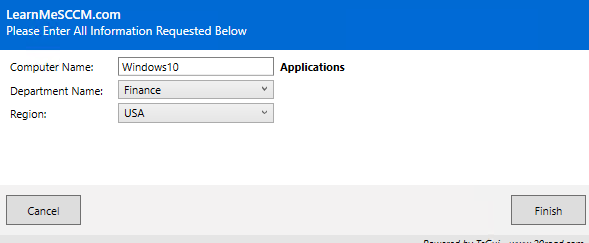
We will now add extra text boxes to the Gui so we can capture extra information. Below is a screenshot of the “Department Name” text box I added.
To add extra text boxes to the Gui follow these steps
- Open Config.xml with notepad++
- Add the following code just before </Column>
<GuiOption Type=”FreeText”>
<Variable>Department</Variable>
<Label>Department Name:</Label>
<DefaultValue>
<Value></Value>
</DefaultValue>
<HelpText>Enter the department for this device</HelpText>
</GuiOption>

- Replace Department with the name of the variable you want to use
- Replace Department Name: with the text you want to display on the Gui
- Replace “Enter the department for this device” with the help text you want to display when the mouse is hovered over this text
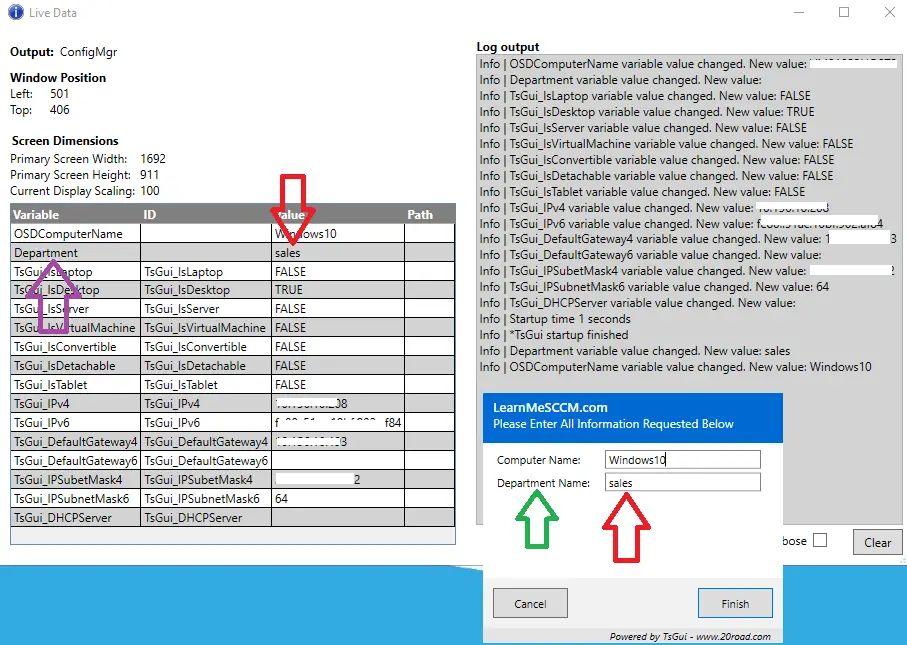
- After making the change open TsGui.exe
- Make sure the Gui looks correct (Below the department shows, green arrow)
- Under Live Data we can see the variable Department has been added (Purple Arrow)
- I entered a department of sales and can see it updated the variable (Red Arrow)

Most cases free text forms are not the best to use because someone could enter the wrong information.
We can configure validation (More on this below) to make sure the correct data is being entered, But in my experience it is best to enter a drop down menu.
Adding A Drop Down Menu
I prefer to use a drop down menu over a free text form because it is much easier for the person to enter the correct information because they just need to select it.
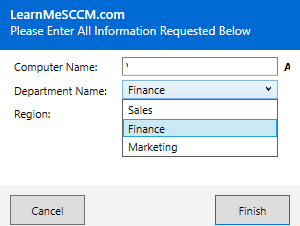
To add a drop down menu follow these steps.
- Open Config.xml with notepad++
- Add the following code just before </Column>
<GuiOption Type=”DropDownList” Sort=”FALSE”>
<Variable>Department</Variable>
<Label>Department Name:</Label>
<SetValue>
<Value>Finance</Value>
</SetValue>
<Option>
<Text>Sales</Text>
<Value>Sales</Value>
</Option>
<Option>
<Text>Finance</Text>
<Value>Finance</Value>
</Option>
<Option>
<Text>Marketing</Text>
<Value>Marketing</Value>
</Option>
</GuiOption> - Replace <Variable>Department</Variable> with the variable name you want to use
- Replace <Label>Department Name:</Label> with the name of the drop down list you want to display on the Gui
- Replace Finance which is in-between the <SetValue> tags with the list item you want to be selected as default
<SetValue>
<Value>Finance</Value>
</SetValue> - Replace the text in-between the <Option> tags with the items you want to add to the drop down list
<Option>
<Text>Sales</Text>
<Value>Sales</Value>
</Option> - Save the config.xml file
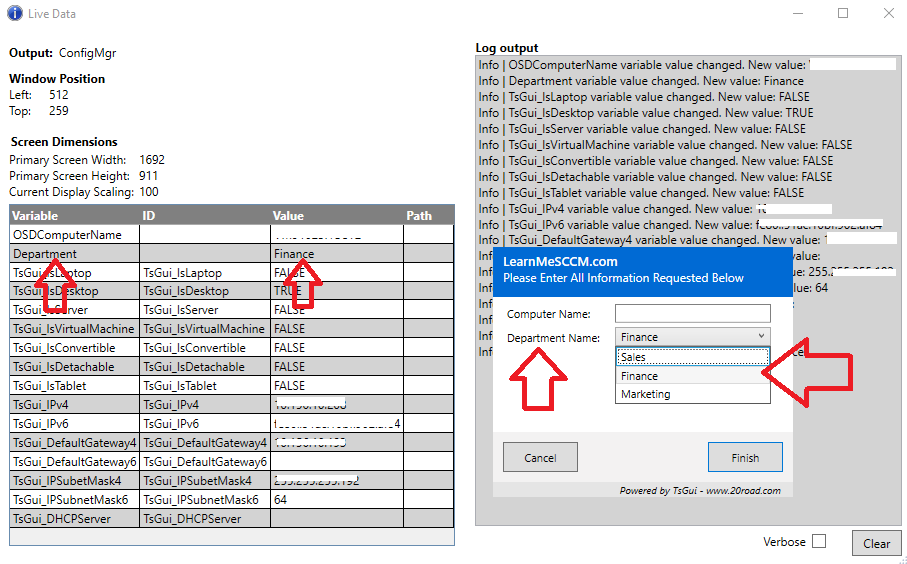
- Double click on TsGui.exe
- Below we can now see the drop down list in Tsgui.exe
Edit Height and Width
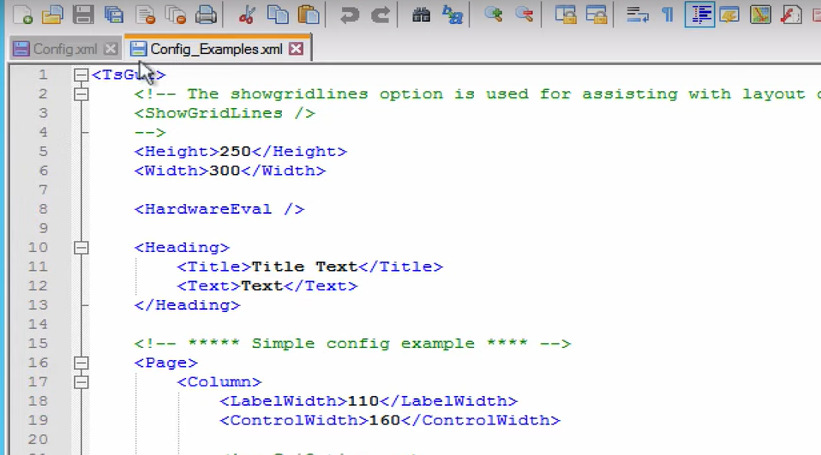
To change the height and width of the Gui is easy all you need to do is edit the below lines of code which are on line 2 and 3.
<Height>250</Height>
<Width>300</Width>
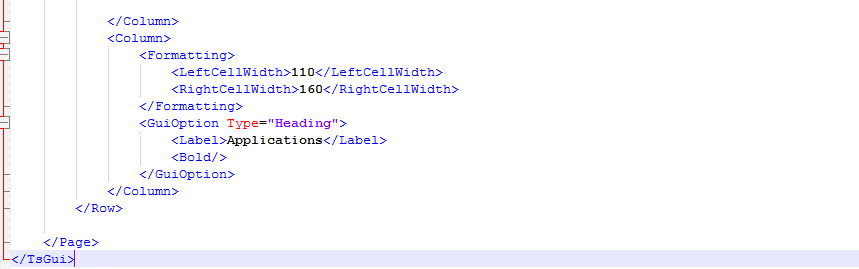
Add An Extra Column
We are now going to add an extra column so we can more options to the Gui. The extra column will look like below
To add an extra Colum follow these steps.
- Open Config.xml with notepad++
- On line 3 replace <Width>300</Width> with <Width>600</Width>
- Add the following code just after the </Column> tag
<Column>
<Formatting>
<LeftCellWidth>110</LeftCellWidth>
<RightCellWidth>160</RightCellWidth>
</Formatting>
<GuiOption Type=”Heading”>
<Label>Applications</Label>
<Bold/>
</GuiOption>
</Column> 
- Save the config.xml file
- Launch TsGui.exe
- Make sure the Gui looks as expected
Add Tick Boxes
I like to add tick boxes in TsGui to allow users to select which applications they want to install.
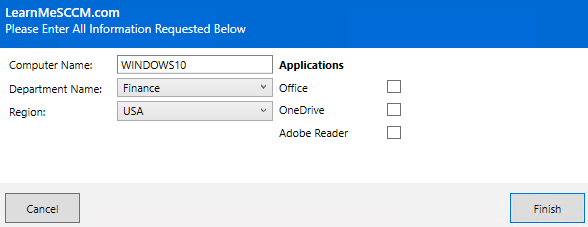
To add tick boxes follow these steps
- Open Config.xml with notepad++
- Add the following code just before the last </Column>
<GuiOption Type=”CheckBox”>
<Variable>App_Office</Variable>
<Label>Office</Label>
<HAlign>left</HAlign>
</GuiOption> - Repeat step 2 for all the applications you want to add
- Save config.xml
- Launch TsGui.exe to make sure everything looks correct
- Notice when you tick the boxes it set the variable to True
Pre Configured Templates
I have a few pre-configures templates which you can copy and paste the code to create your own guis. They are listed below.
General Gui
This is the gui I use in most of the SCCM environments I look after, I usually make one or two small changes to it.
Below is what it look like
Below is the code for it
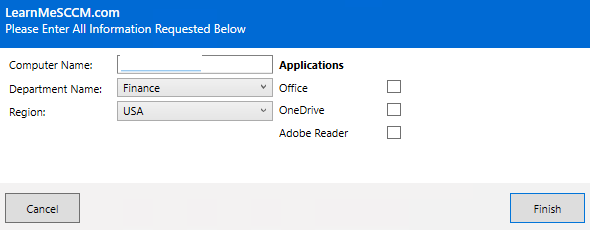
<TsGui LiveData=”TRUE” Output=”ConfigMgr” PurgeInactive=”TRUE”><Height>250</Height><Width>600</Width><HardwareEval /><Heading><Title>LearnMeSCCM.com</Title><Text>Please Enter All Information Requested Below</Text></Heading><Page><Row><Column><Formatting><LeftCellWidth>110</LeftCellWidth><RightCellWidth>160</RightCellWidth></Formatting><GuiOption Type=”ComputerName” /><GuiOption Type=”DropDownList” Sort=”FALSE”><Variable>Department</Variable><Label>Department Name:</Label><SetValue><Value>Finance</Value></SetValue><Option><Text>Sales</Text><Value>Sales</Value></Option><Option><Text>Finance</Text><Value>Finance</Value></Option><Option><Text>Marketing</Text><Value>Marketing</Value></Option></GuiOption><GuiOption Type=”DropDownList” Sort=”FALSE”><Variable>Region</Variable><Label>Region:</Label><SetValue><Value>USA</Value></SetValue><Option><Text>USA</Text><Value>USA</Value></Option><Option><Text>UK</Text><Value>UK</Value></Option><Option><Text>HKG</Text><Value>HKG</Value></Option></GuiOption></Column><Column><Formatting><LeftCellWidth>110</LeftCellWidth><RightCellWidth>160</RightCellWidth></Formatting><GuiOption Type=”Heading”><Label>Applications</Label><Bold/></GuiOption><GuiOption Type=”CheckBox”><Variable>App_Office</Variable><Label>Office</Label><HAlign>left</HAlign></GuiOption><GuiOption Type=”CheckBox”><Variable>App_OneDrive</Variable><Label>OneDrive</Label><HAlign>left</HAlign></GuiOption><GuiOption Type=”CheckBox”><Variable>App_AdobeReader</Variable><Label>Adobe Reader</Label><HAlign>left</HAlign></GuiOption></Column></Row></Page></TsGui>
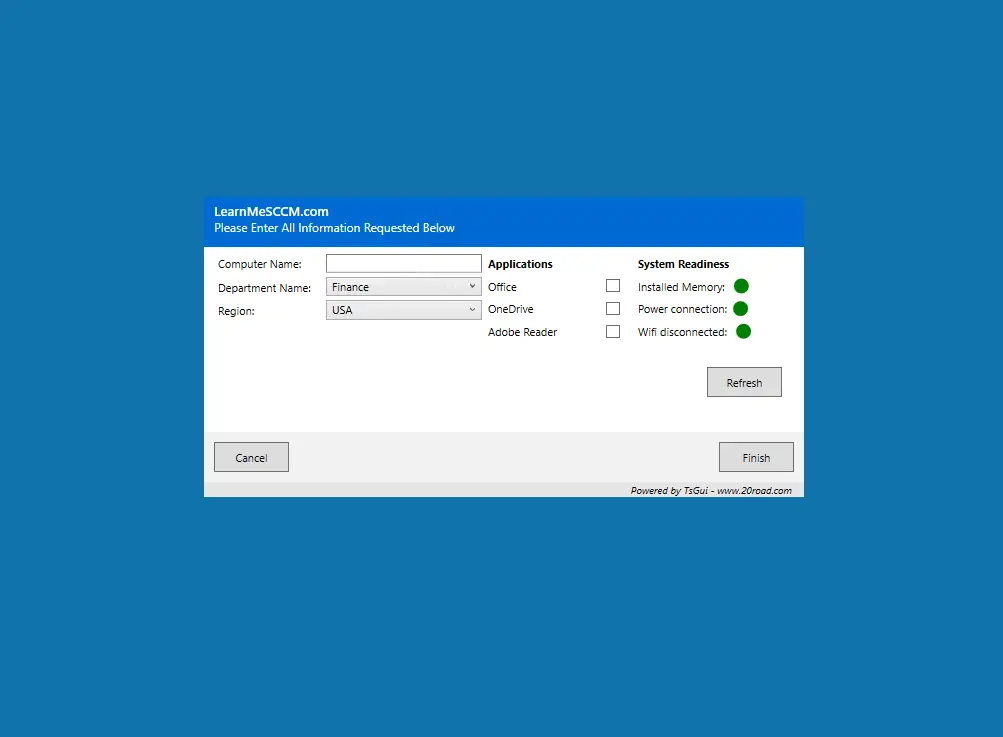
General Gui With System Readiness Check
Below I have added a system readiness check, you can also click the refresh button to refresh the checks.
This can be handy to make sure that when the task sequence is being run the power is connected and wifi is disconnected.
I have had to implement this a few times because our engineers kept forgetting to connect the power to the laptops 🙂
Below is what the screen looks like.
Below is the code I used
<TsGui LiveData=”TRUE” Output=”ConfigMgr” PurgeInactive=”TRUE”><Height>300</Height><Width>600</Width><HardwareEval /><Heading><Title>LearnMeSCCM.com</Title><Text>Please Enter All Information Requested Below</Text></Heading><Page><Row><Column><Formatting><LeftCellWidth>110</LeftCellWidth><RightCellWidth>160</RightCellWidth></Formatting><GuiOption Type=”ComputerName” /><GuiOption Type=”DropDownList” Sort=”FALSE”><Variable>Department</Variable><Label>Department Name:</Label><SetValue><Value>Finance</Value></SetValue><Option><Text>Sales</Text><Value>Sales</Value></Option><Option><Text>Finance</Text><Value>Finance</Value></Option><Option><Text>Marketing</Text><Value>Marketing</Value></Option></GuiOption><GuiOption Type=”DropDownList” Sort=”FALSE”><Variable>Region</Variable><Label>Region:</Label><SetValue><Value>USA</Value></SetValue><Option><Text>USA</Text><Value>USA</Value></Option><Option><Text>UK</Text><Value>UK</Value></Option><Option><Text>HKG</Text><Value>HKG</Value></Option></GuiOption></Column><Column><Formatting><LeftCellWidth>120</LeftCellWidth><RightCellWidth>30</RightCellWidth></Formatting><GuiOption Type=”Heading”><Label>Applications</Label><Bold/></GuiOption><GuiOption Type=”CheckBox”><Variable>App_Office</Variable><Label>Office</Label><HAlign>left</HAlign></GuiOption><GuiOption Type=”CheckBox”><Variable>App_OneDrive</Variable><Label>OneDrive</Label><HAlign>left</HAlign></GuiOption><GuiOption Type=”CheckBox”><Variable>App_AdobeReader</Variable><Label>Adobe Reader</Label><HAlign>left</HAlign></GuiOption></Column><Column><GuiOption Type=”Heading”><Label>System Readiness </Label><Bold/></GuiOption><GuiOption Type=”TrafficLight”><Variable>Compliance_InstalledMemory</Variable><Label>Installed Memory: </Label><PopupShowValue>FALSE</PopupShowValue><GetValue><Query Type=”Wmi”><Wql>SELECT TotalPhysicalMemory from Win32_ComputerSystem</Wql><Property Name=”TotalPhysicalMemory”><Calculate DecimalPlaces=”0″>VALUE/1073741824</Calculate></Property><Separator></Separator></Query></GetValue></GuiOption><GuiOption Type=”TrafficLight”><Variable>Compliance_PowerStatus</Variable><Label>Power connection:</Label><ShowComplianceValue>FALSE</ShowComplianceValue><SetValue><Query Type=”Wmi”><Wql>SELECT BatteryStatus FROM Win32_Battery</Wql><Property Name=”BatteryStatus”/><Separator></Separator></Query></SetValue><Compliance><Message>Please connect the power</Message><DefaultState>Warning</DefaultState><OK><Rule Type=”Contains”>2</Rule><Rule Type=”Equals”>*NULL</Rule></OK></Compliance></GuiOption><GuiOption Type=”TrafficLight”><Variable>Compliance_WifiStatus</Variable><Label>Wifi disconnected: </Label><PopupShowValue>FALSE</PopupShowValue><GetValue><Query Type=”Wmi”><Wql>SELECT * FROM Win32_NetworkAdapter WHERE (AdapterType=”Ethernet 802.3″) AND (NetConnectionStatus=2)</Wql><Property Name=”Name”/><Separator></Separator></Query></GetValue><Compliance><Message>Please disconnect the wifi</Message><DefaultState>Warning</DefaultState><Invalid><Rule Type=”Contains”>Wireless</Rule><Rule Type=”Contains”>Wifi</Rule><Rule Type=”Contains”>WLAN</Rule></Invalid></Compliance></GuiOption><GuiOption Type=”Heading”/><GuiOption Type=”ComplianceRefreshButton”><Formatting><LeftCellWidth>20</LeftCellWidth><RightCellWidth>130</RightCellWidth><Control><HorizontalAlignment>Right</HorizontalAlignment></Control></Formatting><HAlign>left</HAlign></GuiOption></Column></Row></Page></TsGui>
TsGui Error Codes
Whilst installing TsGui I have come across many different errors which I will show you how to resolve below.
If you have an issue with TsGui you are unable to resolve please send me a message by posting in one of my online communities.
There Are No Context Policies
This error message will show when you have loaded the task sequence and the TsGui task sequence step is run.
The source will show as Name:TsGui.exe with a message of There are no context policies. The error will look like the one below. When you click ok the task sequence will fail.
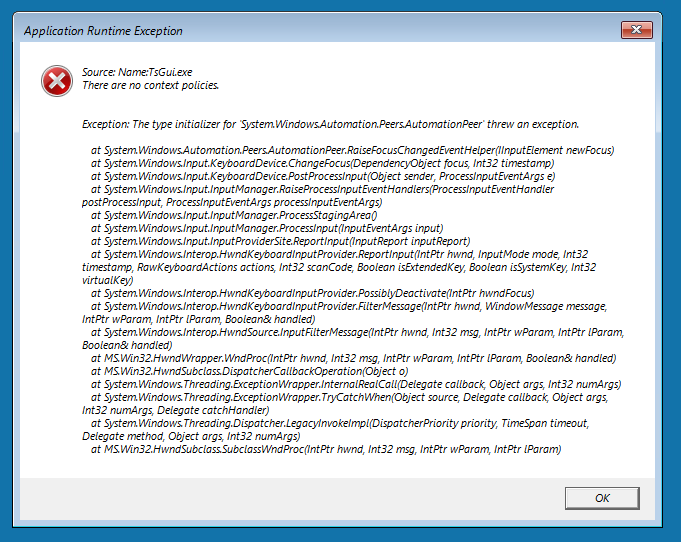
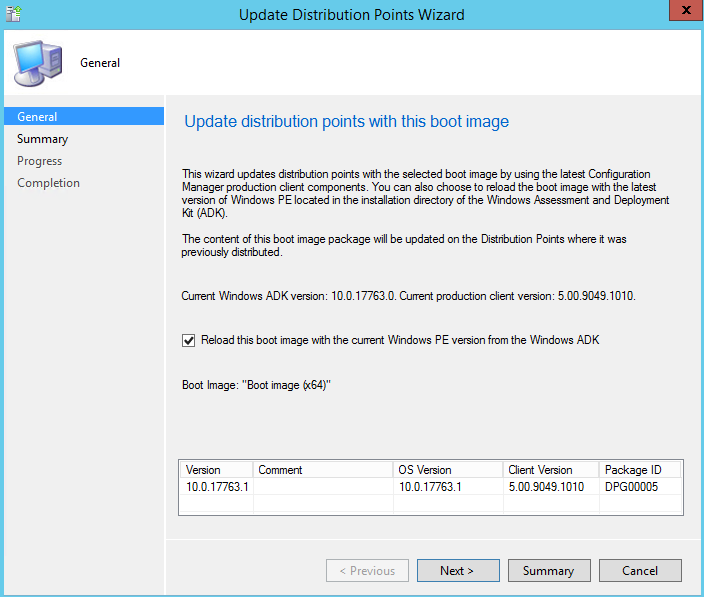
To fix the there are no context policies you need to update the boot image you are using with the latest windows adk version. Tick the box “Reload this boot image with the current windows PE version from the Windows ADK”
0xFFFFFFFF
This error code means the task sequence can not find the TsGui.exe, make sure the package has been distributed to all SCCM distribution points.