
In this article I will show you step by step how to deploy software updates using SCCM.
Over the years I have taken on many SCCM environments where the setup of software updates was a complete mess.
Because of this I have experienced lots of different issues and I have a specific process I use to setup software update deployments which I will teach you today.
In this article you will learn

- Setup Device Collections For Software Updates
- Configure Client Settings
- Create Automatic Deployment Rule
- Enable Peer Caching
- Reporting On Software Update Installs
Pre-Requites
Before we can begin there are some pre-requites we need to make sure have been done. They are
- Installed WSUS On Primary Site Server : This is to get information about the software updates available, if you need help with this check out this guide I wrote on how to install wsus
- Installed Software Update Point Role On Primary Site Server : SCCM will use this role to communicate with WSUS to get software update information as well as some base settings for software updates. I also have written an article on how to install the software update point
When the pre-requites are met we can begin.
How To Deploy Software Updates Using SCCM
Below I am going to show you the exact process I use when I setup software update deployments for my clients when I am contracted with them as a consultant.
My clients pay me for the information I am about to share below.
To setup software update deployments in SCCM follow these steps.
1 : Create Software Updates Folder
First thing we are going to do is create a folder for software updates in the device collections section. This is to make it easier in the future if you need to find any device collection related to software updates.
To create a software updates folder follow these steps
- Open the SCCM Console
- Go to \Assets and Compliance\Overview\Device Collections
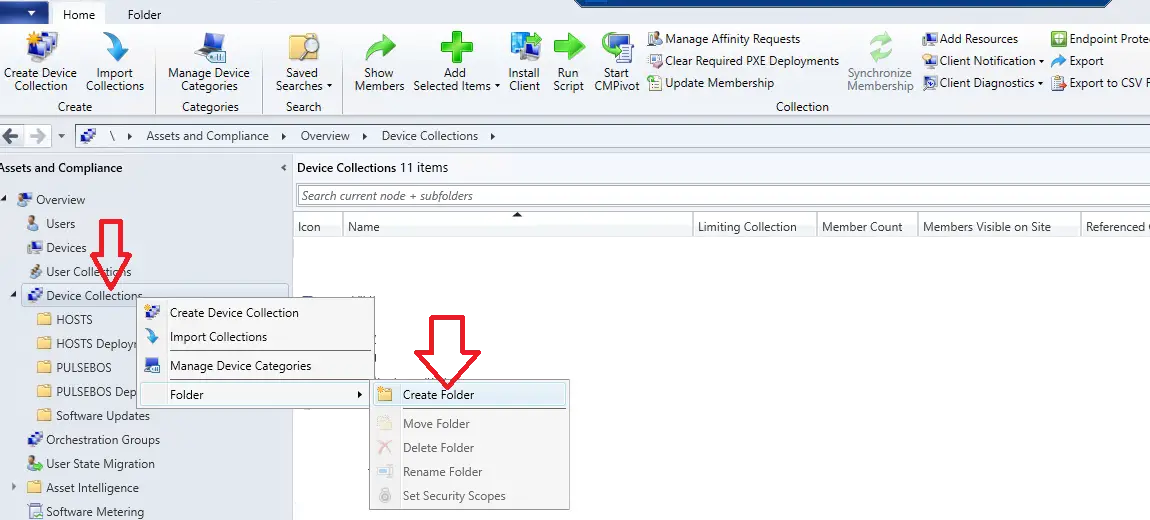
- Right click on Device collections
- Click Folder > Create Folder

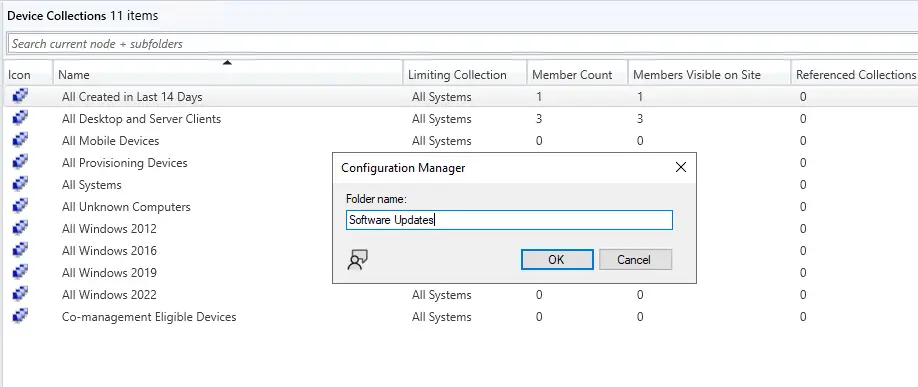
- Enter the name “Software Updates” and click ok

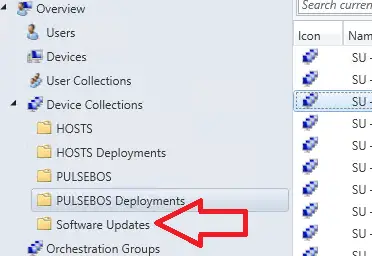
- Confirm the folder was created

2 : Create Device Collections
We are going to start by creating the device collections for the software update process, these device collections will be used to do the following
- Disable Software Updates : Devices put in to this device collection will not get any software updates
- Download Patches : This collection will be used to deploy the software updates to
- Set Maintenance Window : Set maintenance window for when the software updates can install
- All Machines Not Being Patched : So we can know about the machines not currently setup for receiving updates
I will create the device collections one by one and will explain exactly what each one does.
1.1 : Disable Software Updates
Here we will create a device collection so that any sccm client that is in this device collection will not get any software updates.
This can then be used for any machines that you do not want to receive patches.
To create the disable software updates device collection follow these steps
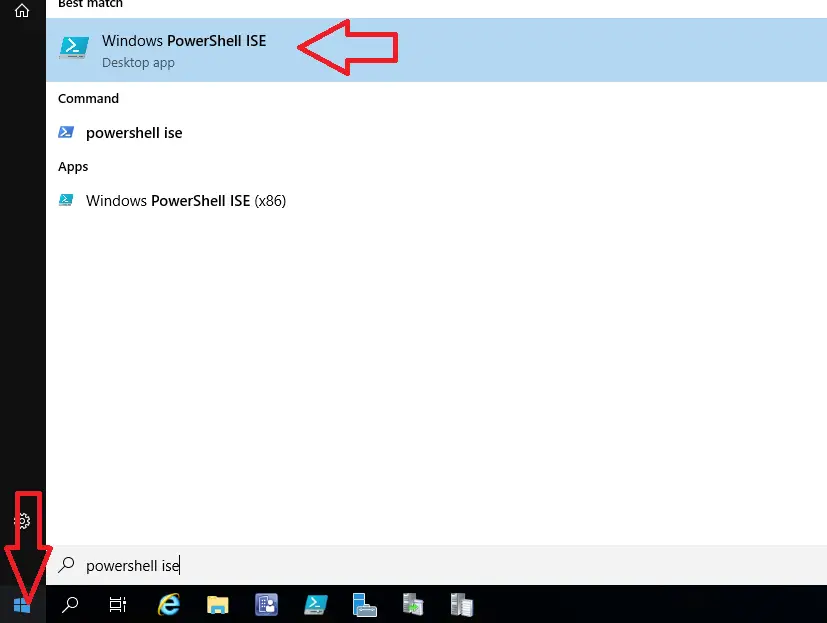
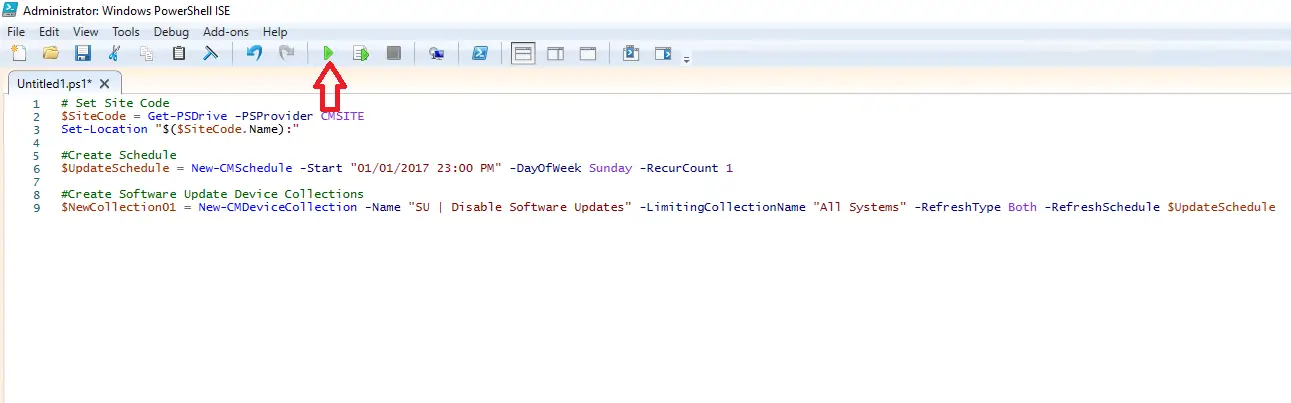
- Open Powershell ISE via the start menu

- Enter the below code in to powershell
# Set Site Code
$SiteCode = Get-PSDrive -PSProvider CMSITE
Set-Location “$($SiteCode.Name):”#Create Schedule
$UpdateSchedule = New-CMSchedule -Start “01/01/2017 23:00 PM” -DayOfWeek Sunday -RecurCount 1#Create Software Update Device Collections
$NewCollection01 = New-CMDeviceCollection -Name “SU | Disable Software Updates” -LimitingCollectionName “All Systems” -RefreshType Both -RefreshSchedule $UpdateSchedule - Replace the device collection name “SU | Disable Software Updates” if you want to use another name
- Click run in powershell, the script usually fails the first time so run it twice

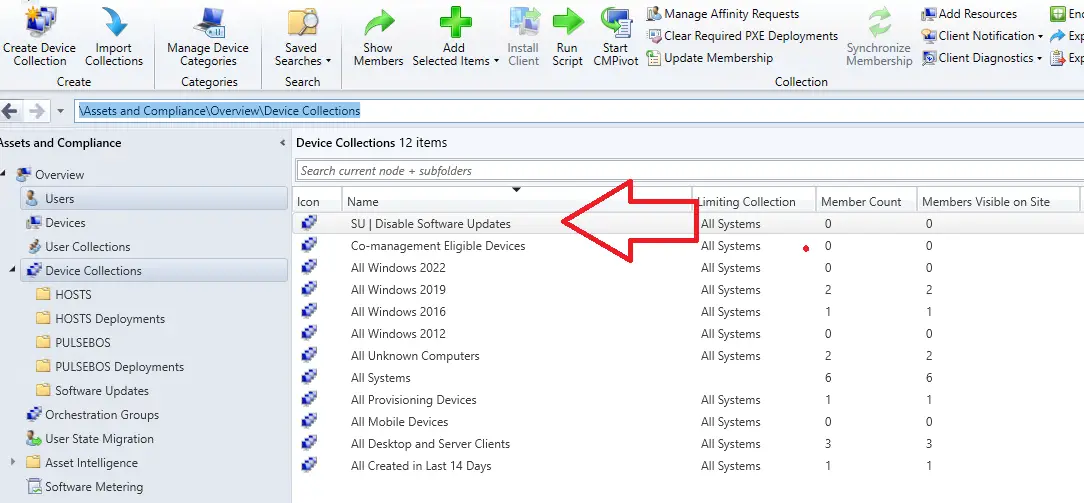
- In the SCCM console go to \Assets and Compliance\Overview\Device Collections
- Confirm the device collection was created

1.2 : Create Patch Groups
Below we are going to create three patch groups
- SU | Test Machines : These machines will receive software updates first
- SU | Test Machines Extended : These will receive software updates a week later
- SU | All Patched Machines : These will receive software updates two weeks later
To create these groups follow these steps
- Enter the below code in to powershell
# Set Site Code
$SiteCode = Get-PSDrive -PSProvider CMSITE
Set-Location “$($SiteCode.Name):”#Create Schedule
$UpdateSchedule = New-CMSchedule -Start “01/01/2017 23:00 PM” -DayOfWeek Sunday -RecurCount 1#Create Software Update Device Collections
$NewCollection01 = New-CMDeviceCollection -Name “SU | Test Machines” -LimitingCollectionName “All Systems” -RefreshType Both -RefreshSchedule $UpdateSchedule
$NewCollection01 = New-CMDeviceCollection -Name “SU | Test Machines Extended” -LimitingCollectionName “All Systems” -RefreshType Both -RefreshSchedule $UpdateSchedule
$NewCollection01 = New-CMDeviceCollection -Name “SU | All Patched Machines” -LimitingCollectionName “All Systems” -RefreshType Both -RefreshSchedule $UpdateSchedule#Add Exclude Collection
Add-CMDeviceCollectionExcludeMembershipRule -CollectionName “SU | Test Machines” -excludeCollectionName “SU | Disable Software Updates”
Add-CMDeviceCollectionExcludeMembershipRule -CollectionName “SU | Test Machines Extended” -excludeCollectionName “SU | Disable Software Updates”
Add-CMDeviceCollectionExcludeMembershipRule -CollectionName “SU | All Patched Machines” -excludeCollectionName “SU | Disable Software Updates”Add-CMDeviceCollectionExcludeMembershipRule -CollectionName “SU | All Patched Machines” -excludeCollectionName “SU | Test Machines”
Add-CMDeviceCollectionExcludeMembershipRule -CollectionName “SU | All Patched Machines” -excludeCollectionName “SU | Test Machines Extended”
Add-CMDeviceCollectionExcludeMembershipRule -CollectionName “SU | Test Machines Extended” -excludeCollectionName “SU | Test Machines” - Replace the device collection names if you want to use another name
- Click run in powershell, the script usually fails the first time so run it twice
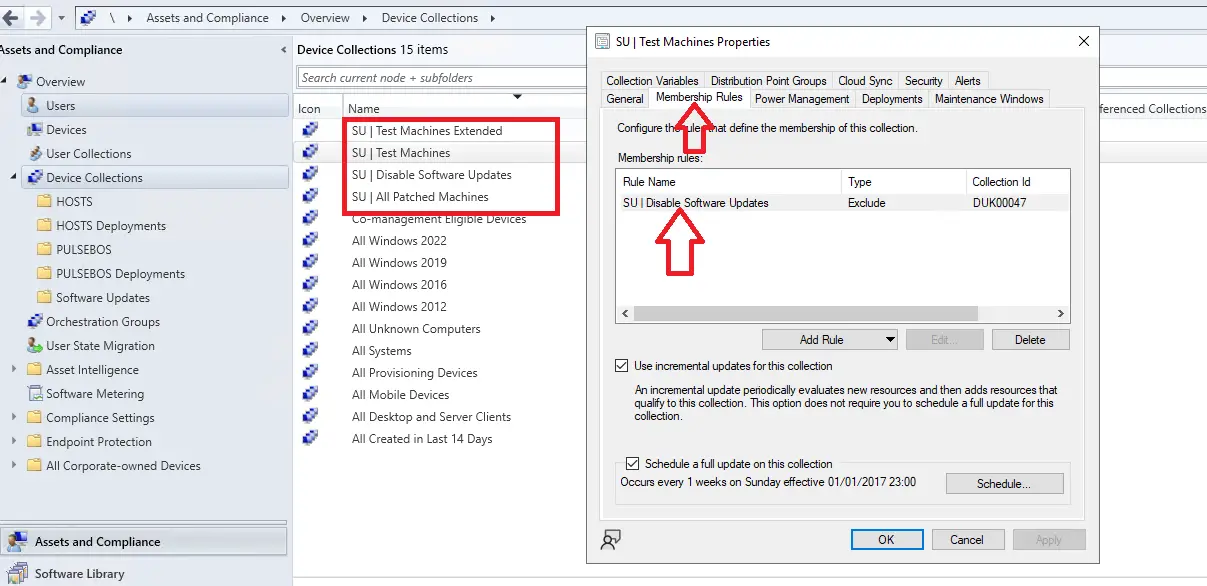
- In the SCCM console go to \Assets and Compliance\Overview\Device Collections
- Confirm the device collections were created
- Then right click on one, Click Membership Rules tab, confirm you can see the “SU | Disable Software Updates” collection
- Click ok to close the properties box

1.3 : Create Maintenance Windows
A maintenance window is a set time when machines can do things such as install software and software updates. We are now going to configure the maintenance windows for the device collections we just created.
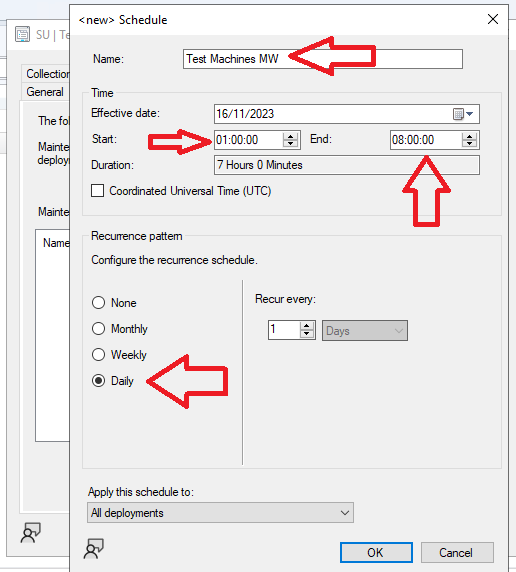
We will configure the “SU | Test Machines” maintenance window first, We will configure it to be able to install patches every day between 01:00 and 08:00. We will use “Wake On LAN” to wake the machines up so they can install software updates out of hours.
To add maintenance windows on to the device collections we just created follow these steps
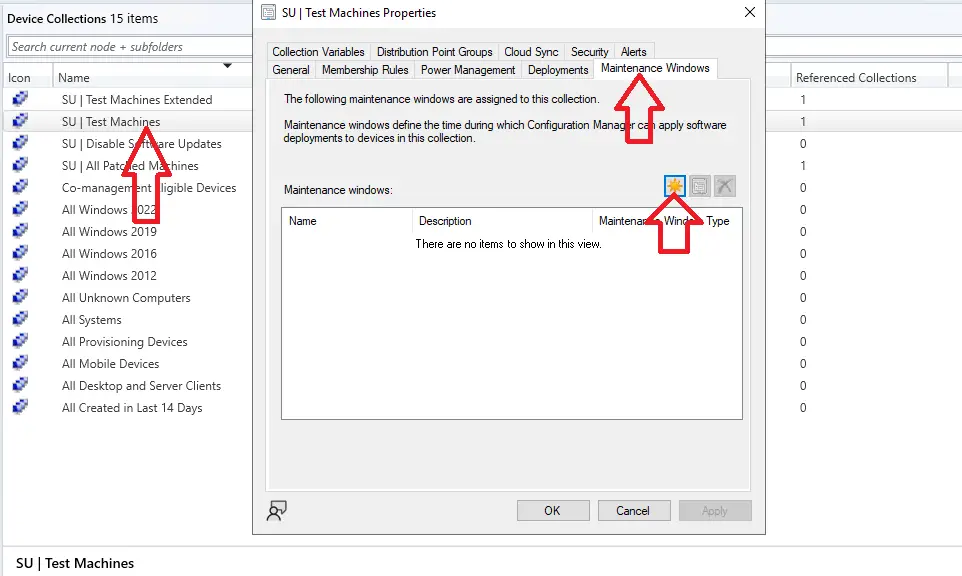
- In the SCCM console go to \Assets and Compliance\Overview\Device Collections
- Right click on “SU | Test Machines” and click properties
- Click the maintenance windows tab
- Click the sun icon

- Give the maintenance window a descriptive name
- Set the start time to 01:00 (Or What ever time you require)
- Set the end time to 08:00 (Or What ever time you require)
- Click Daily
- Make sure 1 day is selected

- Click ok
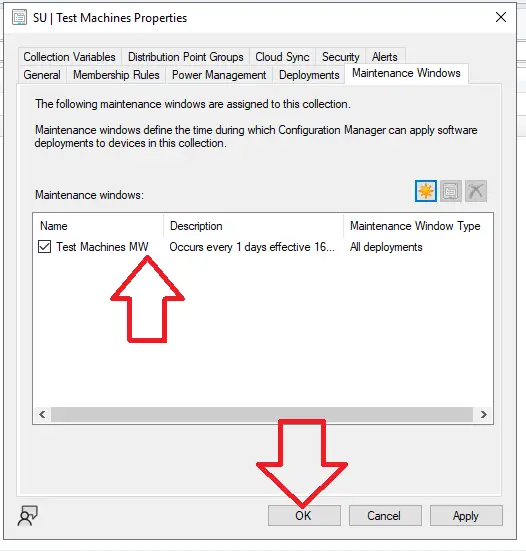
- Confirm the maintenance window has been set
- Click ok to save the changes

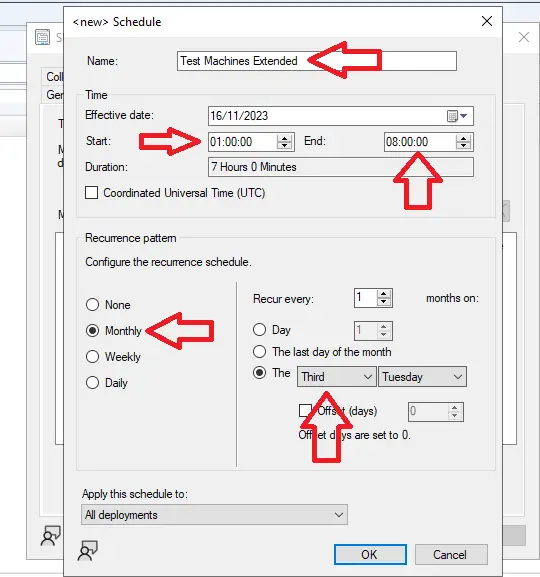
Next we will set the maintenance window for the “SU | Test Machines Extended” group. This group will install the software updates one week after patch tuesday.
To configure the maintenance window for the “SU | Test Machines Extended” group follow these steps
- In the SCCM console go to \Assets and Compliance\Overview\Device Collections
- Right click on “SU | Test Machines” and click properties
- Click the maintenance windows tab
- Click the sun icon
- Fill out the details same as before
- This time select monthly, recur the third Tuesday of the month

- Click ok
- Confirm the maintenance window has been set
- Click ok to save the changes
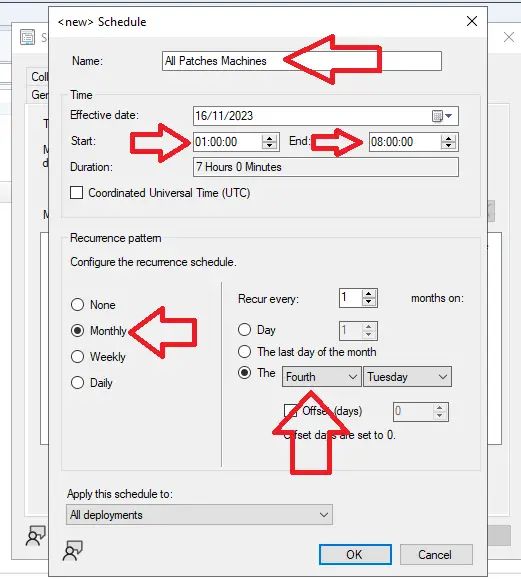
Now we will configure the “SU | All Patched Machines” maintenance window. Repeat the steps above but select the fourth Tuesday of the month. I also recommend to add more maintenance windows for fourth Wednesday + Thursday + Friday of the month.
If you need help with any of these settings please post a question in one of the below communities and I will help you out.
Next we need to move the device collections
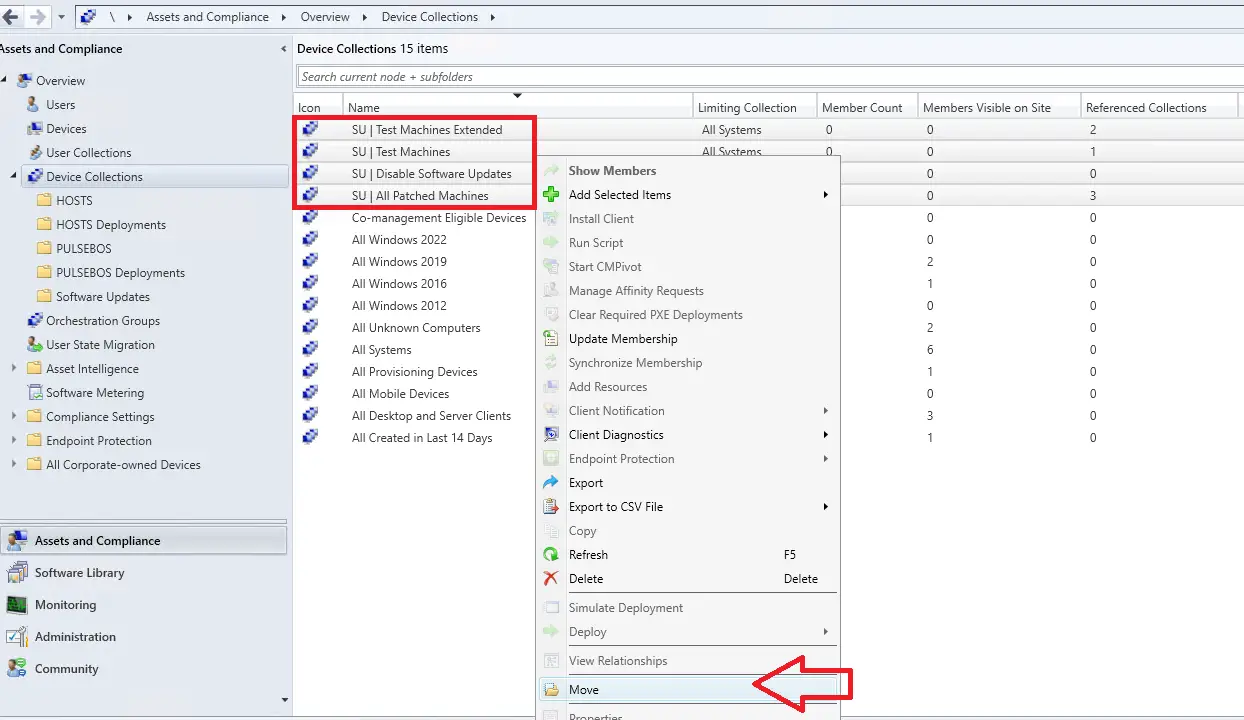
1.4 : Move Device Collections
The last thing we need to do is move the device collections we created in to the “Software Updates” folder we created.
- In the SCCM console go to \Assets and Compliance\Overview\Device Collections
- Highlight the device collections we just created
- Right click and select move

- Select Software Updates and click ok
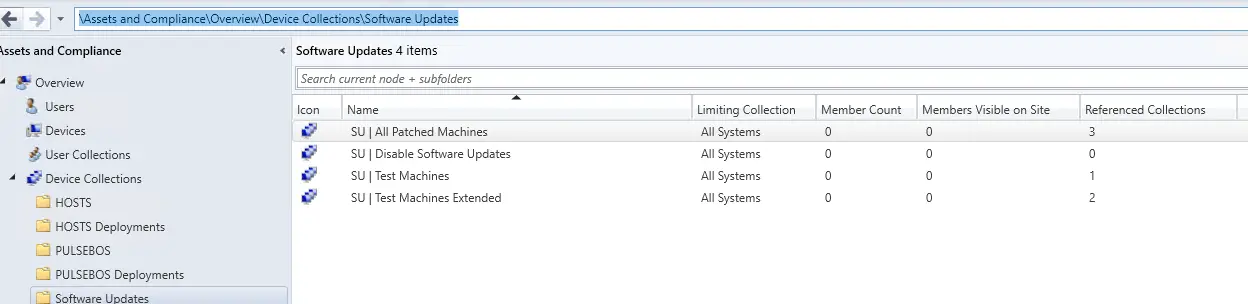
- Go to \Assets and Compliance\Overview\Device Collections\Software Updates
- Confirm the device collections moved correctly

3 : Configure Client Settings
There are many settings we need to set in the SCCM Client Settings section which will increase the success rate of software updates getting installed.
In my experience over the years I have found that changing the client settings as per below will reduce the amount of failures you will get.
To edit the client settings do the following.
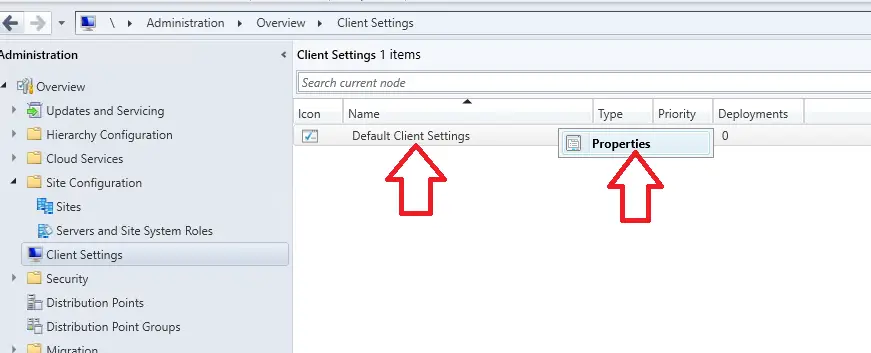
- Open the SCCM console
- Go to \Administration\Overview\Client Settings
- Right click on Default Client Settings and select properties

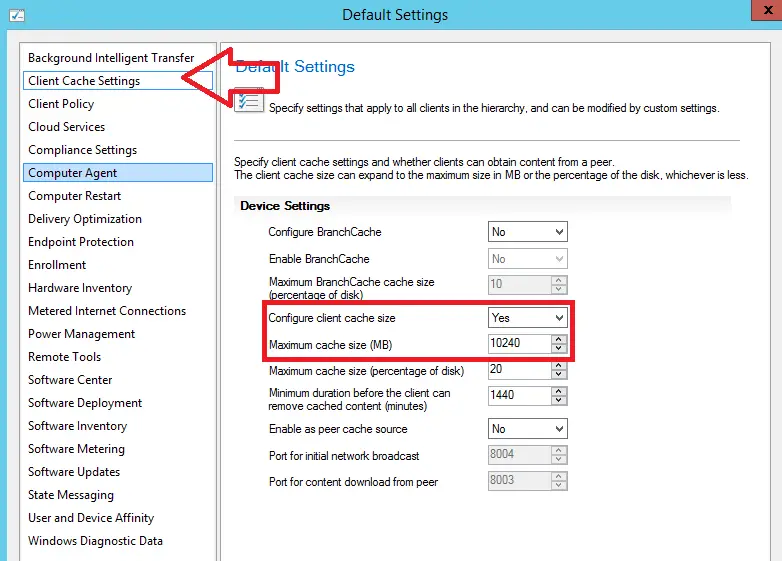
- Click “Client Cache Settings” on the left
- Make sure “Configure Client Cache Size” is set to YES
- Enter 10240 for the “Maximum Cache Size (MB)” This will increase the default amount of SCCM cache a client can store

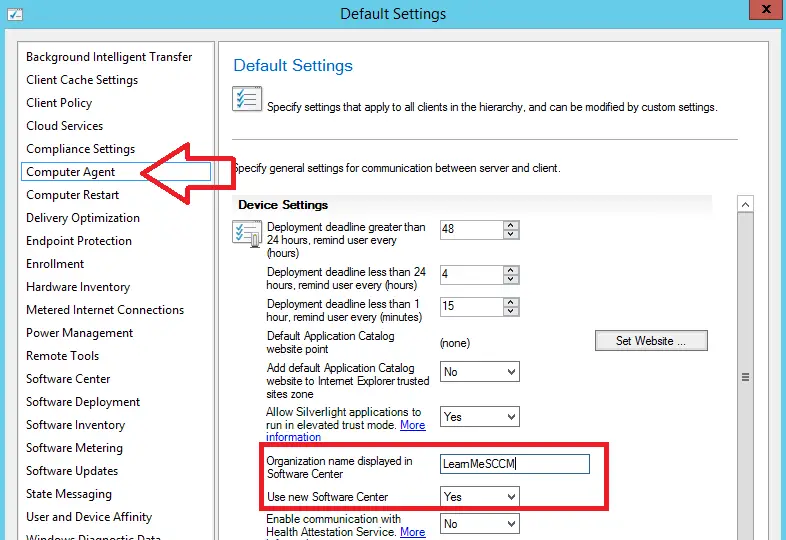
- Click on “Computer Agent”
- Enter an organization name
- Make sure “Use New Software Center” is set to yes

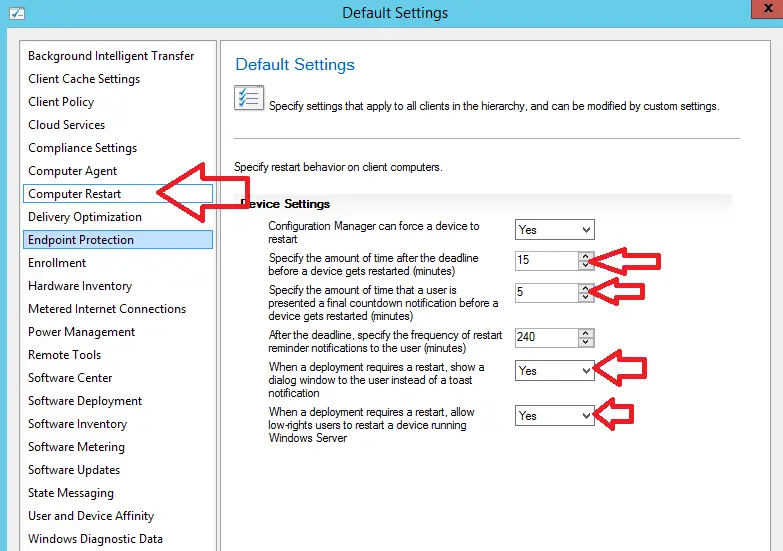
- Click on “Computer Restart”
- In this guide I will configure the software updates to install out of hours, so I am going to configure short notification time for reboots. If you plan to push out software updates in hours I recommend to increate the time the user gets to reboot the system
- Set “Specify the amount of time after the deadline before a device gets restarted” to 15 minutes, or 120 if pushing software updates when users are logged on to the machine. The user will get a message the system needs to reboot and they have 120 minutes before a reboot is forced.
- Set “Specify the amount of time that a user is presented a final countdown” this is a prompt to reboot that a user can not supress, I recommend to set this to 5 or 30 if pushing software updates when users are logged on to the machine.
- Set the last two options to yes

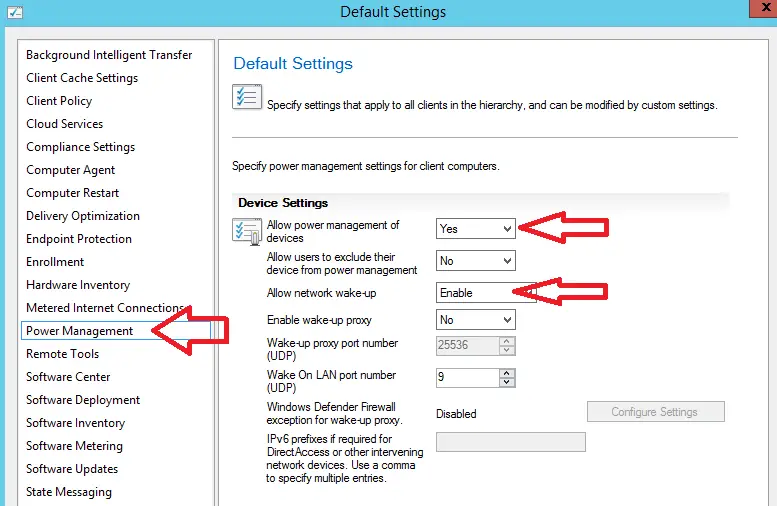
- Click on “Power Management”
- set “Allow power management of devices” to yes
- Set “Allow network wake-up” to Enable, this will enable the client machines to be woken up when software updates are pushed out of hours

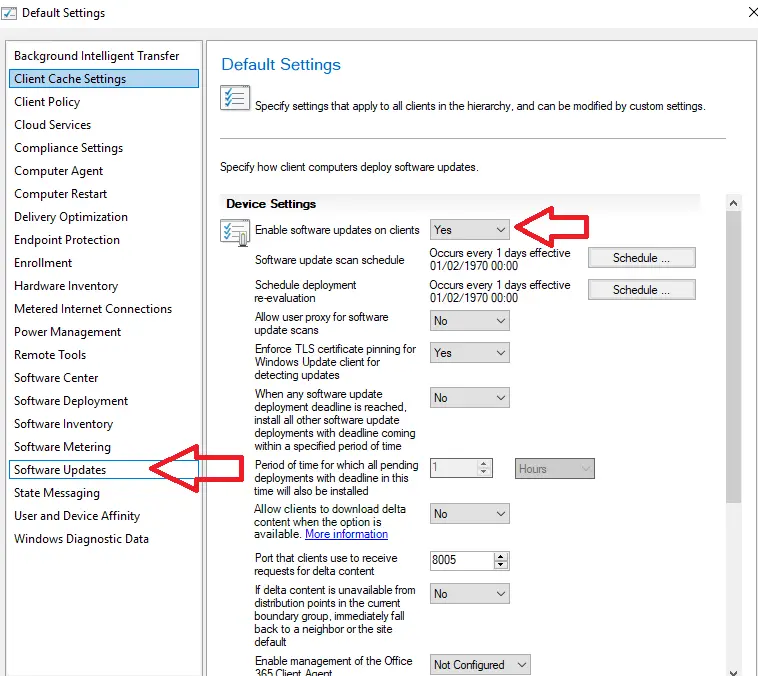
- Click On “Software Updates”
- Make sure “Enable software updates on clients” is set to yes
- Confirm all other settings are as per below

4 : Create Automatic Deployment Rule
We are now going to create an automatic deployment rule, also known as an ADR.
An automatic deployment rule can be configured to automatically run at a certain time, the rule will apply the latest software updates to a group and then deploy to the device collections.
To create an automatic deployment rule do the following
- Log in to the SCCM console
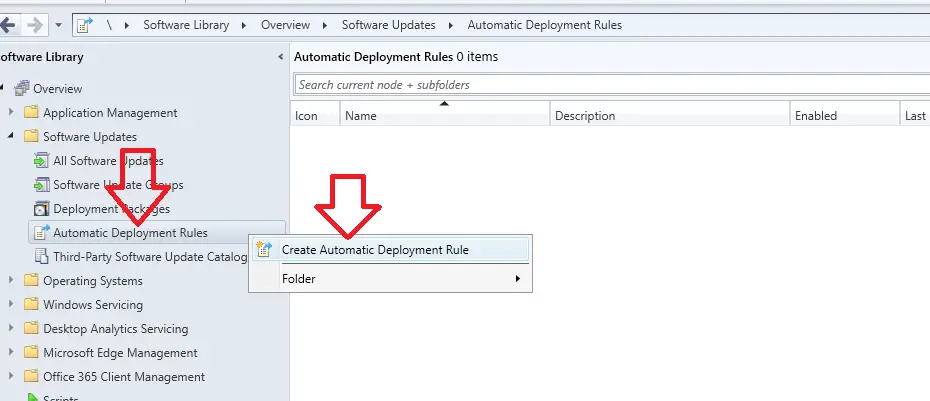
- Go to \Software Library\Overview\Software Updates\Automatic Deployment Rules
- Right click on “Automatic Deployment Rules” then select “Create Automatic Deployment Rule”

- IMPORTANT : If you are deploying software updates to more than 1 product I highly recommend you to create a separate ADR for each product.
- Below I am creating an ADR to deploy updates to Windows 2016 machines, if you want to deploy to windows 10 machines create a separate ADR for windows 10 updates.
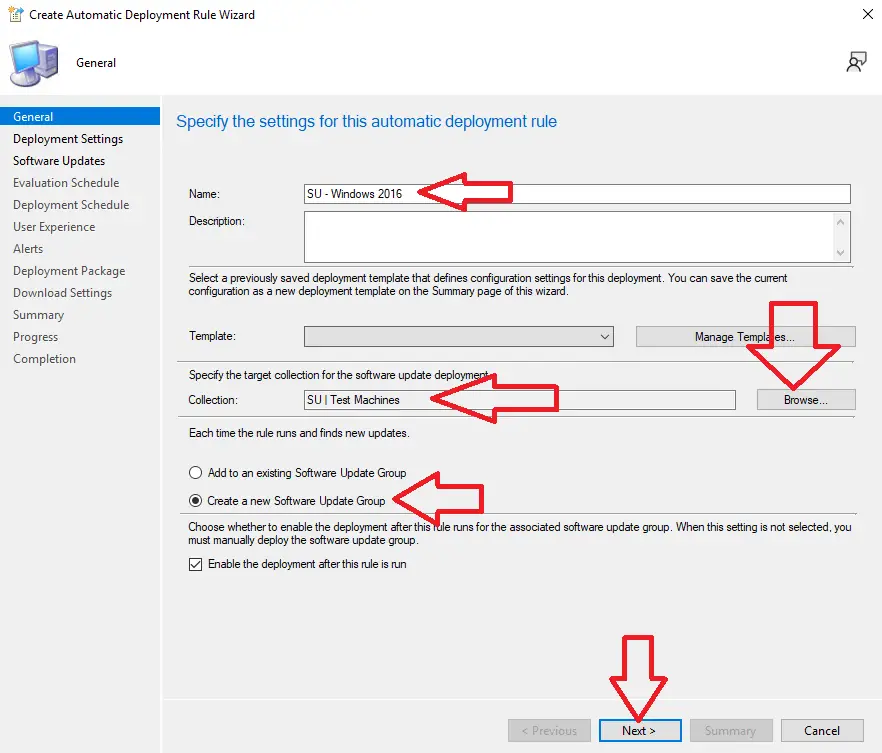
- Give the ADR a descriptive name. Below I used “SU – Windows 2016”
- Click browse and select the “SU | Test Machines” collection
- Select “Create a new Software Update Group”
- Click next

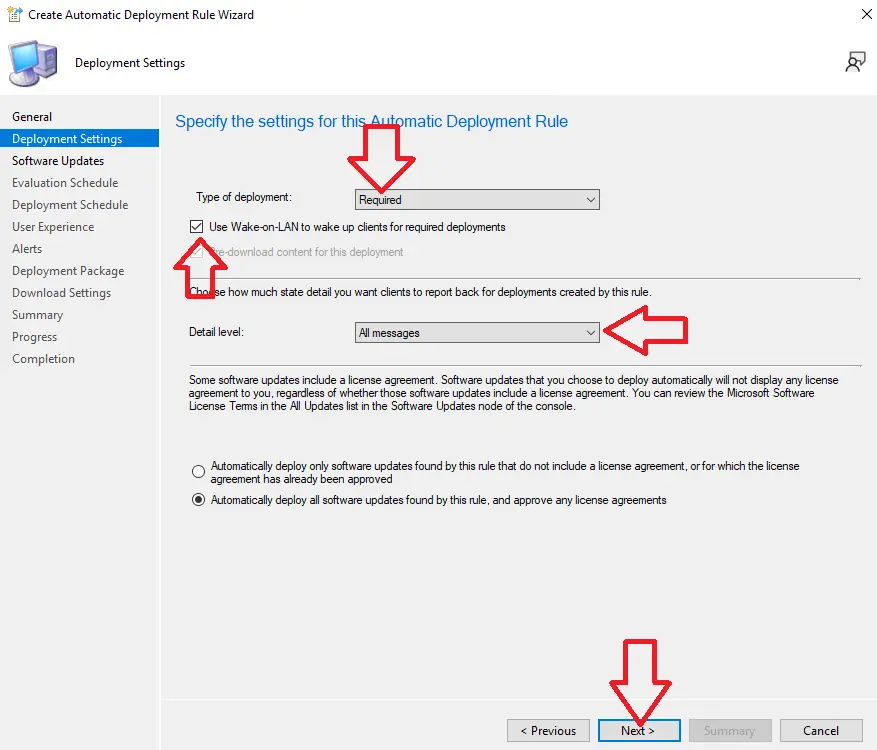
- On the deployment settings screen make sure required is selected (Required means the software updates automatically install, Available means they need to be manually installed on the client in system center)
- Tick the box “Use Wake-on-LAN to wake up clients” this will wake up the clients when we push out the updates at 1am
- In my experience it is best to select “All messages” as this will give you the most detail on the software updates install status
- Click next

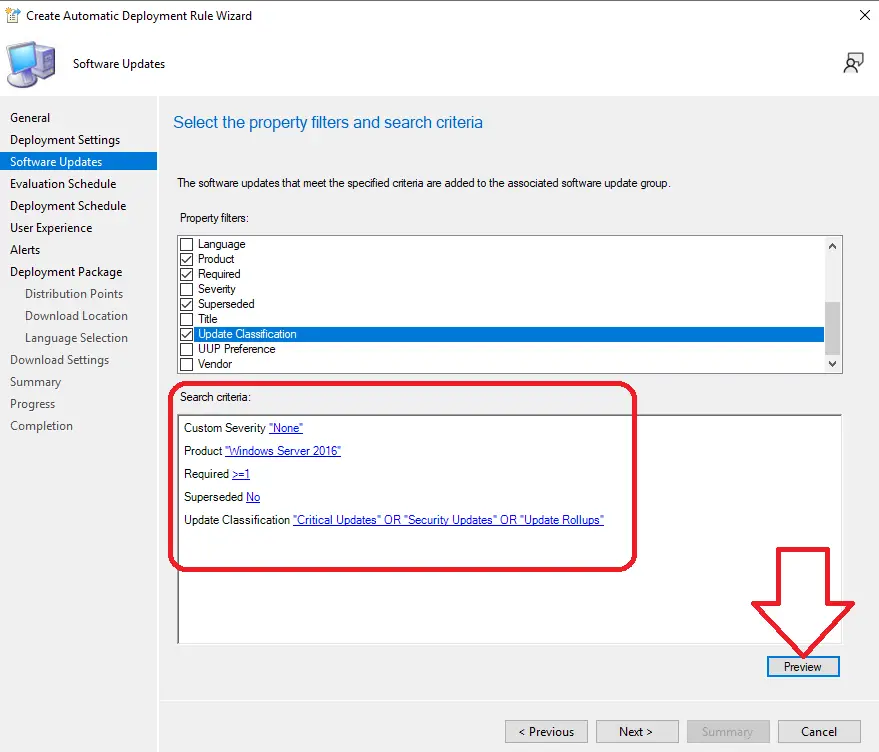
- Here we need to specify the filters for the software updates we want to deploy. We only want to download the updates we need so in my experience I have found the below filter the best to use.
- Product = Select only 1 product, Below I have selected Windows Server 2016
Custom Severity = Set to none, we will use this to exclude single software updates from being installed if we need to in the future.
Required = Set >=1 This will only download an update if there is a machine that required it to be installed
Superseded = No We dont want to download superseded updates as they will never install
Update Classification : Select Critical Updates, Security Updates and Update Rollups - Click Preview
 This will now show all the updates that are available to deploy for your ADR
- Click close

- Click next
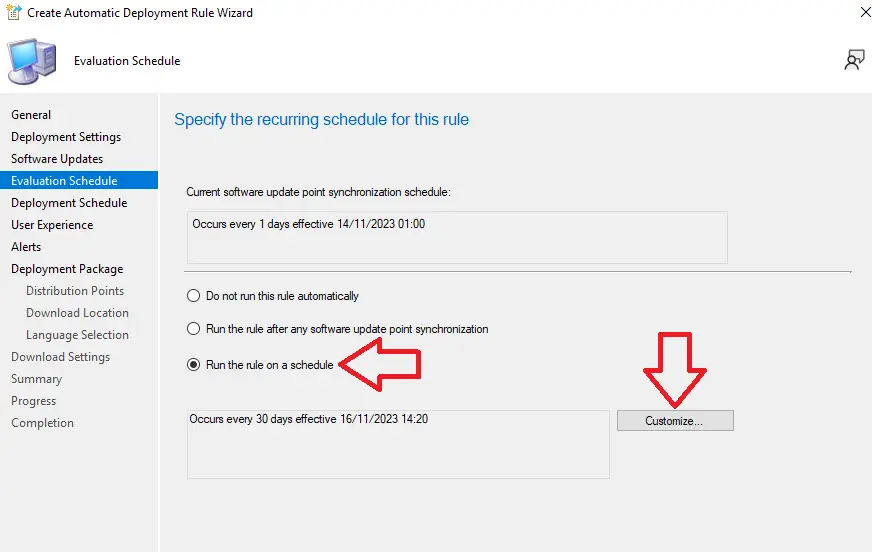
- Select “Run the rule on a schedule” click customize
- If you want to manually run the ADR then select “Do not run this rule automatically”

- There are a few things that need to happen for the SCCM ADR to find new patches which is,
2nd Tuesday Of The Month at 23:30 : WSUS needs to run and complete a sync
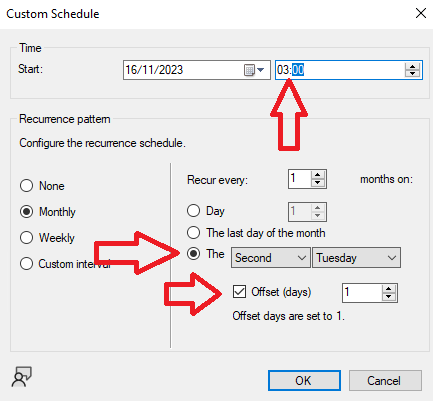
SCCM Software Update Synchronize at every day at 01:00 : Should take 30 minutes to complete - In the custom schedule I like to set the time to run at 03:00 as this gives plenty of time for the WSUS and SCCM syncs to complete
- Then run on the second tuesday with 1 off set day. An off set day is +1 day, so it will run on a wednesday at 03:00
- Do not set the recurrence to the second wednesday of the month because sometime the 2nd wednesday comes before the 2nd tuesday
- Click ok

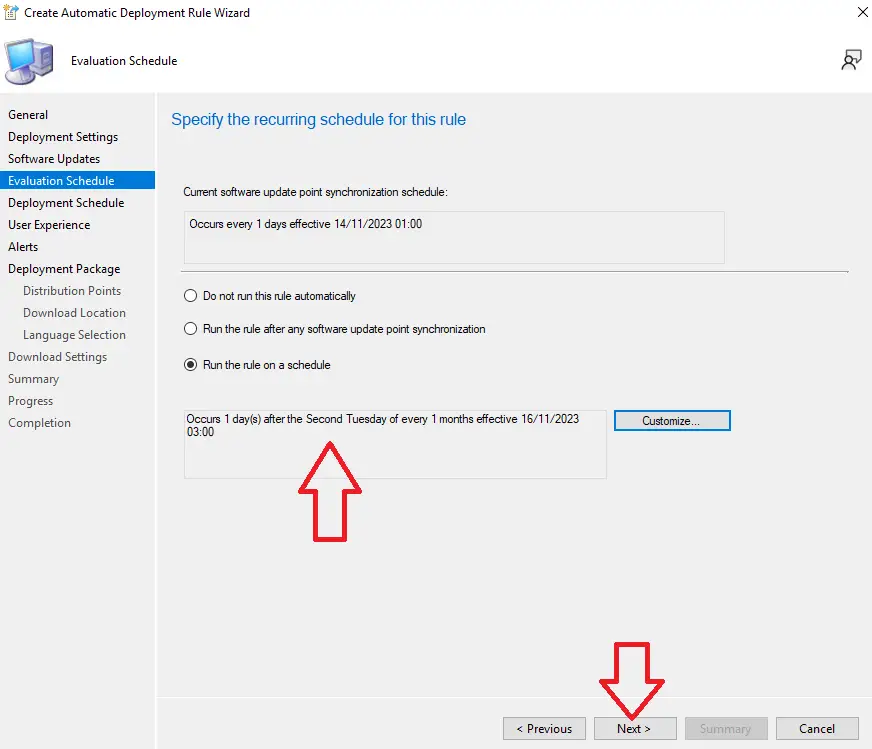
- Confirm the schedule
- Click next

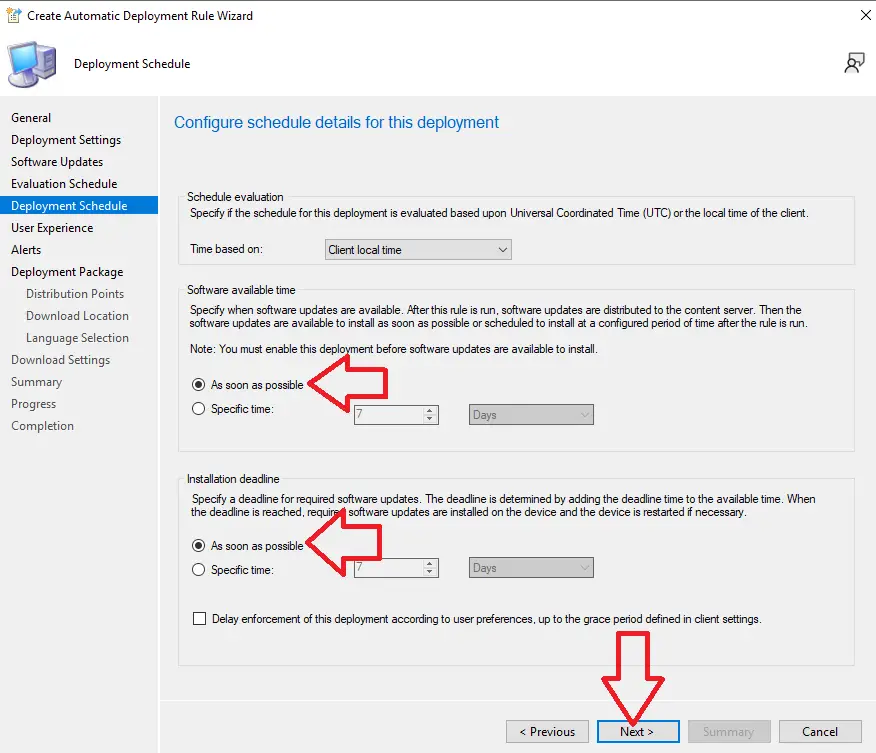
- Select as soon as possible for both settings
- Click Next

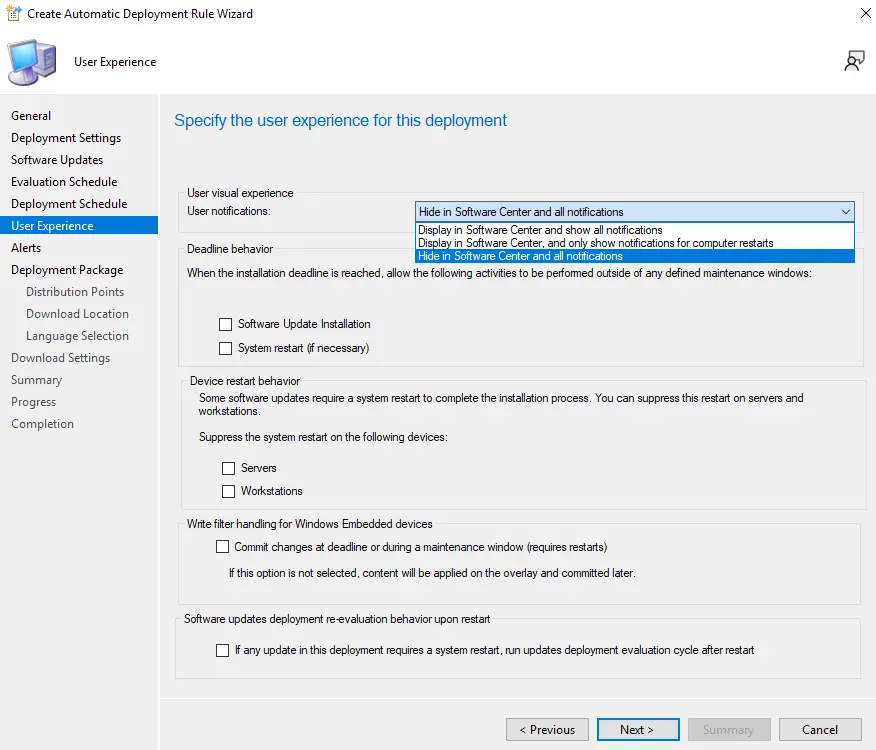
- Under user notifications I recommend to select “Display in software center and only show notifications for computer restarts”
- Leave all other options as default / not selected
- Click next

- Click next on the alerts page
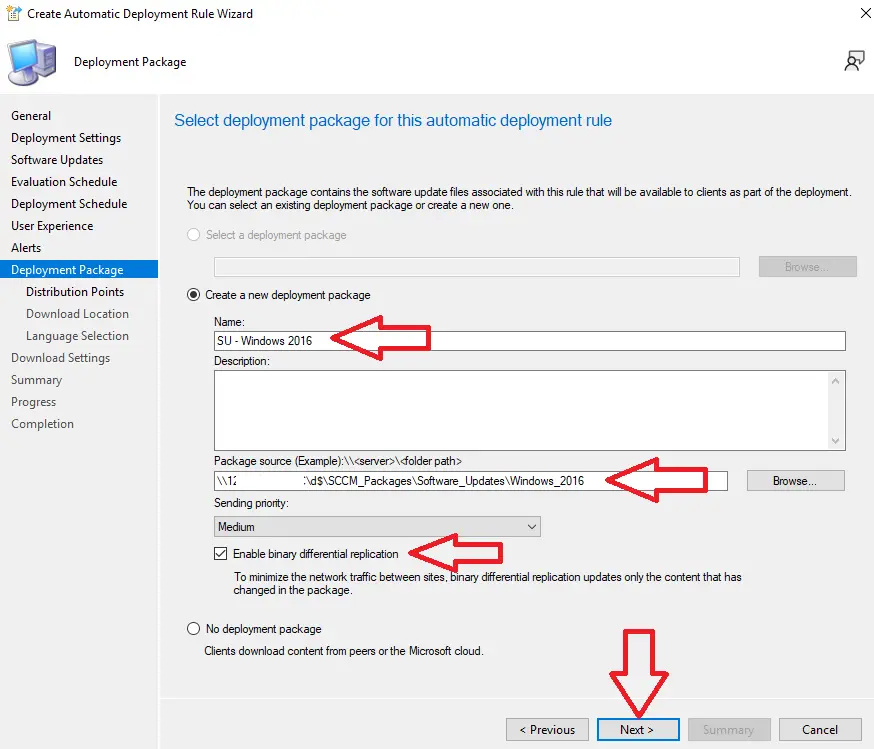
- Select “Create a new deployment package”
- I recommend to enter the same name you gave the ADR
- Enter a UNC path where the software updates will be downloaded to
- Tick “Enable binary differential replication”
- Click next

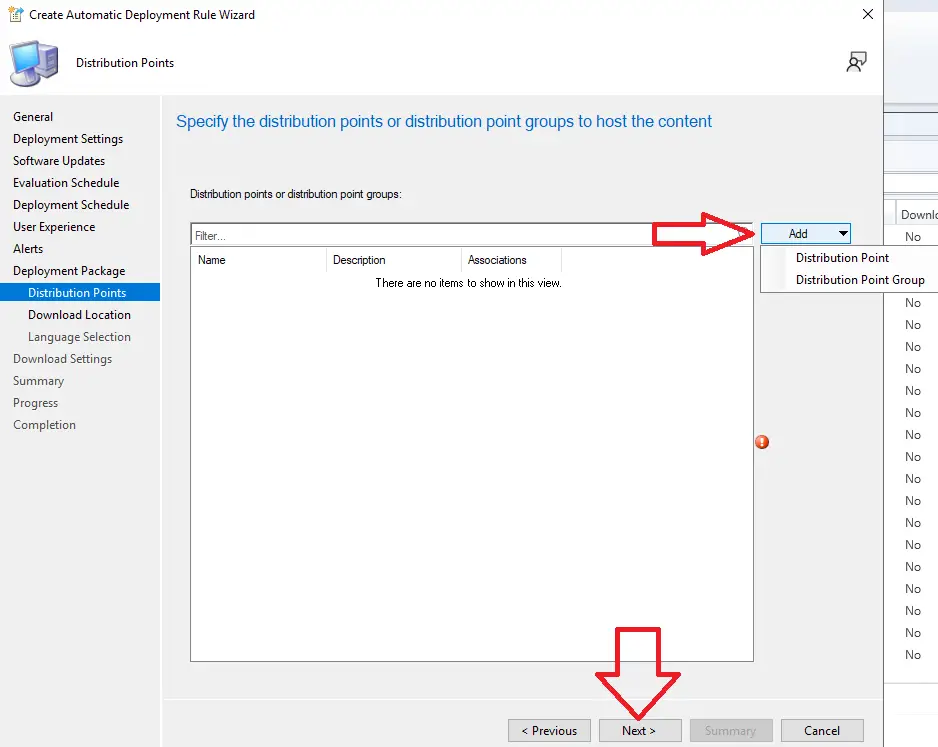
- Click add and add the distribution groups you want to copy the software updates to
- Click next

- Click next on downloads location page
- Click next on language selection page
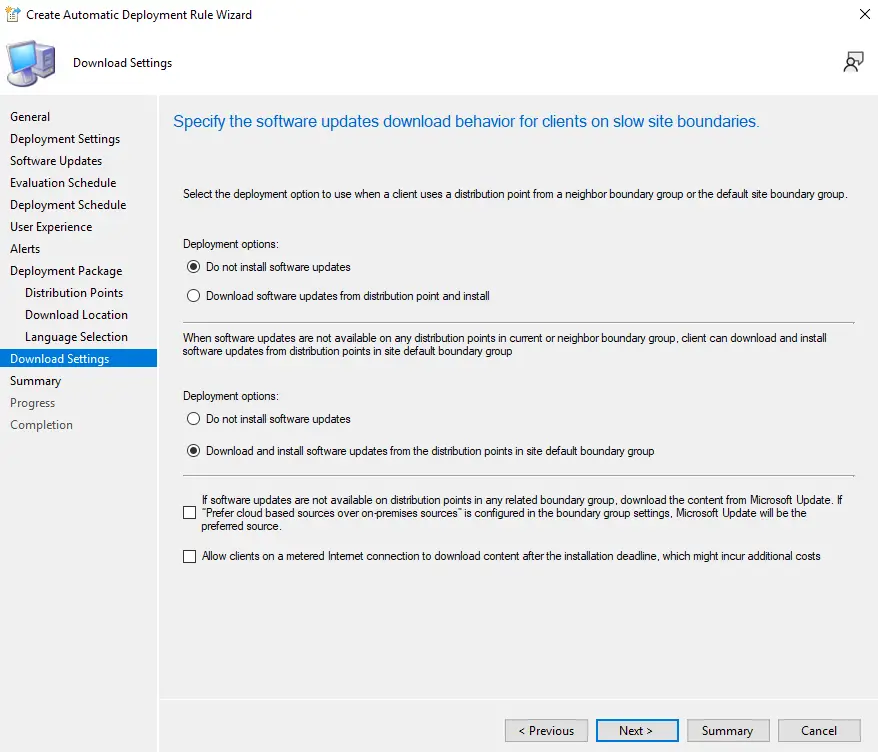
- On the download settings page keep the defaults and click next

- On summary page click next
- Click close
- Repeat steps 3 – 46 to create ADRs for other required products such as windows 11
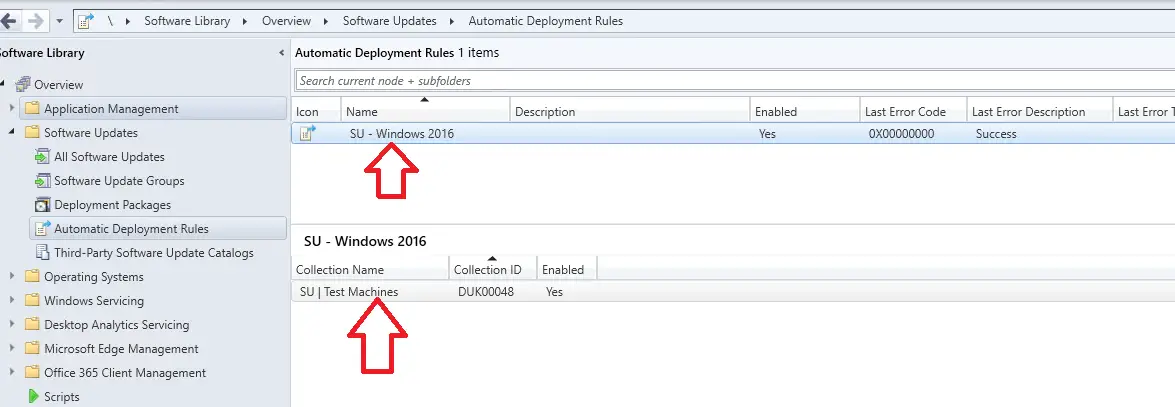
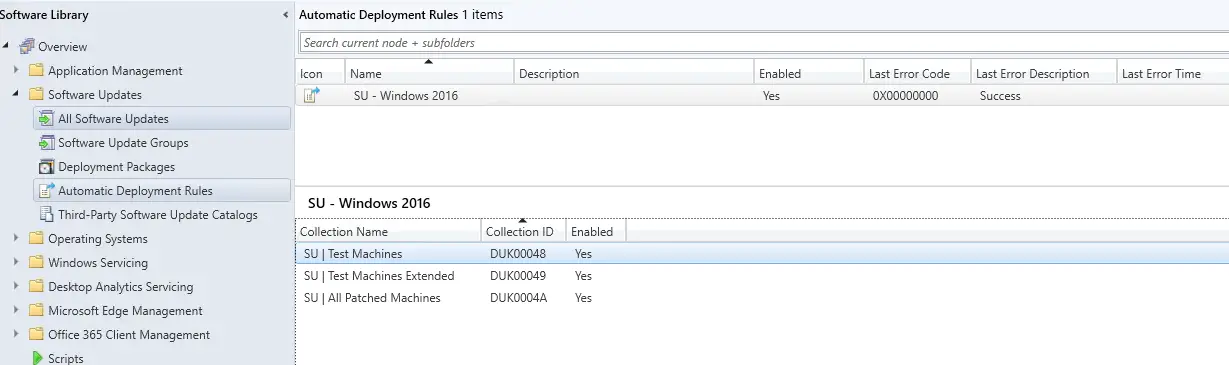
- Below we can now see the ADR we created and the deployment we configured at the bottom

- We now need to setup the deployment for the other two device collections
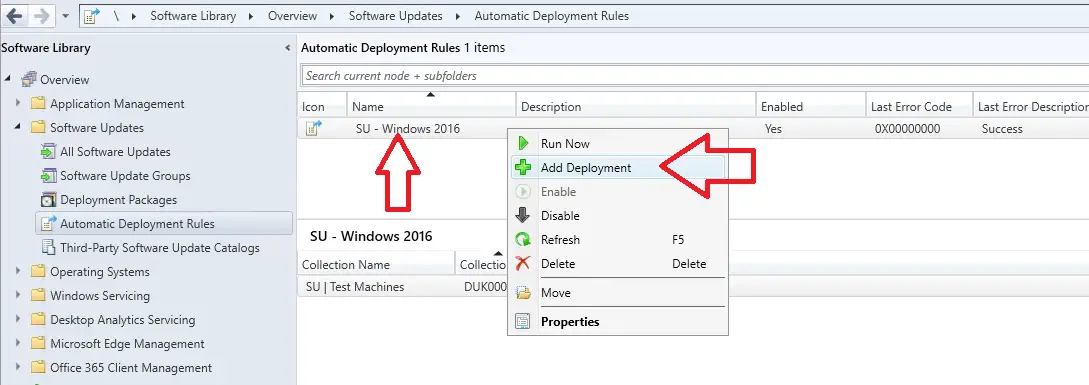
- Right click on the ADR we created and select add deployment

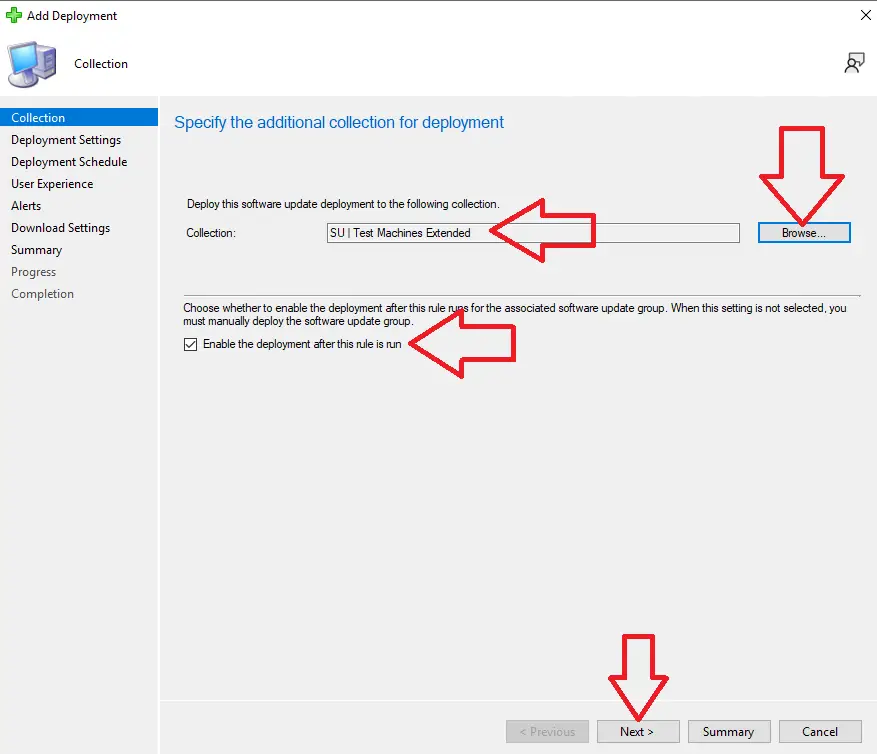
- Click the browse button and select the “SU | Test Machines Extended”
- Make sure the “Enable the deployment after this rule is run” is selected
- Click next

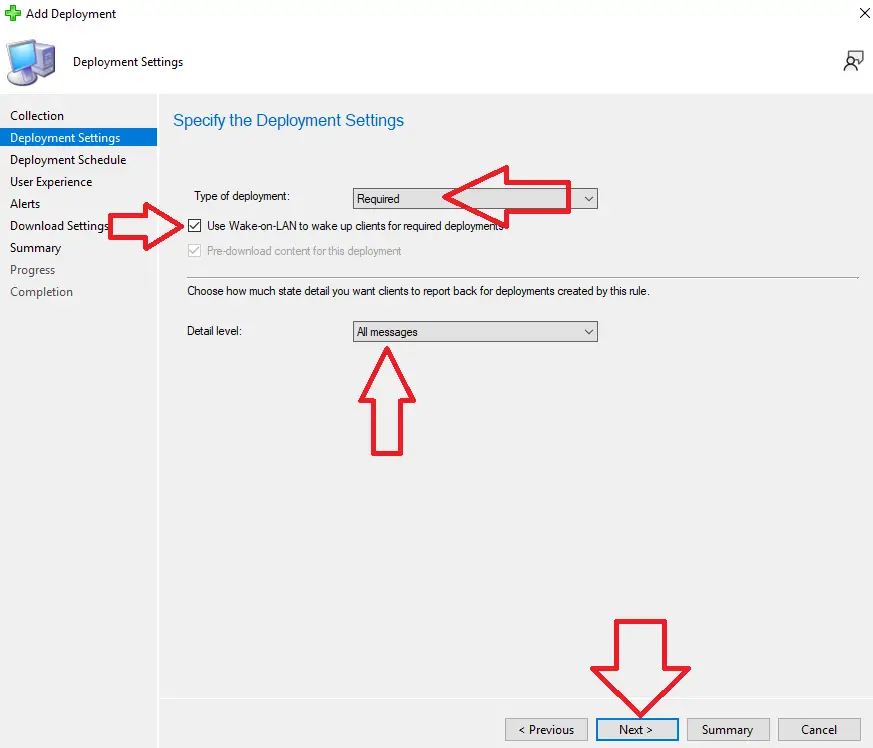
- Make sure required is selected for deployment type
- Tick the box “Use Wake-on-LAN”
- Detail level select all messages
- Click next

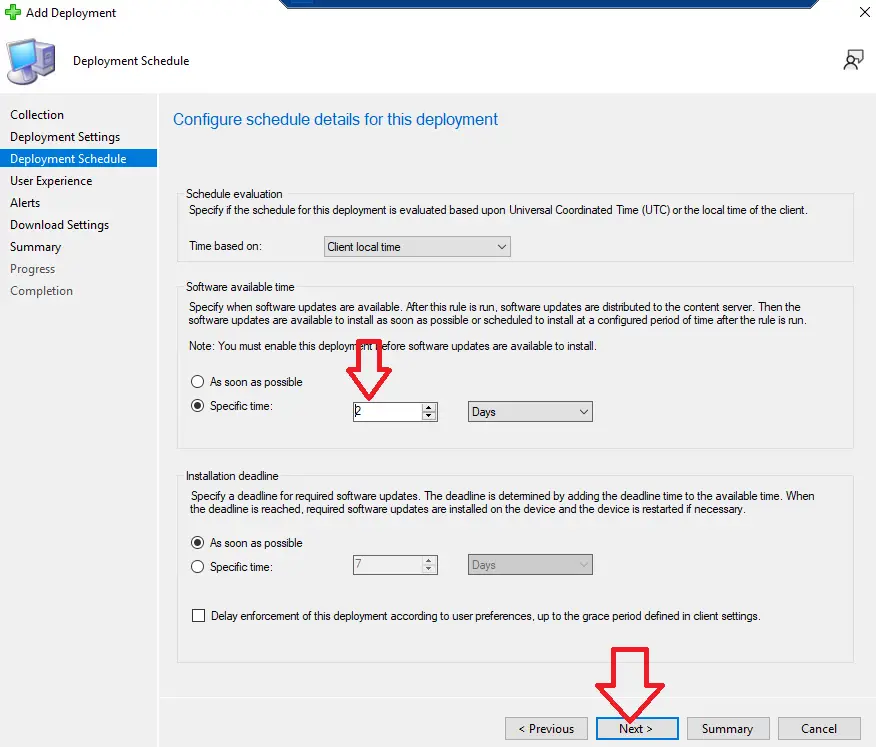
- Under “Software available time” set the specific time to 2 days. This will schedule the software updates to be pushed out 2 days after the ADR has run
- Make sure “Install deadline” is set to as soon as possible
- Click next
- Note : The updates will not install on “SU | Test Machines Extended” until 6 days after the ADR has run because we configured the maintenance window for this time.

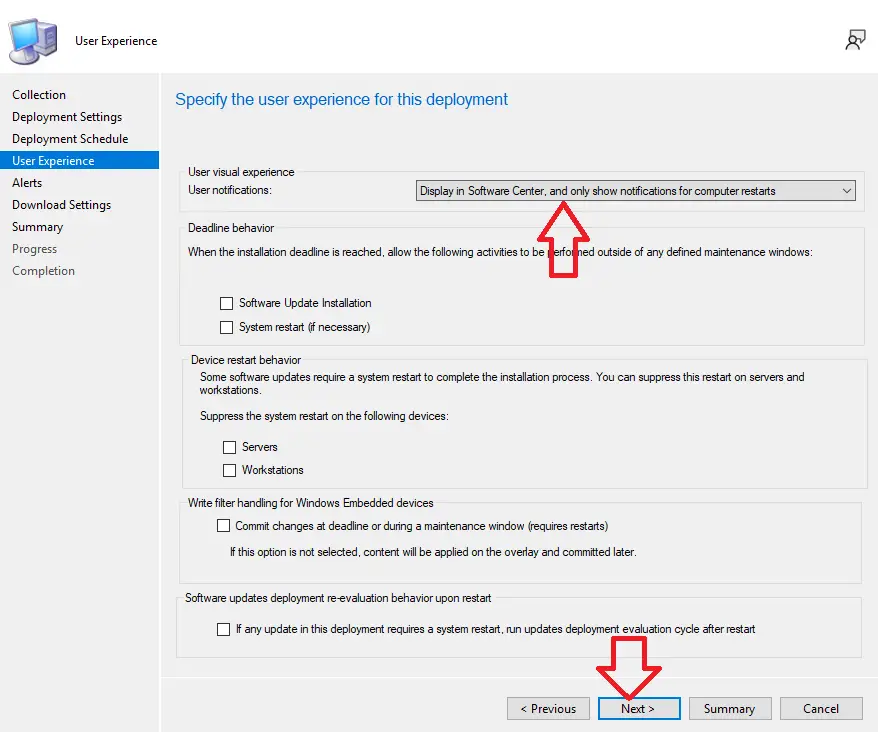
- I recommend to set the user notifications to “Display in software center and only show notifications for computer restarts”
- Click next

- On the alerts page click next
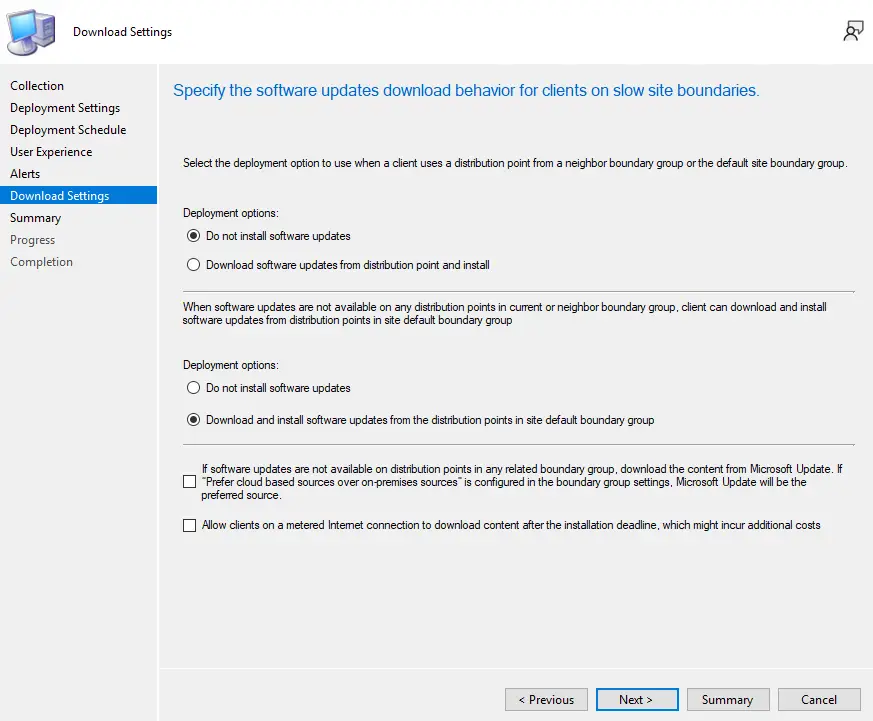
- On the download settings page leave the defaults
- Click next

- On summary page click next
- Click close
- Repeat steps 50 – 68 for the device collection “SU | All Patched Machines” On step 58 make sure to set 7 days for the software available time
- We have now finished setting up the automatic deployment rule, it should now look like below

 This will now show all the updates that are available to deploy for your ADR
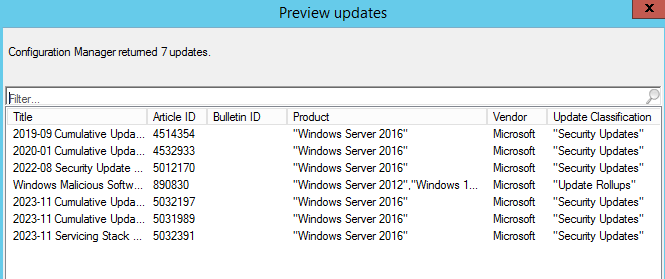
Just to summarise we did the below in this step
- Created an automatic deployment rule to download only required software updates
- Created a deployment rule to push software updates to the test machines as soon as the ADR was run
- Software updates will then get deployed to the Test Machine Extended group 2 days after the ADR was run
- Software updates will then get deployed to all machines 7 days after the ADR was run
5 : Enable Peer Cache (Optional)
This step is optional but I highly recommend that you enable peer cache on your clients.
When a SCCM client downloads a package / software update or application it will download it from a SCCM distribution point. If you enable peer caching the SCCM client can download the package from any other SCCM client on the same network.
Advantages of peer caching include
- Adds multiple locations to download content from
- Can replace the need for SCCM distributions points
- Content can be download from the LAN and not acorss the WAN (If the SCCM DP is located on the WAN)
I recommend to enable peer caching on the device collections “SU | Test Machines” and “SU | Test Machines Extended” To do this follow these steps
- Open the SCCM console
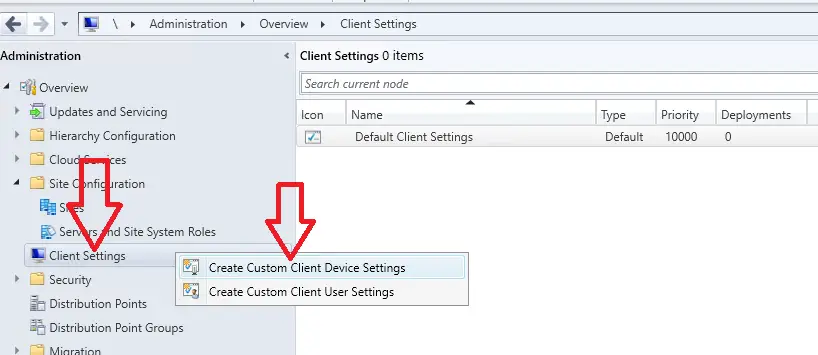
- Go to \Administration\Overview\Client Settings
- Right click on client settings, select Create custom client device settings

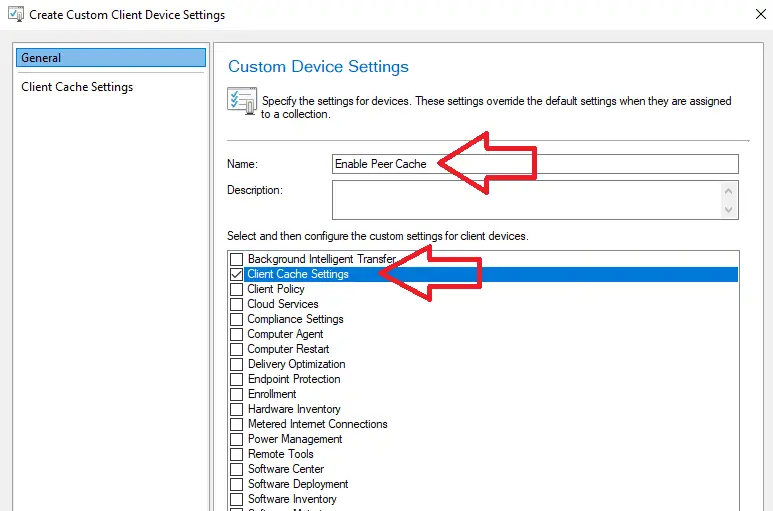
- Give the custom device settings a name such as “Enable Peer Cache”
- Tick the box “Client Cache Settings”

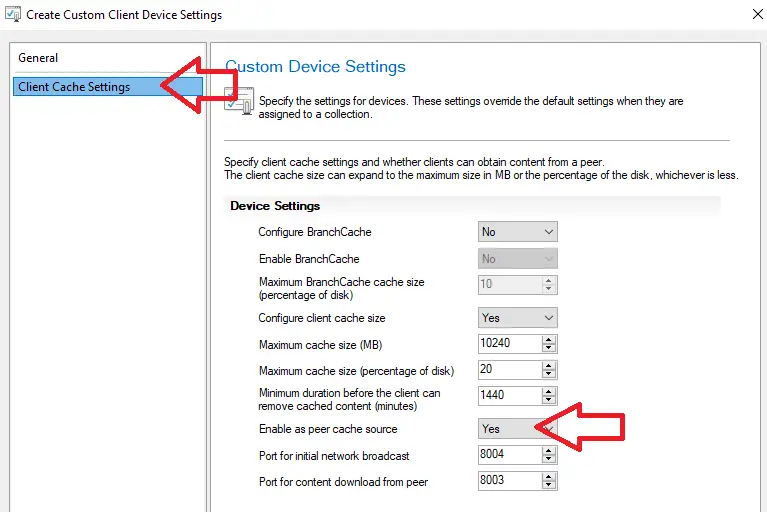
- Select “Client Cache Settings” in the left coulmn
- Select yes for “Enable as peer cache source”
- Click ok

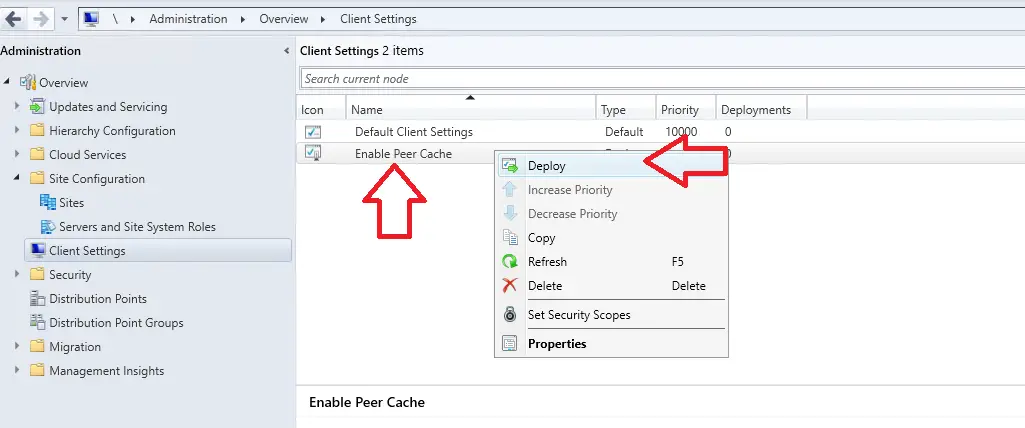
- Right click on the policy we just created, select deploy

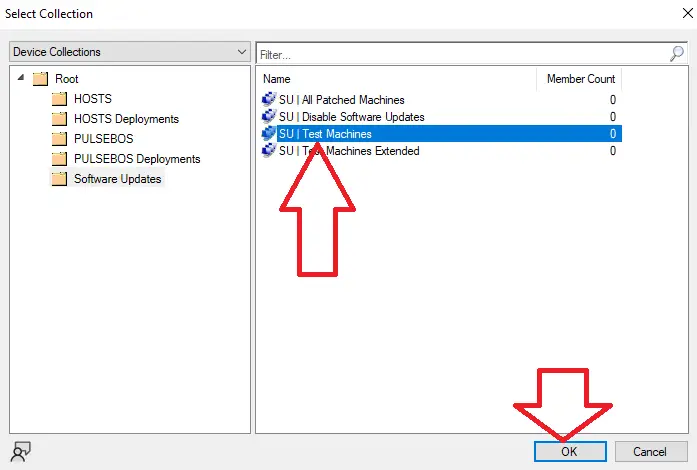
- Select the “SU | Test Machines” collection and click ok
- Repeat steps 9 and 10 for the collection “SU | Test Machines Extended”

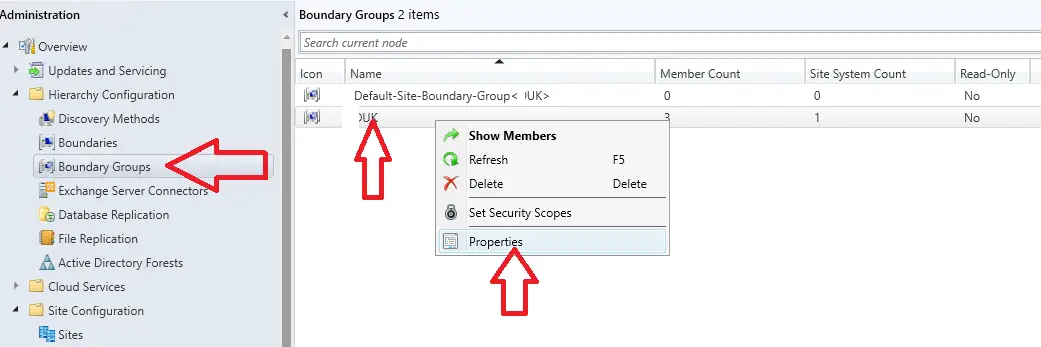
- In the SCCM console go to \Administration\Overview\Hierarchy Configuration\Boundary Groups

- Right click on each boundary group you want to enable peer caching for and select properties
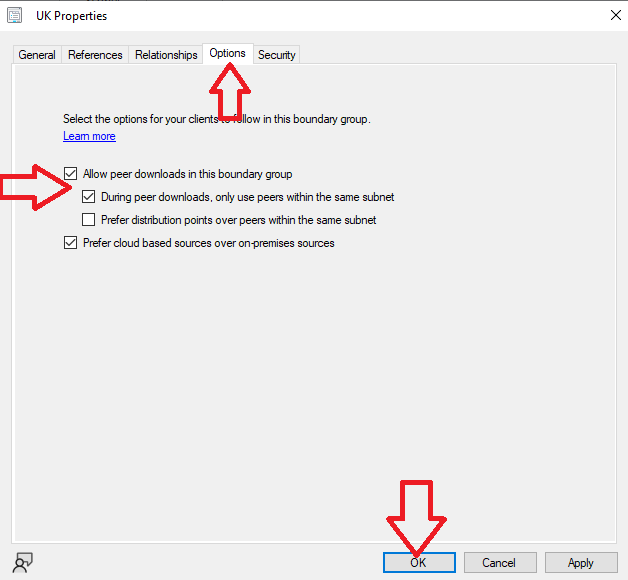
- Click the options tab
- tick the boxes “Allow peer download in this boundary group” and “During peer downloads only use peers within the same network”
- Click ok

6 : Populate Device Collection Groups
Now we have completed all the above steps we can start to add device in to the device collections.
To do this follow these steps
- Open the SCCM console
- go to \Assets and Compliance\Overview\Device Collections\Software Updates
- Right click on “SU | Test Machines” Click add resources, top right of screenshot below
- In “Name String Contains” enter the name of the machines you want to add
- Click search
- highlight the machines you want to add and click add
- Click ok

- Repeat steps 3-7 for the device collection “SU | Test Machines Extended”
- I recommend to wait at least a few hours for the machines to apply that they are in a new device collection and also apply the Client Settings / policies we created
- Repeat steps 3-7 for the device collection “SU | All Patched Machines” I recommend to add an include device collection such as “All Windows 2016 Machines”

7 : Run The Automatic Deployment Rule
I highly recommend to let the automatic deployment rule run at the scheduled time and not run manually.
Wait until the day the ADR is due to run and then follow the below steps to check that it ran correctly.
- Log in to the SCCM console
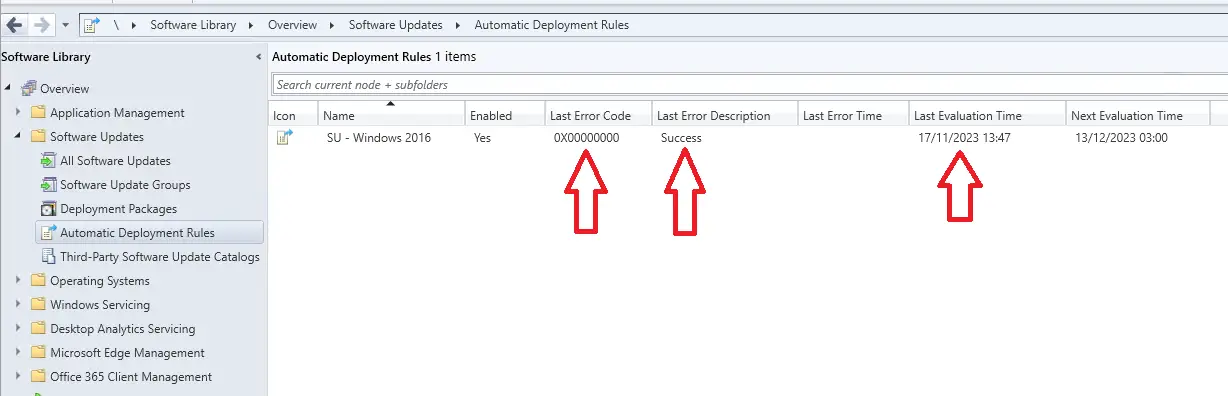
- go to \Software Library\Overview\Software Updates\Automatic Deployment Rules
- Confirm last error description is 0x00000000 which means no error
- And last evaluation time ran at the expected time

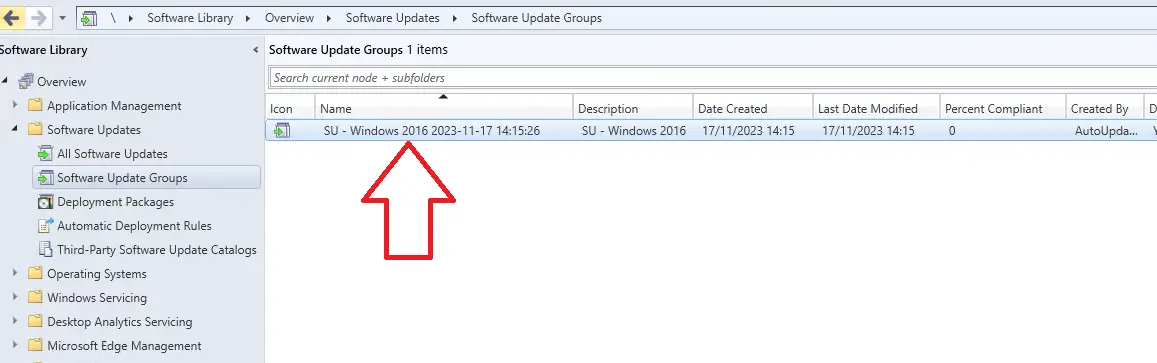
- Go to \Software Library\Overview\Software Updates\Software Update Groups
- Confirm the software update group was created like below

- Go to \Monitoring\Overview\Deployments
- Confirm 3 deployments have been created
- Click on the tool bar to bring up the options shown below and select “Deployment Start Time”
- Now confirm the start times are set as expected
- You can also check the compliance here


Check Updates Have Been Downloaded On a Client
Now we have setup everything on the SCCM server it is time to log on to a client to make sure they have downloaded the patches.
I recommend to wait at least two hours after the ADR ran before checking the clients.
To check if a client has downloaded the patches do the following
- Log on to the client
- In the start menu type “C:\Windows\CCM\ClientUX\SCClient.exe” and hit enter
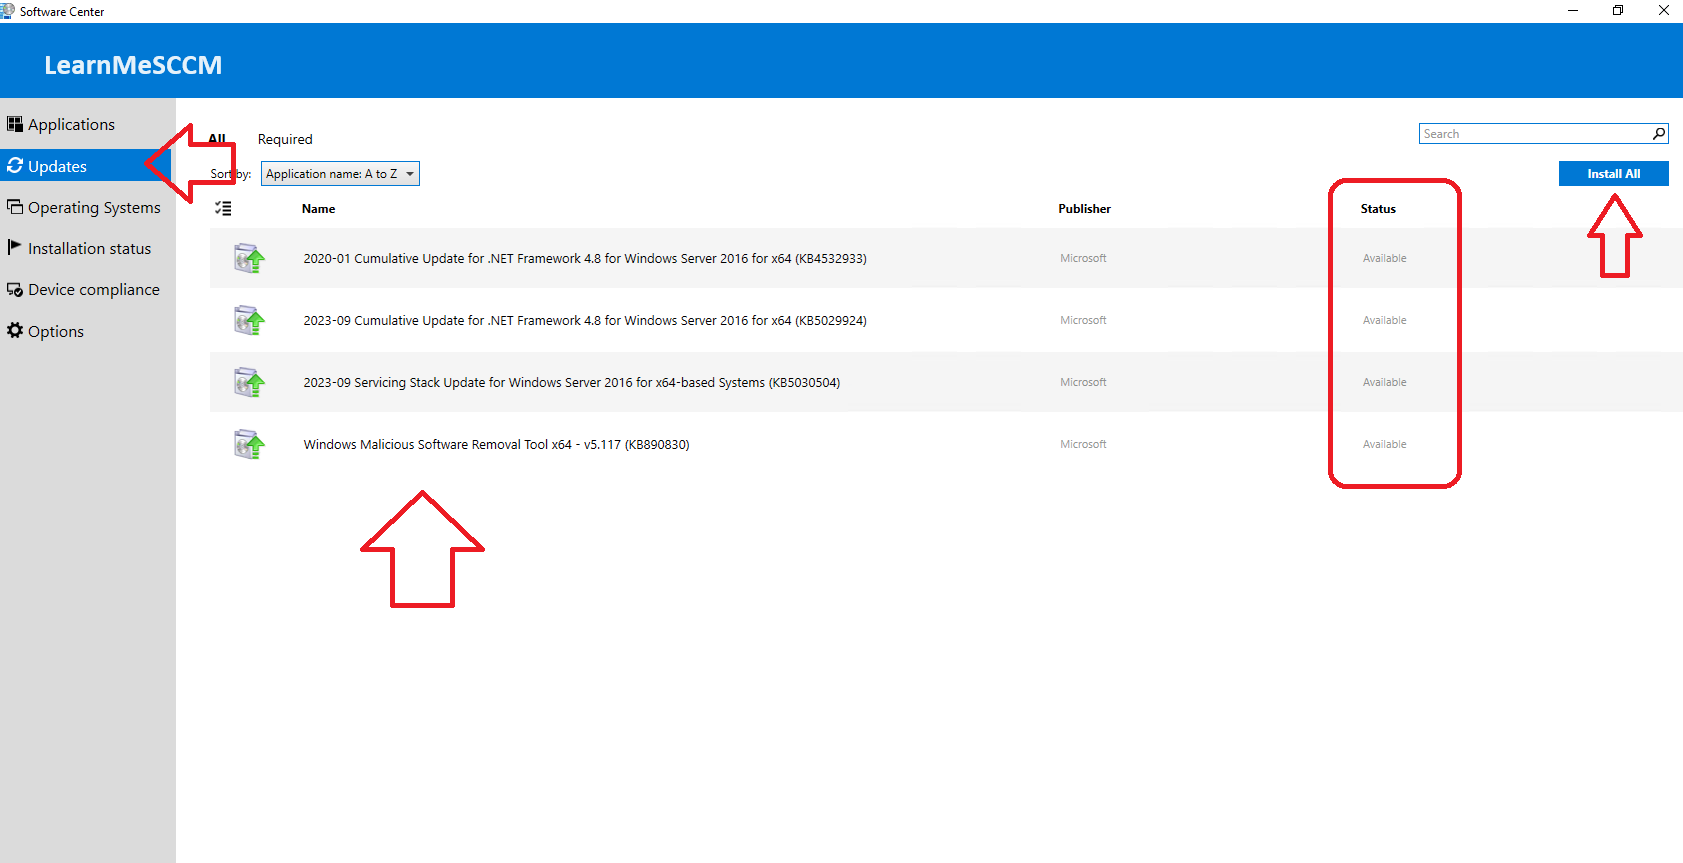
- Click updates in the left column
- Here you should see all the software updates that have been downloaded to the client
- Below they are on available status, this is because the software update has been downloaded and is availing the maintenance window to install the update
- You can install the updates now by clicking on install all

Conclusion
Setting up software updates is quite a long and complicated process. Hopefully this guide has helped you in this task.
I have included many things I have learned over the years to get the most successful patching rate within SCCM, I hope these tips serve you well.
I would be very interested in your experiences with configuring and deploying software updates, let me know in a comment below or by posting in one of our communities.