If you are having issues installing microsoft windows updates, then clearing the windows update cache will resolve most issues you will be having.
I personally recommend that you only perform the below steps on machines that are having issues installing windows updates.
In some cases I had to also reset windows update components and also re-register windows BITs in order to be able to download and install software updates again.
The Issue
You will see the issue when you try to install microsoft windows updates, you will get an error as shown below that says “There were some problems installing updates”
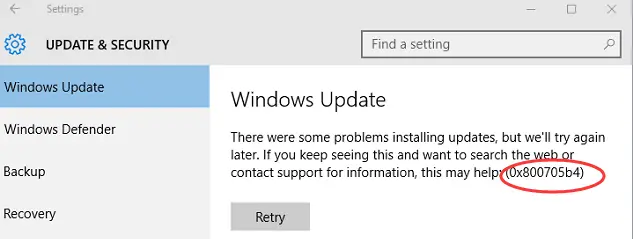
This issue will also show lots of different error codes. The issue is usually caused by some corrupt files which usually happens when the computer is shutdown when downloading an update.
The Solution
The first thing we are going to do it to clear the windows update cache, I will show you two different ways to clear the cache, I recommend to use powershell to clear the cache as this is the easiest and quickest way.
Using Powershell
To remove the windows update cache via powershell do the following
- Open powershell
- copy and paste the below in to powershell ise
1
2
3
4
5net stop wuauserv
net stop cryptSvc
net stop bits
net stop msiserver
remove-item -path "C:\Windows\SoftwareDistribution\Download\*.*" -Force - Run the powershell script and confirm there are no errors shown
- Now restart your machine
Try to install the windows update again. If you still get an error try to delete the cache manually following the below steps.
Manually
To delete the windows update cache manually do the following
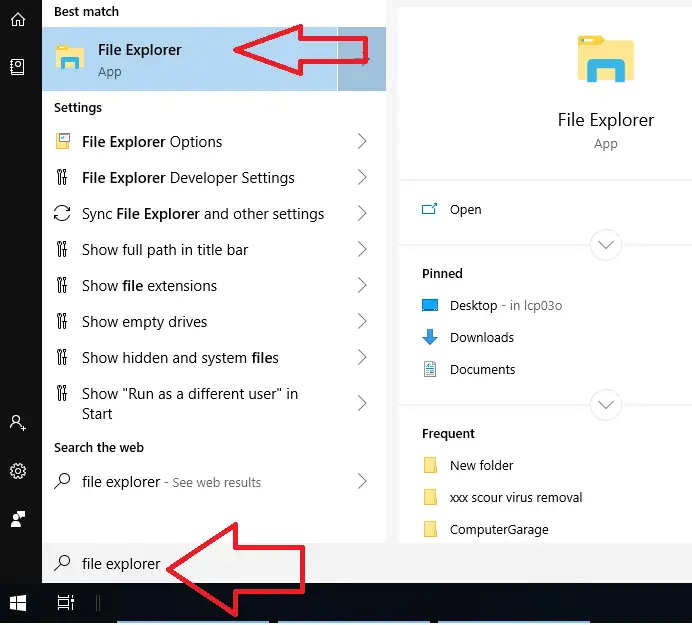
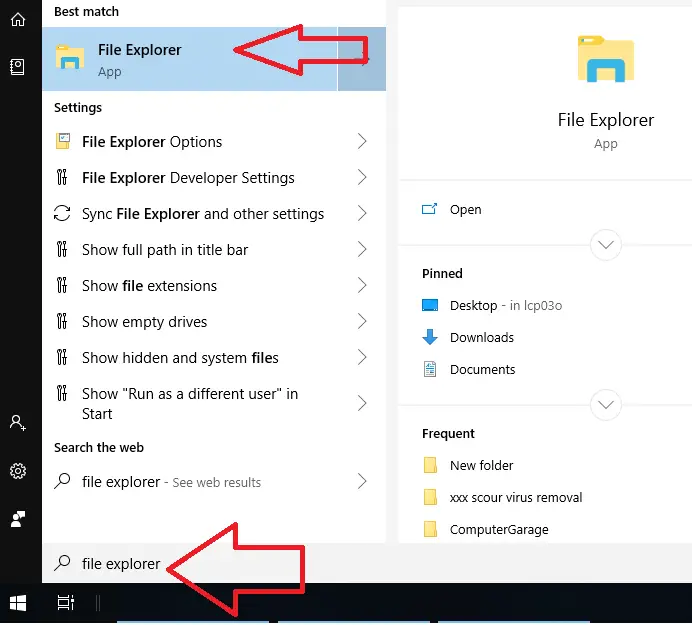
- Click start, type in “File Explorer” and left click on file explorer

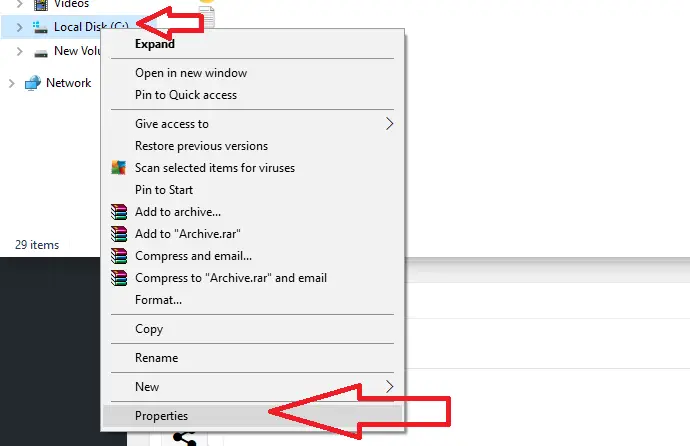
- Right click on “Local Disk (C:)” then left click properties

- On the next windows click on “Disk Clean-up”

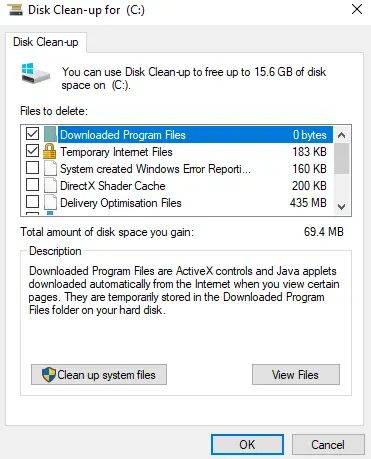
- Next click on “Clean up system files”

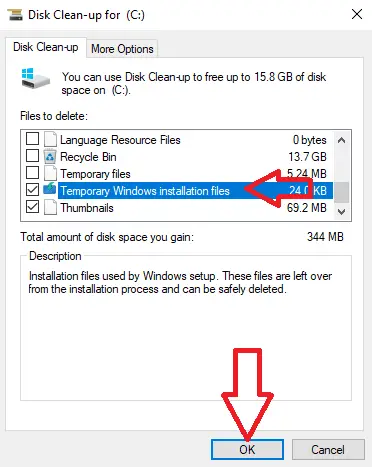
- Make sure you tick the boxes next to “Windows upgrade log files” and “Temporary Windows Installation files” then click on OK. Your system will now remove these files from your machine.

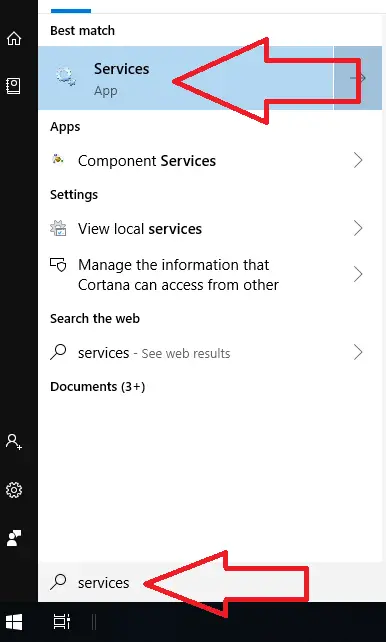
- Now click start and type in services and then left click on services application.

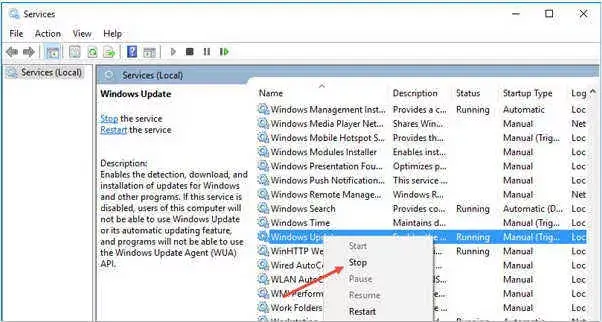
- Scroll down and right click on Windows Update and click stop. Wait for the service to stop which usually takes less than a minute

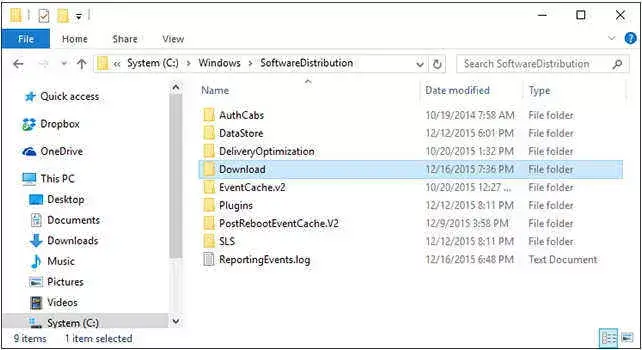
- Now open file explorer again and browse to C:\Windows\SoftwareDistribution

- Now right click on the download folder and select delete, Hit Yes if you are prompted

- Reboot your machine
We have now managed to manually clear the windows update cache, Run windows update again to see if your issue is now resolved.
If you still get errors when trying to download or install updates then you will need to reset windows update components and also re-register windows BITs which I will now show you how to do.
Reset Windows Update Components
To reset the windows update components follow these steps
- Click start, type in CMD then right click on “Command Prompt” and select run as administrator
- If prompted by UAC click YES
- In the command prompt window type in the following commands one by one
1 2 3 4 5 6 7 | net stop wuauserv net stop cryptSvc net stop bits net stop msiserver Next run the following commands ren C:\Windows\SoftwareDistribution SoftwareDistribution.old ren C:\Windows\System32\catroot2 Catroot2.old |
Now restart your computer, after restarting your computer I recommend to re-register windows BITs.
Re-Register BITS and Windows Update .dll Files
To re-register the windows bits on your system follow the below steps.
- Click start, type in CMD then right click on “Command Prompt” and select run as administrator
- If prompted by UAC click YES
- In the command prompt window type in the following commands one by one
1
2
3
4
5
6
7
8
9
10
11
12
13
14
15
16
17
18
19
20
21
22
23
24
25
26cd /d %windir%\system32
regsvr32.exe /s atl.dll
regsvr32.exe /s urlmon.dll
regsvr32.exe /s mshtml.dll
regsvr32.exe /s shdocvw.dll
regsvr32.exe /s browseui.dll
regsvr32.exe /s jscript.dll
regsvr32.exe /s vbscript.dll
regsvr32.exe /s scrrun.dll
regsvr32.exe /s msxml3.dll
regsvr32.exe /s msxml6.dll
regsvr32.exe /s actxprxy.dll
regsvr32.exe /s softpub.dll
regsvr32.exe /s wintrust.dll
regsvr32.exe /s dssenh.dll
regsvr32.exe /s rsaenh.dll
regsvr32.exe /s cryptdlg.dll
regsvr32.exe /s oleaut32.dll
regsvr32.exe /s ole32.dll
regsvr32.exe /s shell32.dll
regsvr32.exe /s wuapi.dll
regsvr32.exe /s wuaueng.dll
regsvr32.exe /s wups.dll
regsvr32.exe /s wups2.dll
regsvr32.exe /s qmgr.dll
regsvr32.exe /s wudriver.dll - Restart your machine


